Module configuration deployment
This document describes possible deployment process which could be used for the application. Workflow can be seen in image below, schema steps are described in following sections.
Configuration files preparation
Let’s say you are configuring modules on your local machine (how to do this please read the modules configuration document). After your are done, you have prepared files in var/configuration/shops/ directory.
Dealing with environment files
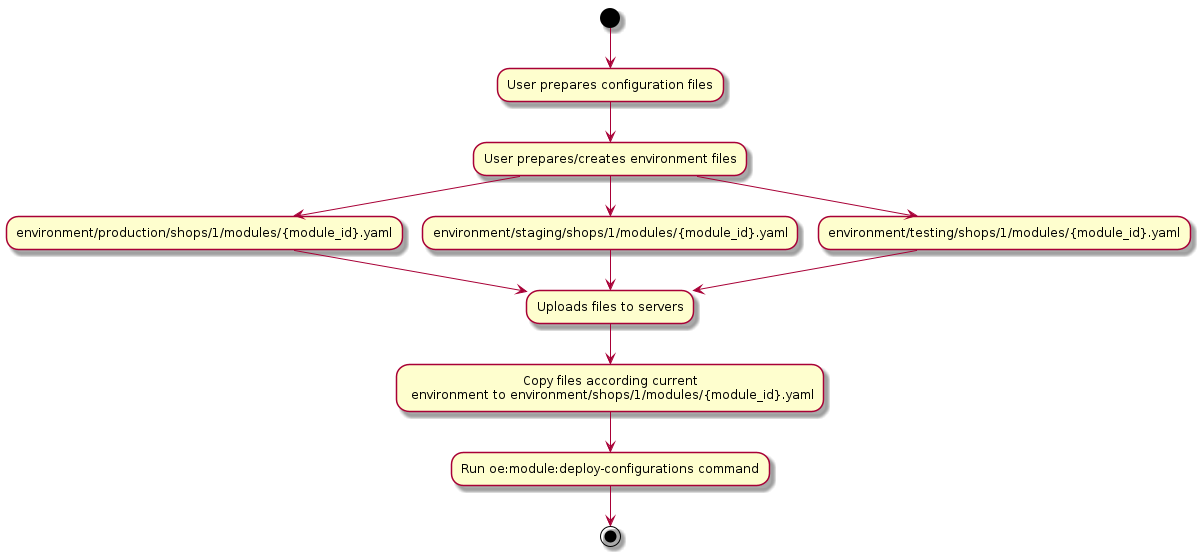
Let’s assume you have OXID eShop with PayPal module and you want to deploy your configuration from your development
environment to staging environment. All settings in both environments are the same except sOEPayPalUsername
and sOEPayPalPassword. So you would need all the time after deployment to change these values
as configuration files would be overwritten. To solve this problem, environment feature
was introduced.
Environment files overwrite settings which are already described in configuration files located in
var/configuration/shops/ directory.
To use this feature you need to create the directory var/configuration/environment and put stripped down contents
of a module configuration file var/configuration/environment/shops/<shop-id>/modules/<module-id>.yaml in there. Here you may configure environment specific values, for example
credentials for payment providers.
So to solve the problem described in the beginning of the section follow these steps:
On staging environment (assuming it’s main shop with id 1 and the module id is oepaypal) file with the name of the module id inside the
var/configuration/environment/shops/1/modulesdirectory.Copy and paste the part of your module settings from
var/configuration/shops/1/modules/oepaypal.yamltovar/configuration/environment/shops/1/modules/oepaypal.yaml.Write your new values for
sOEPayPalUsernameandsOEPayPalPasswordand save your file.
Example of the environment file var/configuration/environment/shops/1/modules/oepaypal.yaml:
moduleSettings:
  sOEPayPalUsername:
    value: 'staging_environment_username'
  sOEPayPalPassword:
    value: 'staging_environment_password'
Don’t forget to clean module cache after updating yml files.
Important
If you have environment configuration files in the OXID eShop you should not save settings via admin backend. If you do this, the environment specific values will be merged into the base configuration and the environment configuration for the module will be renamed to .bak file like oepaypal.yaml.bak. Be aware that if there is already an environment backup file, it will be overridden if setting will change again.
Next steps would be:
Upload directories to the production server.
Copy testing, staging or production directory on top of main environment directory. Example command:
cp var/configuration/environment/production/ var/configuration/environment/
Deploy module configurations. More information can be found in following section.
Deploy module configurations
Each module configuration file has a activated
option and It can have two states:
truemeans that the module is prepared for the activation or already active.falsemeans that the module is prepared for the deactivation or already inactive.
Example of the module yaml file:
id: oegdproptin
path: oe/gdproptin
activated: true
...
This option can be set manually by changing configuration file.
Also the option will be set to true if you activate a module manually via console or admin backend
or to false if you deactivate your module.
To deploy configurations of all modules use the following command:
vendor/bin/oe-console oe:module:deploy-configurations
Provide --shop-id option if you are using an OXID eShop Enterprise Edition and it is only for one shop.
vendor/bin/oe-console oe:module:deploy-configurations --shop-id=1
Important
When command is executed module data in configuration files will overwrite data in database.