Images
Assign up to twelve product images to products, which are displayed in the detailed view of the product.
Items have zoom images that can also be called up on the detail page. Specify globally or at category level or for individual products which type of zoom you want to use.
Smaller item images show the item in the item lists, in product boxes and in the shopping cart. All required image types are generated automatically. To optimize page load speed and user experience, specify the maximum image size and image quality.
Specify whether order confirmations should be sent with images.
Specifying image generation and quality
The required settings for image generation and image sizes are made for all products in the administration area.
Displaying basic settings
If required, check the version of the software that is responsible for the dynamic creation of images.
Procedure
Under , choose the Settings tab.
Choose Pictures.
Check the version of GDLib, the software on the server that generates graphics dynamically.
Check whether the automatic generation of icons is activated.
Leave both settings unchanged.
Specifying the image quality
If required, increase the speed at which pages are loaded in the browser.
Procedure
Under , choose the System tab.
Choose the Pictures section.
You have the following options:
Picture Quality: Specify the image quality when generating the images.
The default setting is 75 and is a good compromise between image quality and file size.
If the value is significantly lower, the product images are heavily compressed and therefore have a small file size, but poor image quality (blurring and compression artifacts).
If the value is greater than 75, the image quality increases, but so does the size of the file (longer loading times).
Automatically convert images to WebP format: Increase the browser speed.
To do so, automatically convert the images to WebP image format.
Sending order confirmations with pictures
Decide whether order confirmations should include images.
Background
E-mails with item images can quickly become large, which can lead to problems when sending and receiving the e-mails.
By default, e-mails are sent without item images.
The item images are loaded by the customer’s mail program when the e-mail is read.
Procedure
Under , choose the System tab.
Choose the Pictures section.
To send product images in the order confirmation, activate the Send e-mails with inline Images checkbox.
Optimizing image sizes
To optimize the speed at which pages are loaded, set the smallest possible image sizes. Your images are then scaled down to this maximum image size before loading by the browser.
The actual :emphasis:` displayed` size of the images for products and categories as well as the manufacturer and brand logos depends on the design of your OXID eShop. You define these values with your CSS.
Example
In our demo store, the images for displaying subcategories (Fig.: Category image of a subcategory) are downsized to a size of 400x300 pixels (Fig.: Example: Set maximum image size 400x300 pixels, item 1). This is the size that the browser would download on the end device.
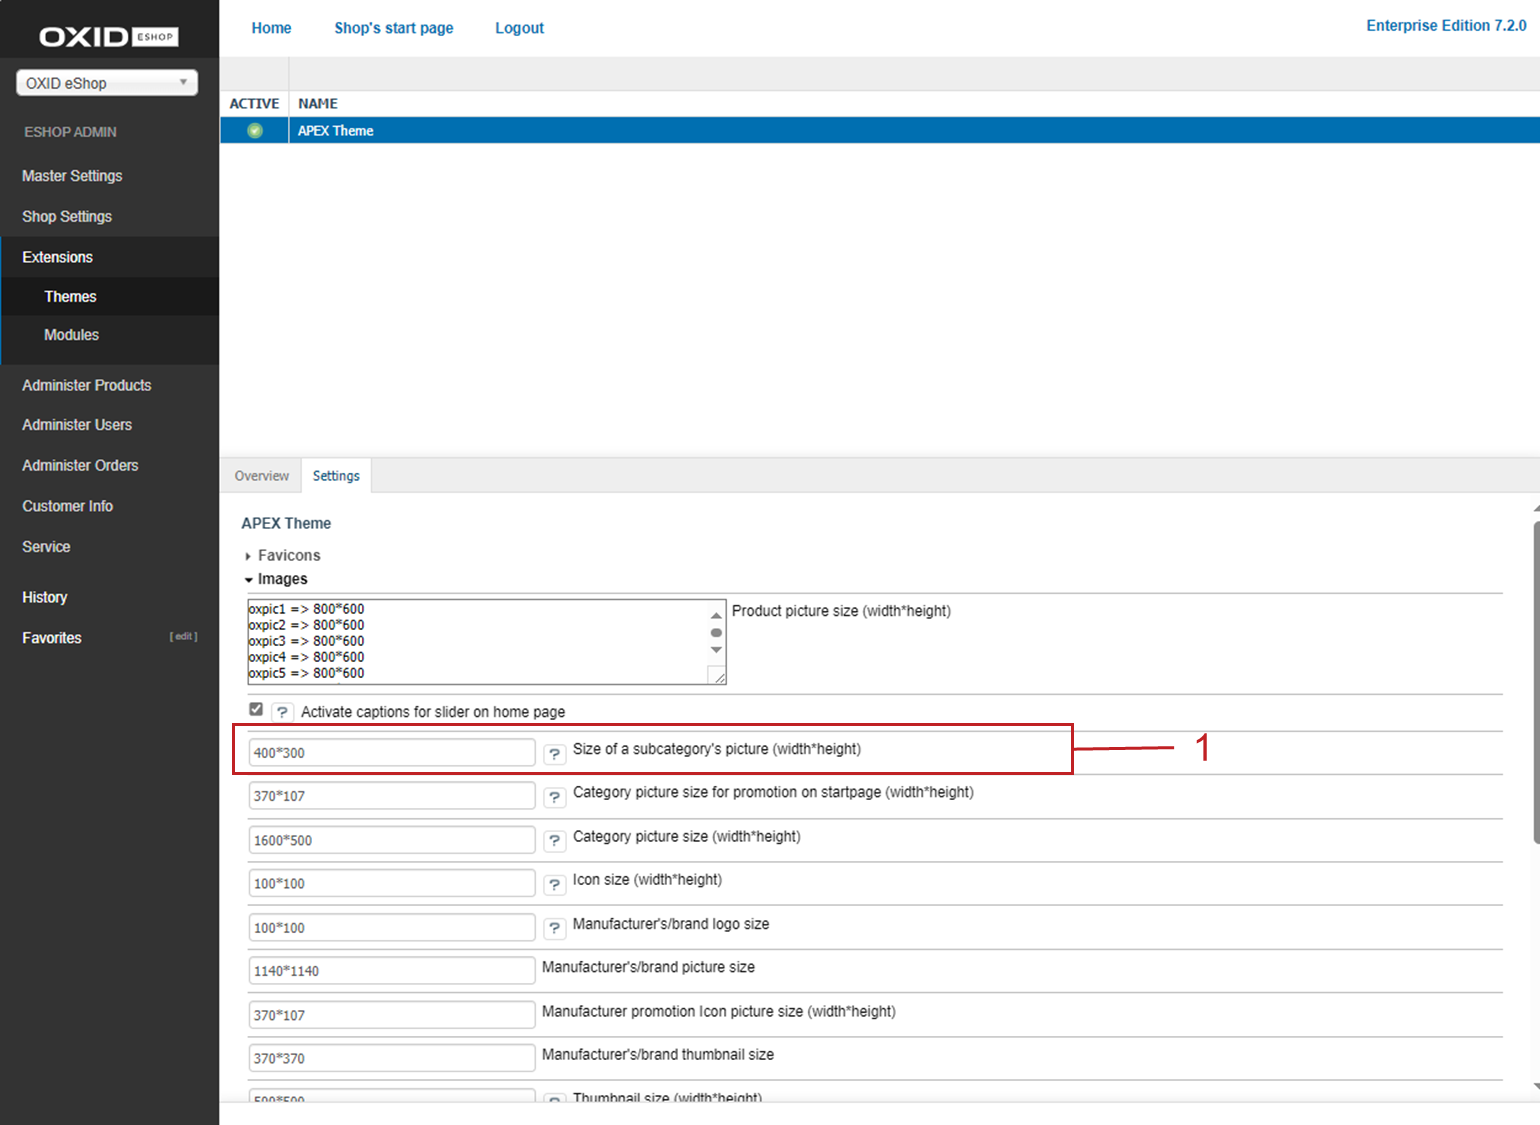
Fig.: Example: Set maximum image size 400x300 pixels
The stylesheet in turn reduces the image to 62x62 pixels. This is the actual displayed (rendered) size compared to the intrinsic size of the image downloaded by the browser (Fig.: Rendered image size 62x62 pixels in the stylesheet, item 1).
The displayed intrinsic size of 300 x 300 pixels differs from the maximum size because it is a square image. In this case, the system uses the smallest side length as a basis, i.e. 300 pixels in this example.

Fig.: Rendered image size 62x62 pixels in the stylesheet
Procedure
Under , choose the theme.
Choose the Settings tab and choose Images.
You have the following options for adjusting the image sizes:
Product picture size (width*height)
Product image that is displayed on the detail page.
Define the maximum size of up to 12 product images.
This allows product images of different sizes.
For each product image there is a line at the beginning of which is
oxpicand a number.oxpic1stands for the first product picture,oxpic2for the second product picture and so on.Hint
Use different image sizes with caution.
Product images of different sizes could possibly lead to a rather unprofessional-looking presentation of the products.
Size of a subcategory’s picture (width*height).
Image for displaying subcategories in the category overview.
Name of the function:
category.getIconUrl
Name of the parameter:CatIconsize
Default size: 400 pixels wide and 300 pixels high.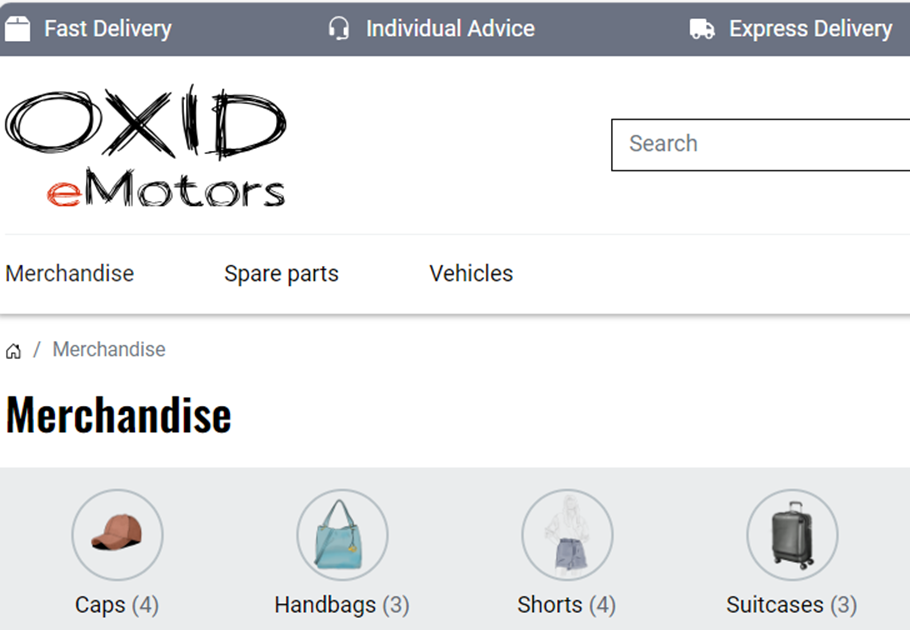
Fig.: Category image of a subcategory
Category picture size for promotion on startpage (width*height)
Image for displaying the category overview. This image type is currently not used, but is retained to ensure downward compatibility, to enable future use and to allow you to integrate it into your own templates if required.
Name of the function:
category.getPromotionIconUrl
Name of the parameter:CatPromotionsize
Default size: 370 pixels wide and 107 pixels high.Category picture size (width*height)
Image of the category that is advertised on the start page.
This image type is not used in the current demo data. However, it is part of the APEX theme and can be used at any time (example: Fig: Category picture).
Name of the function:
category.getThumbUrl
Name of the parameter:sCatThumbnailsize
Default size: 1600 pixels wide and 500 pixels high.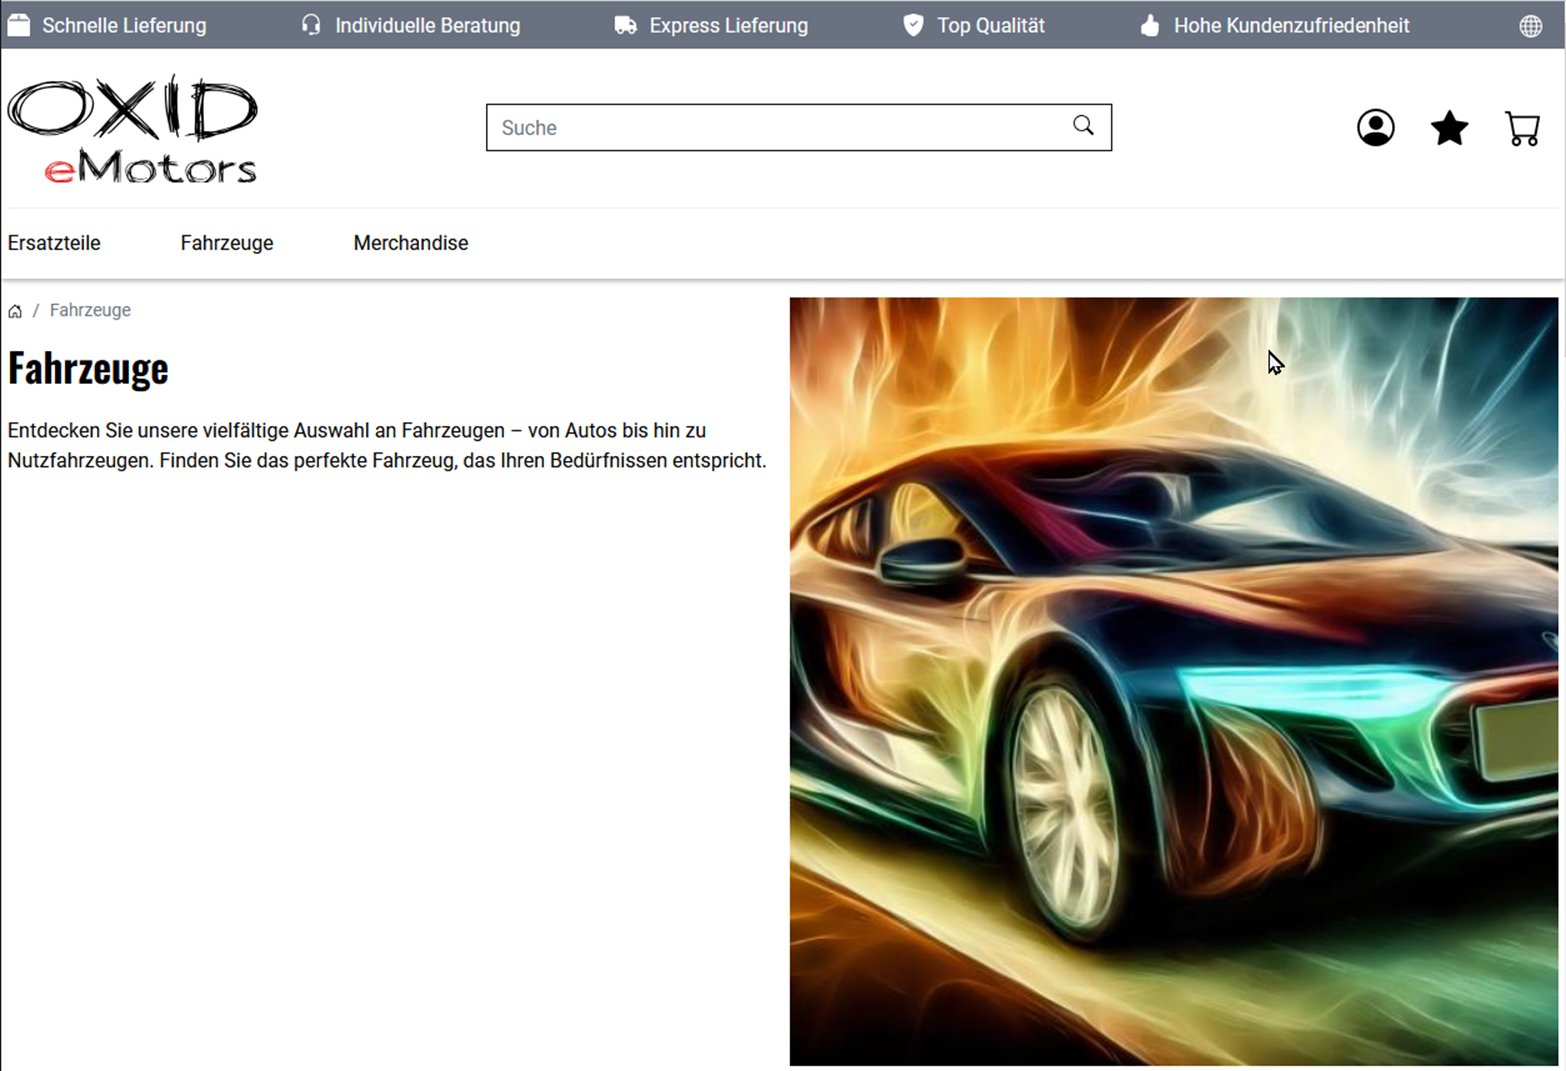
Fig: Category picture
Icon size (width*height)
Icons are the smallest product images. They are used
in the shopping cart preview (minibasket) (Fig.: Icon in various functions, item 1)
in the shopping cart (Fig.: Icon in various functions, item 2)
as an image switcher (Fig.: Icon in various functions, item 3)
as image switcher for the modal zoom (see Choosing a zoom type)
for the size of the gift box
Name of the function:
article.getIconUrl
Name of the parameter:sIconsize
Default size: 100 pixels wide and 100 pixels high.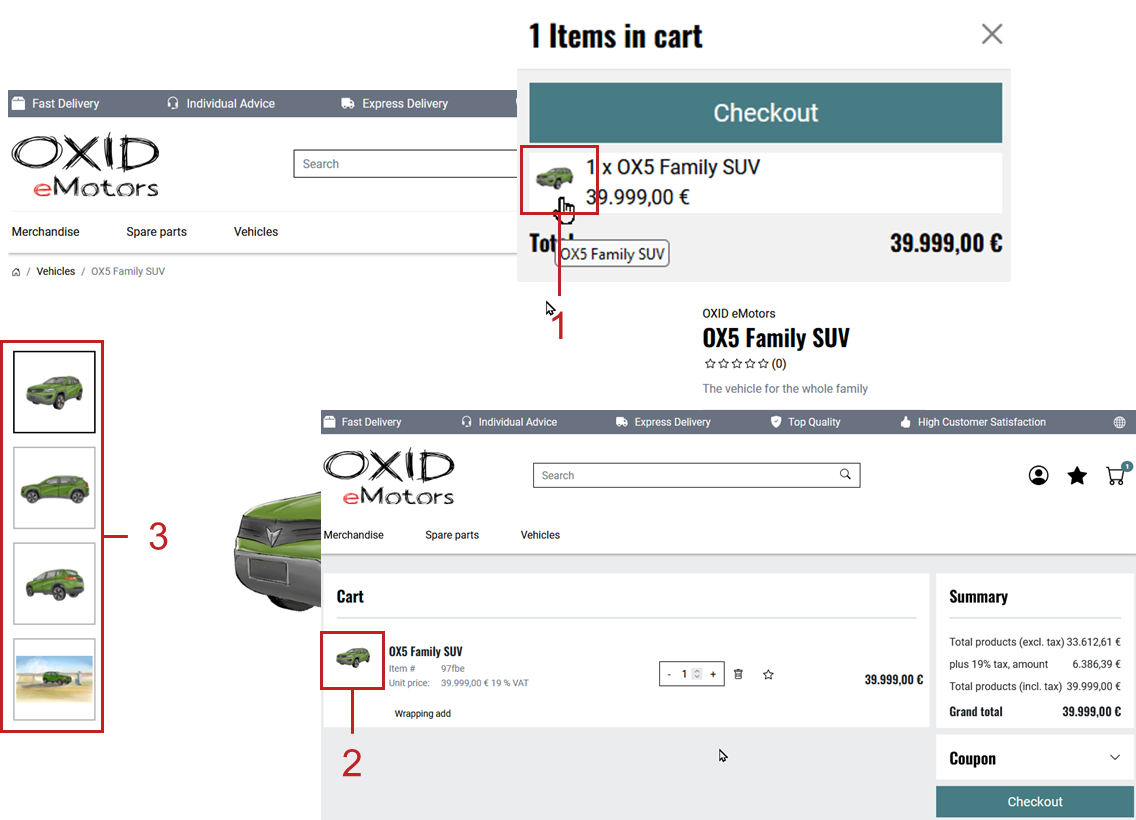
Fig.: Icon in various functions
Manufacturer’s/brand logo size
Logo that is displayed
in the brand overview on the start page (Fig.: Manufacturer/brand logo in various functions, item 1)
in the product overview per manufacturer (Fig.: Manufacturer/brand logo in various functions, item 1)
on the product detail page (Fig.: Manufacturer/brand logo in various functions, item 1)
Name of the function:
vendor.getIconUrl
Name of the parameter:ManufacturerIconsize
Default size: 100 pixels wide and 100 pixels high.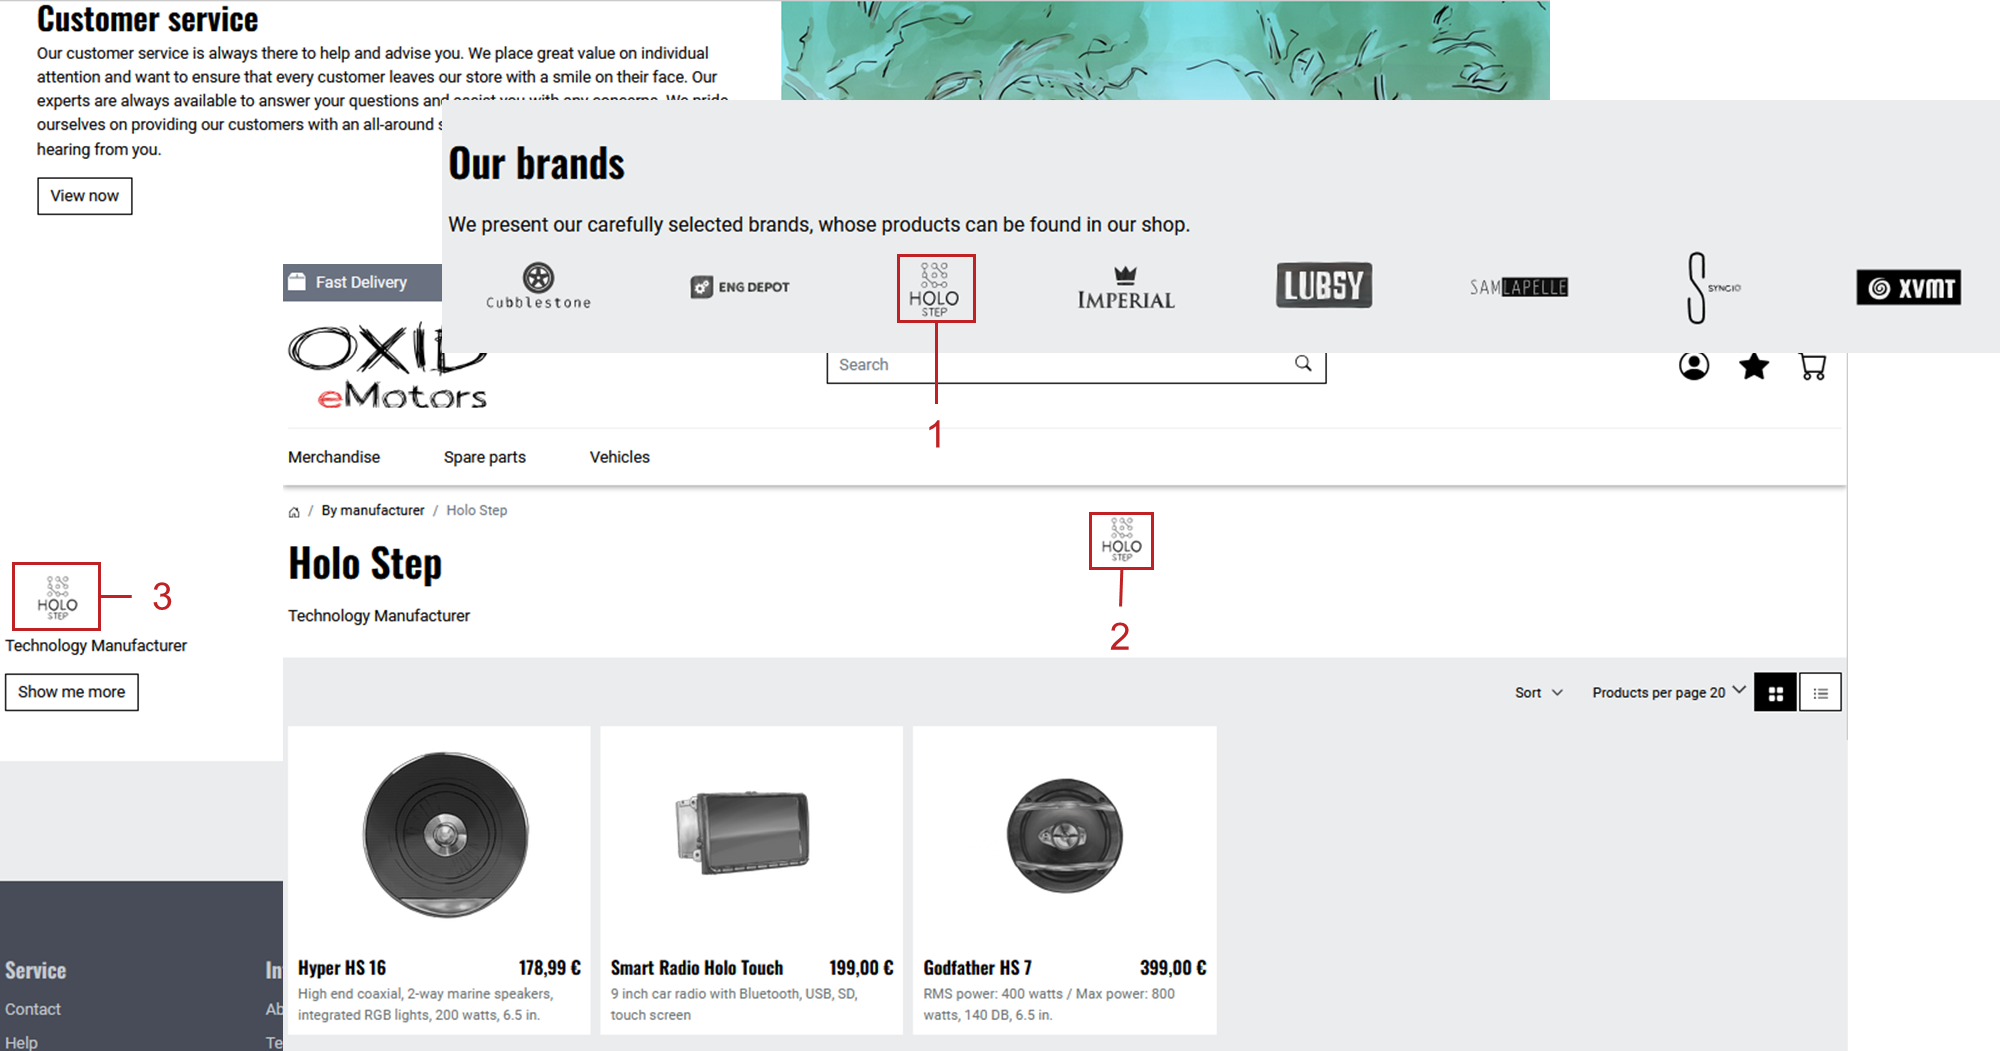
Fig.: Manufacturer/brand logo in various functions
Manufacturer’s/brand picture size
This image type is currently not used, but is retained to ensure downward compatibility, to enable future use and to allow you to integrate it into your own templates if required.
Name of the function:
manufacturer.getPictureUrl
Name of the parameter:ManufacturerPicturesize
Default size: 1140 pixels wide and 1140 pixels high.Manufacturer promotion Icon picture size (width*height)
This image type is currently not used, but is retained to ensure downward compatibility, to enable future use and to allow you to integrate it into your own templates if required.
Name of the function:
manufacturer.getPromotionIconUrl
Name of the parameter:ManufacturerPromotionsize
Default size: 370 pixels wide and 107 pixels highManufacturer’s/brand thumbnail size
This image type is currently not used, but is retained to ensure backward compatibility, to enable future use and to allow you to integrate it into your own templates if required.
Name of the function:
manufacturer.getPromotionIconUrl
Name of the parameter:ManufacturerThumbnailsize
Default size: 370 pixels wide and 370 pixels highThumbnail size (width*height)
Thumbnails are preview images and are displayed wherever products are listed, for example in
Product comparison pages
Item lists, such as category overviews and search results
Promotions (example: Just arrived!)
They can appear in grid view (Fig.: Thumbnails in grid and list view, item 1) or list view (Fig.: Thumbnails in grid and list view, item 2).
Name of the function:
article.getThumbnailUrl
Name of the parameter:Thumbnailsize
Default size: 500 pixels wide and 500 pixels high.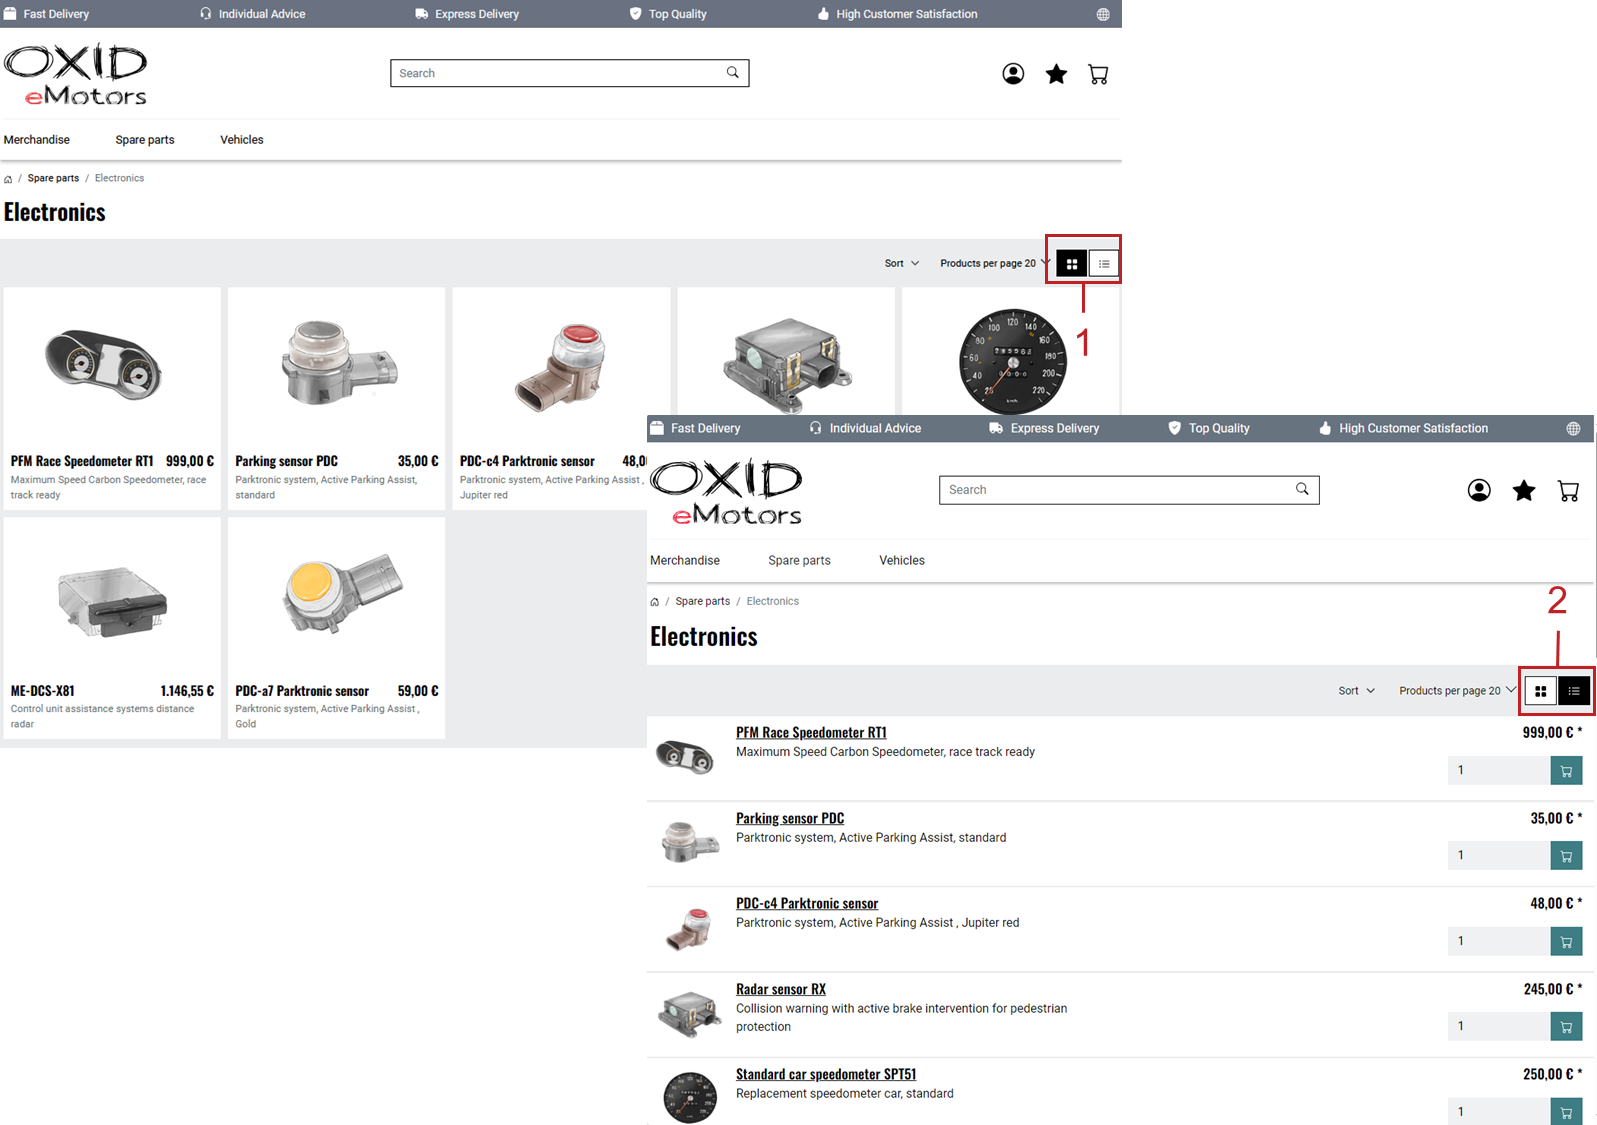
Fig.: Thumbnails in grid and list view
Zoom picture size (width*height)
Enlarged display of modal product images that can be called up on the detail page.
For more information, Choosing a zoom type.
Name of the function:
article.getZoomPictureUrl
Name of the parameter:ZoomImageSize
Default size: 1200 pixels wide and 1200 pixels high.
Choosing a zoom type
Depending on the application and product, positively influence the willingness to buy by addressing different psychological needs of customers with one of three ways of enlarging images in the APEX theme.
Hover zoom: This function offers an interactive way of viewing product images in detail.
When the mouse pointer hovers over the image, it is enlarged and the magnification follows the mouse movement.
Hover zoom is ideal for stores with a wide range of products where customers frequently switch between different products. The interactive nature of the hover zoom can improve the user experience and increase dwell time.
Hover zoom encourages curiosity and engagement, which can lead to faster, emotionally driven purchase decisions.
Modal zoom: Clicking on the product image opens it in a larger modal window, in which further details become visible.
In addition, the user can zoom into the image again within the modal to see particularly fine details.
This offers a comprehensive opportunity to take a close look at products.
The modal zoom conveys trust and security, supports rational decisions and strengthens confidence in product quality.
Magnifying glass zoom: A magnifying glass function is activated when the mouse pointer is moved over the image (Fig.: Example: Magnifying glass zoom).
A separate area shows a greatly enlarged view of the image section directly under the mouse pointer.
This enables precise viewing of specific product details without having to enlarge the entire image.
The magnifying zoom emphasizes precision and quality, which is particularly well received by customers who pay attention to details and specifications, and can thus strengthen confidence in specific product features.
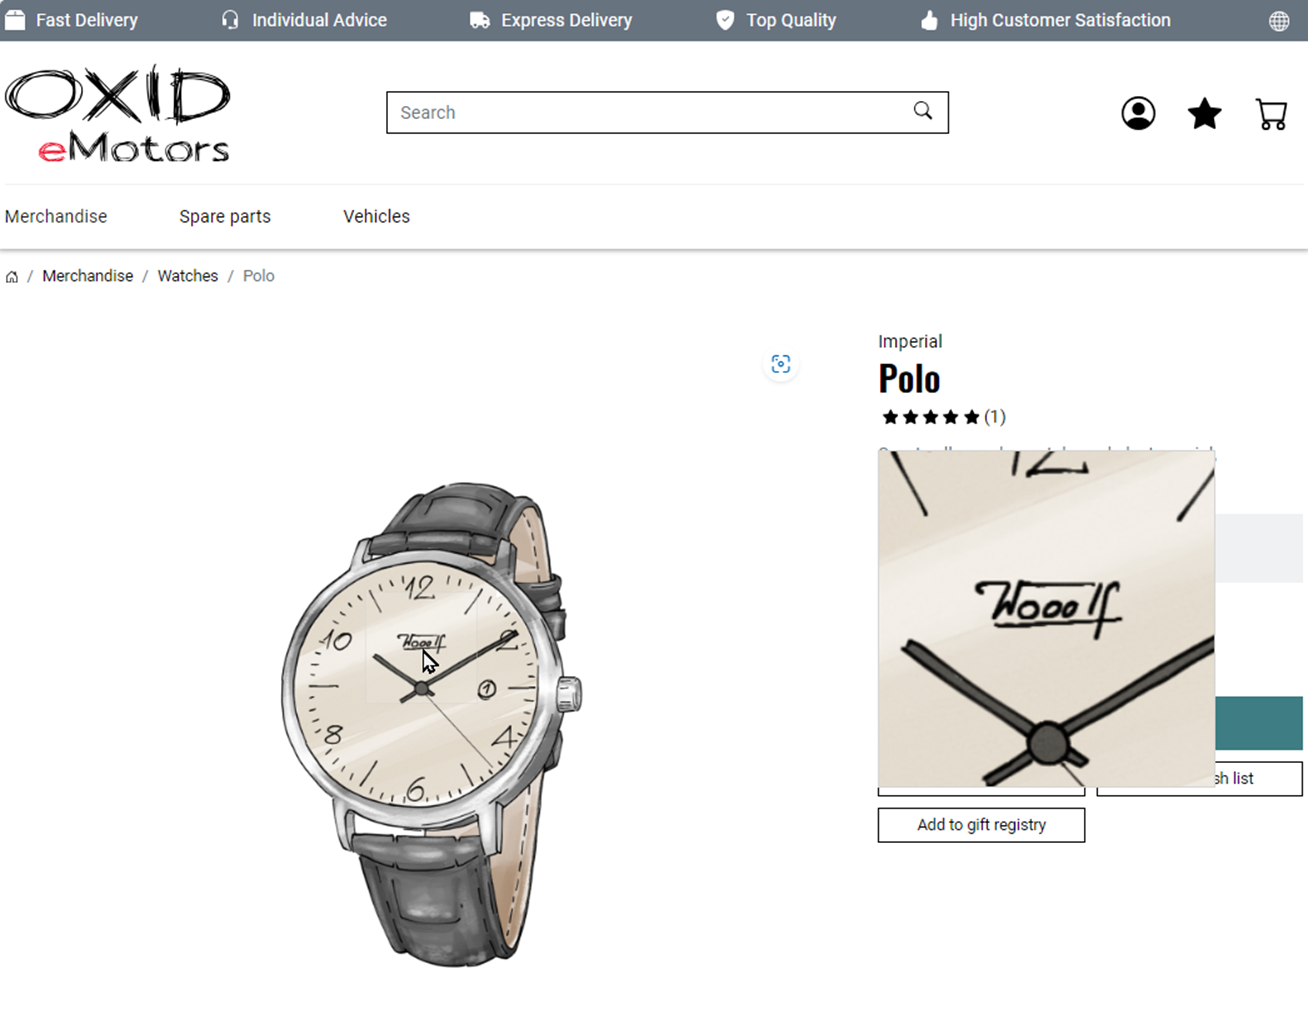
Fig.: Example: Magnifying glass zoom
You can define the desired type of zoom globally for your eShop. In addition to this standard zoom, you can also set the three zoom options individually for each product.
Setting the zoom globally
Choose the type of zoom globally for your eShop.
Procedure
Under , choose the APEX theme.
On the Settings tab, expand the Product detail page area.
Under Zoom type for product detail page choose the desired zoom type.
Save your settings.
Specifying the zoom for individual products
If required, assign an individual zoom option to individual products.
In addition to setting a standard image zoom option in the theme settings, you can use the three zoom options individually for each product.
This gives you greater flexibility for different products.
Procedure
Under , choose the product and choose the Settings tab.
Set the desired zoom by entering the path of the corresponding template in the Alternative Template input field (in our example, defining the magnifyer zoom type, Fig.: Defining an alternative template for a product, Pos. 1).
Hover zoom:
custom/hover_zoom.html.twigModal zoom:
custom/modal_zoom.html.twigMagnifier zoom:
custom/magnifier_lens.html.twig
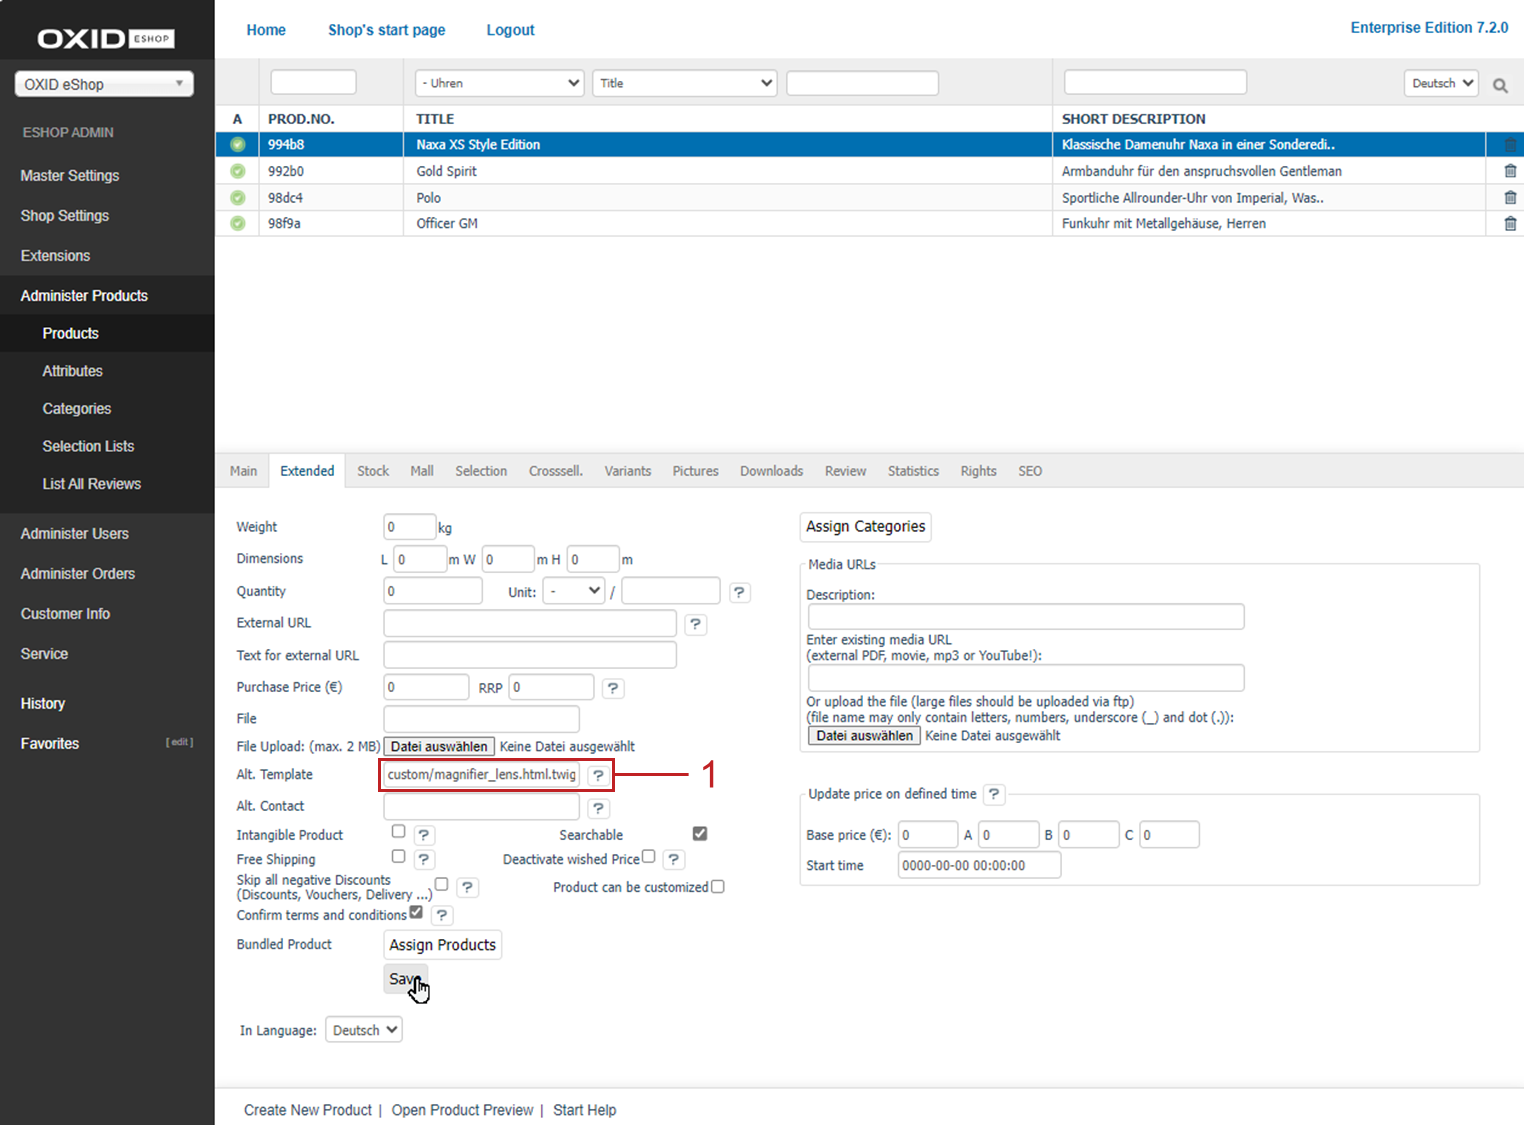
Fig.: Defining an alternative template for a product
Save your settings.
Optional: To ensure the uniformity of the display, repeat the steps for all products in a category.
Background: It is not possible to apply the zoom templates at category level.