Configuration
Make Unzer Payment for OXID ready to use.
Basic procedure
Configure and test Unzer. Then switch on live operation.
Prerequisites
You have agreed on the conditions with Unzer, opened a merchant account and received the access data from Unzer.
Procedure
Activate the module.
Under Access Data, create the connection to your Unzer merchant account.
If you use Apple Pay, do the following:
Generate the necessary certificates locally.
Sign the certificates in your Apple developer account.
To make your Apple Pay credentials known to Unzer, under Options for Apple Pay, enter the signed certificates and upload them to Unzer.
Optional: if required, under Additional options … configure that payments should be triggered with a delay (for example, for business customers).
Check if your eShop theme uses jQuery.
If it does not, under Other, include jQuery.Link the payment methods provided by Unzer to your shipping methods and shipping rules and run test payments in the Unzer sandbox.
The Sandbox mode is set by default after activation.Test Unzer in the Unzer sandbox and adjust the configuration until all payment processes work as you want.
When you have finished your tests, under Operation mode switch to Production.
If you have run the tests on a dedicated test system and then move your eShop to the production system, regenerate the webhooks for the production system URL.
Activating Unzer
Activate Unzer in each subshop where you want to use the module.
Procedure
Choose .
Choose the module Unzer Payment Module for OXID and choose .
Result
Under , the payment method covered by the Unzer Payment for OXID module are marked as active.
Active are automatically those payment method that match the countries you marked as active in (Fig.: Automatically activated payment methods).
Example
You have marked the Netherlands as active. This makes the payment method iDEAL available.

Fig.: Automatically activated payment methods
Configuring Unzer
Start the configuration.
Procedure
Choose .
Choose the Unzer Payment Module for OXID module and choose Settings.
Access Data: Generating a webhook
Register a webhook to connect your eShop with Unzer.
Prerequisites
You have the following data ready, which Unzer provided you with when you set up your merchant account:
Sandbox Public-Key
Sandbox Private-Key
Production Public-Key
Production Private-Key
For more information about authenticating with Unzer, see docs.unzer.com/server-side-integration/api-basics/authentication.
Procedure
Under , enter the keys provided by Unzer into the corresponding fields (Fig.: Registering a webhook, item 1).
Choose the Register webhook for this shop button (Fig.: Registering a webhook, item 2).

Fig.: Registering a webhook
Result
The URL of your registered webhook is displayed (Fig.: Registered Webhook). Your store is connected to Unzer.
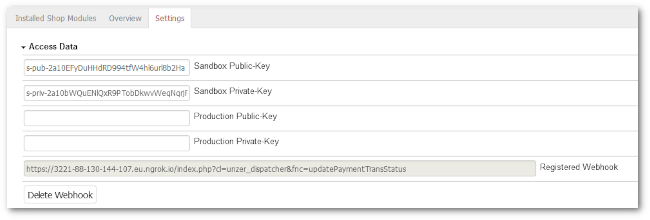
Fig.: Registered Webhook
Credit card/PayPal options
Specify whether payments are to be collected immediately for the eShop, or whether payments are only to be reserved.
Example
Typically, the money is collected immediately.
In certain cases, it makes sense that the payment is only triggered by the delivery:
You sell certain individualized products that you do not manufacture, commission, or order until the order is received.
You have an eShop for business customers. Here the delivery quantities and payment amounts are larger than for private customers.
So, in case of an error returns management would be more difficult.
Therefore, you want to make sure that the payment is only triggered when the goods are there or on their way to be shipped.
Procedure
Choose .
You have the following options:
To trigger payments directly, choose direct Capture.
To reserve the payment only and trigger it later, choose Authorize & later Capture.
Repeat step 2 under .
Save your settings.
Make sure that you have assigned only the appropriately configured PayPal or Cards payment method to the customized products in your eShop.
Delayed payment for payment by PayPal or Cards takes effect for all items in your eShop to which you have assigned these payment methods.
Result
The order has the status pending (see Fig.: Unzer order state: pending in chapter Operation).
If you have chosen Authorize for payment by PayPal or card payment, the delayed payment will be triggered,
as soon as you set the ordered item to the status Delivered in your eShop
when you request the payment using Unzer Insights (at insights.unzer.com)
For all other payment methods supported by Unzer, the payment is triggered immediately with the order.
Options for payment by installments: Entering the Unzer interest rate
Enter the interest rate for installment payments that you have agreed upon with Unzer.
Attention
Conversion at risk
For technical reasons, you must manually enter the installment interest rate you have agreed upon with Unzer.
If you accidentally enter a different value, no checkout will be possible, and your customer will probably reject your shop.
Make sure you enter the exact correct value as agreed with Unzer.
Procedure
Under additional options for installment, enter the interest rate for installment payments that you have agreed on with Unzer.
Save your settings.
Options for Apple Pay: Entering your credentials
If you use Apple Pay, connect to Apple separately.
To do this, generate the following Apple Pay credentials, have them signed in your Apple developer account, and upload them to Unzer:
Merchant ID
Payment processing certificate
Payment processing certificate private key
Merchant certificate
Merchant certificate private key
Prerequisites
You have connected your OXID eShop to Unzer (see Access Data: Generating a webhook).
Procedure
Create an Apple Pay merchant ID (see Creating an Apple Pay merchant ID).
Create an Apple signed payment processing certificate and associated payment processing private key in PKCS#8 format (see: Generating a payment certificate).
Choose .
In the appropriate input fields, enter payment certificate and key.
Make sure to include the prefix and suffix (-----BEGIN PRIVATE KEY-----, for example).Open the
pemfile with the payment processing certificate (in our exampleapple_pay.pem) and copy the content into the payment processing certificate field.Open the text file with the private key for payment processing (in our example
privatekey.key) and copy the content into the Private key for payment processing field.
Choose the Transfer payment certificates button.
Generate an Apple-signed merchant certificate and the corresponding private key in PKCS#8 format (see: Creating an Apple Pay merchant ID).
Choose .
In the Merchant Identifier field, enter the merchant ID you created in your Apple developer account (see Creating an Apple Pay merchant ID).
Enter the merchant certificate and key in the appropriate input fields (including prefix and suffix):
Open the
pemfile containing the merchant certificate (in our examplemerchant_id.pem) and copy the contents into the Payment Processing Certificate field.Open the text file with the private key to the merchant certificate (in our example
merchant_id.key) and copy the content into the Private key for payment processing field.
In the Company field, enter your company name.
Under Supported credit cards, activate the credit card company whose credit card is associated with your Apple Pay account.
Attention
Conversion at risk
Which credit card companies you can choose as supported depends on your agreement with Unzer.
If you mark credit card companies that differ from your agreement with Unzer, no checkout is possible, and your customer will probably reject your shop.
Test all payment methods extensively in the sandbox.
Optional: Under Supported payment types, choose the card type you want to allow :
Checkbox Credit Card: Allow credit card payments.
Check box Debit Card: Allow debit card payments.
By default, both card types are active. Both card types are active even if you check neither of the two checkboxes.
Debit card payments are used less frequently than credit card payments. For example, if you consider credit cards more reliable, choose this card type as the only one allowed.Save your settings.
Optional: Ensuring correct currency settings
Make sure that the currencies your OXID eShop supports match the currencies that Apple Pay supports.
However, you can`t go wrong: For currencies that Apple Pay does not support, only the Apple Pay button will not be displayed.
Apple Pay supports the following currencies:
AUD
CHF
CZK
DKK
EUR
GBP
NOK
PLN
SEK
USD
HUF
RON
BGN
HRK
ISK
Procedure
Check the currencies that your store supports:
Choose .
On the Settings tab, expand the Other Settings section.
In the input field for currencies, check whether you want to add or remove currencies.
To ensure a clean configuration, do the following:
Under , for the Apple Pay payment type, choose the Country tab.
Make sure that only those countries are assigned that have the currencies supported by Apple Pay.
Other: Ensuring optimum performance
Unzer uses jQuery for validating form inputs.
However, to avoid affecting the performance of your OXID eShop, make sure that jQuery is not installed twice.
Example
You use one of the two OXID themes Wave or Fluid.
Both OXID themes have jQuery already integrated.
To avoid interference, make sure that jQuery is not included again separately for Unzer Payment for OXID.
Procedure
Verify if the theme of your OXID eShop uses jQuery:
Ask your web front-end developer.
Alternatively: Inspect the HTML code of your eShop’s front page.
Choose .
Do the following:
If your theme uses jQuery, make sure the Include jQuery via the module checkbox is deactivated.
If your theme does not use jQuery, make sure the Include jQuery via the module checkbox is activated.
Operation mode: Testing the eShop and activating live operation
Test Unzer Payment for OXID in the Unzer sandbox and adjust the configuration until all payment processes work as you want them to.
To do this, run test payments in the Unzer sandbox.
The operating mode Sandbox is set by default.
Recommendation: Use a dedicated test system for testing. In this case, follow the instructions in Switching from a test system to the production system.
Procedure
Optional: To generate logs during testing, activate the checkbox under activate Enable debug mode.
Typically, you turn on logging only on request: When the Unzer support asks you to debug a problem.
You find the log files in the directorysource/log/unzer.Configure the payment methods provided by Unzer Payment for OXID as payment methods in your eShop:
Enable the countries you want to cover.
Link the payment methods to your shipping methods and shipping rules.
Avoid duplication of payment methods.
Background: Unzer Direct Debit (SEPA Direct Debit) can be offered in European countries including Germany, Unzer Direct Debit (SEPA Direct Debit) (secured with Unzer) however only in Germany.
Configure these invoice types so that Unzer Direct Debit (SEPA Direct Debit) (secured with Unzer) is assigned to German user groups only and Unzer Direct Debit (SEPA Direct Debit) is assigned to non-German user groups only.
After you have configured and tested the functions of the module, under make sure that you have entered the following data that you received from Unzer:
In the Live public key field is the Production public key.
In the Live private key field is the Production Private-Key.
Under Operation mode, choose Production and choose Save.
If you use Apple Pay, do the following:
Under additional options for Apple Pay, re-enter key and certificates.
You have created the certificates and keys in your Apple developer account and saved them locally (see Creating Apple Pay access data).Payment processing certificate (file
apple_pay.pem).Private key for payment processing (file
privatekey.key).Shop operator certificate (file
merchant_id.pem)Private key to store operator certificate (file
merchant_id.key)
Choose Transfer payment certificates (Production).
To avoid unnecessary memory consumption, under Operating mode make sure that the debug mode is disabled in live mode.
Save your settings.
Switching from a test system to the production system
If you have installed Unzer on a dedicated test system first, regenerate the webhook for the production system URL.
Otherwise, you will not receive any status messages on your production system, and you will not be able to process your customers’ orders.
Also, make sure that you delete the webhook on your test system.
In this way, you maximize the performance of your Unzer connection.
Delete and regenerate a webhook also in case you have changed the URL of your OXID eShop for other reasons.
Background
If the webhook is still active on your test system even when you are not using the test system, the status messages that Unzer sends to their production system will also be sent to your test system.
This creates an unnecessary system load on the Unzer system that is connected to your webhook. This can decrease the performance of your Unzer connection.
Procedure
On your dedicated test system, do the following:
Choose .
Under Access Data, choose Delete Webhook (see Fig.: Registered Webhook).
Repeat step 1 on your production system.
Under Access Data, re-enter your Unzer access data (Fig.: Registering a webhook, item 1).
Choose the Register Webhook button (Fig.: Registering a webhook, item 2).
Verify the URL that is displayed as part of the registered webhook (see Fig.: Registered Webhook).
If you use Apple Pay, under enter the certificates and keys you created in your Apple developer account and stored locally (see Creating Apple Pay access data).
Result
Your production system receives status reports from Unzer about your customers’ payment transactions.
You can view the transaction data. For more information, see Operation.