Developer Information
Important
The English version of this Visual CMS documentation serves only as a basis and for developers and does not contain all details. More comprehensive documentation can be found in the German documentation.
The Visual CMS can be extended by adding further widgets.
The Visual CMS creates shortcodes from all widgets (similar to BBCode), which it then saves as content. In the frontend these shortcodes are parsed again, and the corresponding classes are triggered.
Even the usage of custom grid systems is possible. As default, the module uses a slimmed down version of the Bootstrap 5 grid system.
Theme Integration
The Visual CMS shortcode widgets currently supplied are compatible with the APEX theme. For other themes, minor adjustments may be necessary.
The following information refers to the Twig template engine.
Content Pages
When needed, the two themes content.html.twig and content_plain.html.twig must be extended by two requests (see comment inside the source code: “Customization: …”):
content.html.twig
{% capture append = "oxidBlock_content" %}
    {% set oContent = oView.getContent() %}
    {% set tpl = oViewConf.getActTplName() %}
    {% set oxloadid = oViewConf.getActContentLoadId() %}
    {% set template_title = oView.getTitle() %}

    <div class="container-xxl">
        {% if not oContent.oxcontents__ddhidetitle.value %}
            <h1>{{ template_title }}</h1>
        {% endif %}
        <article class="cmsContent pb-5">
            {{ oView.getParsedContent()|raw }}
        </article>
    </div>
    {{ insert_tracker({title: template_title}) }}
{% endcapture %}
{% include "layout/page.html.twig" %}

{# Customization: Checking the display of the sidebar #}
{% if sidebar %}
    {% include "layout/page.html.twig" %}
{% else %}
    {% include "layout/page.html.twig" with {sidebar: "Left"} %}
{% endif %}
content_plain.html.twig
{% capture append = "oxidBlock_content" %}
    {% set oContent = oView.getContent() %}
    {% set template_title = oView.getTitle() %}
    {% set tpl = oViewConf.getActTplName() %}
    {% set oxloadid = oViewConf.getActContentLoadId() %}

    {# Customization: Checking the display of the heading #}
    {% if not oContent.oxcontents__ddhidetitle.value %}
        <h1>{{ template_title }}</h1>
    {% endif %}

    {{ oView.getParsedContent() }}
    {{ insert_tracker({title: template_title}) }}
{% endcapture %}
{% include "layout/popup.html.twig" %}
More information about Twig in modules can be found here in the developer documentation.
Widget Creation
In case of creating your own shortcode, make sure the one:
Registered in the
visualcms/src/ShortCode/services.yamlas a separate serviceHas a shortcode special tag in service description: ‘visualcms.shortcode.tag.twig’
Implements the OxidEsales\VisualCmsModule\ShortCode\ShortCodeInterface
Has unique value set for shortCodeTag of shortcode Metadata - the identifier of the shortcode, like “carousel”, “image”, “hero”. You can check example shortcode GoogleMap in vcms-example repository.
OxidEsales\VcmsExamples\ShortCode\GoogleMap:
  class: OxidEsales\VcmsExamples\ShortCode\GoogleMap
  tags: [ 'visualcms.shortcode.tag.twig' ]
BaseShortCode usage
The BaseShortCode abstract class provides basic implementation of some OxidEsales\VisualCmsModule\ShortCode\ShortCodeInterface methods.
ShortCodeInterface interface
The interface implementation is a requirement for your shortcode to work with the VisualCms module.
public function getMetadata(): ShortCodeMetadataInterface;
The method should return main information about your shortcode. The ShortCodeMetadataInterface implemented object should be returned. The OxidEsales\VisualCmsModule\DataType\ShortCodeMetadata class can be used.
public function getTemplate(): string;
The pointer(path) to the shortcode template. Make sure you are using your module id in the path, like used in one of our examples: @ddoevisualcms/shortcodes/visualcms_shortcode_tabs
public function getOptions(): OptionList;
List of options wrapped in OxidEsales\VisualCmsModule\DataType\OptionList object. The OptionList ensures options array have more standard contents, and will not allow to break everything through simple missconfiguration.
Example:
public function getOptions(): OptionList
{
    $shopLanguage = Registry::getLang();

    return new OptionList([
        'id' => new SelectFromDataOption(
            // Label name
            label: $shopLanguage->translateString('DD_VISUAL_EDITOR_WIDGET_ARTICLE'),
            // Specifies a method which will be used for a live search
            data: 'searchArticle',
            // placeholder name
            placeholder: $shopLanguage->translateString('DD_VISUAL_EDITOR_WIDGET_CHOOSE_ARTICLE'),
            // fields that are also taken into account for a selection (only for type "select")
            dataFields: ['name' => 'label']
        ),
        'articletype' => new SelectOption(
            label: $shopLanguage->translateString('DD_VISUAL_EDITOR_WIDGET_ARTICLE_TYPE'),
            values: [
                'grid' => $shopLanguage->translateString('DD_VISUAL_EDITOR_WIDGET_ARTICLE_TYPE_GRID'),
                'line' => $shopLanguage->translateString('DD_VISUAL_EDITOR_WIDGET_ARTICLE_TYPE_LINE'),
            ],
            defaultValue: 'grid'
        ),
        'name' => new HiddenOption()
    ]);
}
Note
Please note, the
OptionList()class consumes the array ofOxidEsales\\VisualCmsModule\\Option\\ShortCodeOptionInterfaceobjects. Our currently provided options should cover most of the cases you may need to configure your widgets. If not, feel free adding your own Options, and using them directly in your shortcode initialization.public function prepareTemplateParams(string $content, array $params): array;
This method is the entry point for your imagination and the place where you can prepare variables for your shortcode template. The result of this method is extracted as variables before rendering your template. Read more in next sections.
ShortCodeMetadataInterface interface
The ShortCodeMetadata class takes those parameters during object creation:
- shortCodeTag
Short-code tag - the identifier of the shortcode, like “carousel”, “image”, “hero”. This one should be unique.
- isWidget
Boolean - Can this shortcode be directly included into the content or not? (in other words - is there a button for this shortcode?)
- title
Title of the widget (Lang-String)
- previewOptionKey
Special attribute which describes which Option data will be used for a preview text in the content grid admin interface for this widget. As a value, Option key should be set here, ex: we have “content” option in the Text widget, so values for that option are shown in the grid.
- backgroundColor
Color of the widget in the content grid admin interface (html format, like ‘#ccbbaa’)
- icon
CSS-class for the icon of the widget in the back end (s.
http://fontawesome.io/icons/)
Example:
public function getMetadata(): ShortCodeMetadataInterface
{
    return new ShortCodeMetadata(
        shortCodeTag: 'text',
        isWidget: true,
        title: 'DD_VISUAL_EDITOR_SHORTCODE_TEXT',
        previewOptionKey: 'content',
        backgroundColor: '#3498db',
        icon: 'fa-align-left'
    );
}
prepareTemplateParams()-Method
The following describes the process for the text widget. When saving a CMS content in the admin, the data is stored in the oxcontent table as follows.
The
prepareTemplateParams()method is executed when the shortcode is read in the frontend.The
$contentparameter is reserved for the content widget option.All other values are passed in the array of the second parameter.
public function prepareTemplateParams(string $content, array $params): array
{
    $frontendController = oxNew(FrontendController::class);

    $listType = $frontendController->getListDisplayType();
    $viewConfig = Registry::get('oxViewConfig');

    if (!$params['articletype']) {
        if (Registry::getConfig()->getTopActiveView()->getClassKey() == 'start') {
            if (($sStartType = $viewConfig->getViewThemeParam('sStartPageListDisplayType'))) {
                $listType = $sStartType;
            }
        }
    } else {
        $listType = $params['articletype'];
    }

    $params = array_merge($params, [
        'listType' => $listType
    ]);

    return parent::prepareTemplateParams($content, $params);
}
A text widget configured via the admin is stored in oxcontent as follows:
[text background_color="#875c5c" background_image="vcms_Car_03_Mood_1.png" background_fixed="1" fullwidth="" class=""]some text widget contents[/text].
After parsing this part for the frontend, the BaseShortCode::prepareTemplateParams method is called. It receives the contents of the text widget as $content and other parameters:
array(5) {
    ["background_color"]=>
    string(7) "#875c5c"
    ["background_image"]=>
    string(22) "vcms_Car_03_Mood_1.png"
    ["background_fixed"]=>
    string(1) "1"
    ["fullwidth"]=>
    string(0) ""
    ["class"]=>
    string(0) ""
}
The “shortcode” and “content” keys come from BaseShortCode::prepareTemplateParams.
We can overwrite the prepareTemplateParams() with additional logic, requiring the parent of prepareTemplateParams().
This array will be given to the shortcode template, and the data will be accessible as regular template variables.
Services
The information can be used, for example, in the text widget template to include user information or to respond to previous user actions. It is also possible to inject services in the shortcodes:
public function __construct(
    protected \OxidEsales\VisualCmsModule\Service\Categories $categoriesService
) {
}
The information above should be enough to create a shortcode widget. Everything else depends on the complexity of the widget.
Note
All currently existing widgets are in the src/ShortCode folder of VisualCMS. These can be used as examples.
Override a existing shortcode
If you want to override a existing shortcode then below is example in which we override the Text shortcode and added a additional field Heading given at vcms-example repository.
OxidEsales\VisualCmsModule\ShortCode\Text:
  class: OxidEsales\VcmsExamples\ShortCode\Text
  tags: [ 'visualcms.shortcode.tag.twig' ]
Extending the shortcode
As “Overriding” could be used for extending the shortcode too, the recommended way to be used for extending shortcodes - service decoration!
The concrete example with shortcode decoration can be found in our Examples module.
Also make sure you register your drecorator:
OxidEsales\VcmsExamples\DecorationExample:
  decorates: OxidEsales\VisualCmsModule\ShortCode\Action
  arguments: ['@.inner']
Override a shortcode template
If you only want to override a template for a shortcode then below is example given at vcms-example repository.
vcmsTemplateOverrideForApexTheme:
  class: OxidEsales\VisualCmsModule\DataType\ThemeTemplatesConfiguration
  arguments:
    $themeId: 'apex'
    $templates:
      column: '@@oe_vcmsexamples/shortcodes/vcmsexamples_shortcode_column'
      action: '@@oe_vcmsexamples/some_other_template_for_overwriting_the_original_action_template_for_apex'
  tags: [ 'shortcode.themeTemplates' ]
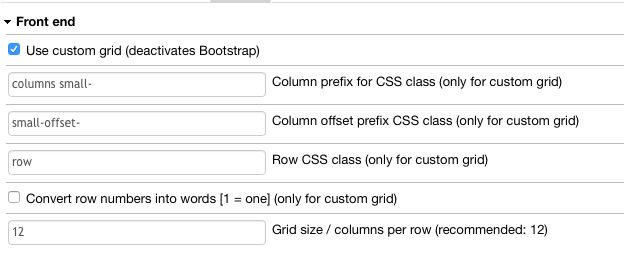
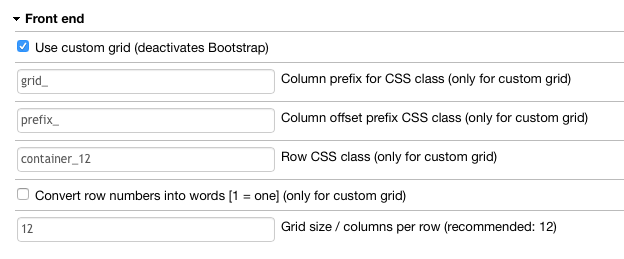
Custom Grid System
In order to use your own custom grid system, only a few changes in the settings are necessary.
Please navigate in the admin area of the eShop to
Activate the checkbox Use custom grid. This checkbox is located under the point Front end
Enter the prefixes of CSS-classes for your grid system
Enter the maximum number of columns of the grid system
Save
After that, offsets and column widths can no longer be adjusted by Layout settings of the widget, but must be made by dragging and dropping them on the CMS page.
Examples
Foundation
960 Grid System
Note
The grid system of your choice has to have been included into the theme.