Module configuration deployment
This document describes an example deployment workflow for module configurations across different environments in OXID eShop.
Overview
After preparing your environment-specific configurations (see Module environment configuration), you need a process to deploy them to your target environments. Below is an example of how such a deployment workflow could look like.
Prerequisites
Install the deployment tools using Composer:
composer require oxid-esales/deployment-tools
Example Deployment Workflow
The deployment process follows these steps:
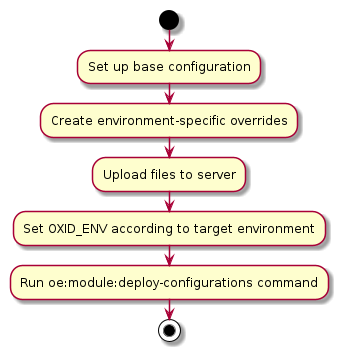
Set up base configuration
Create the base configuration in
var/configuration/shops/<shop-id>/modules/<module-id>.yamlcontaining all basic module settings.Create environment-specific overrides
Create override configurations in
var/configuration.<env>/shops/<shop-id>/modules/<module-id>.yamlcontaining only the settings that differ from the base configuration.Server Deployment
Upload all configuration files to the target server
Ensure the correct
OXID_ENVvariable is set for your target environment
Execute Deployment Command
For all shops (Professional Edition or all Enterprise Edition shops):
vendor/bin/oe-console oe:module:deploy-configurations
For a specific shop in Enterprise Edition:
vendor/bin/oe-console oe:module:deploy-configurations --shop-id=1
Note
This is just an example workflow. Adapt it to your specific needs and deployment processes.