Testing PayPal Checkout in the PayPal Sandbox
To test PayPal Checkout in the PayPal sandbox, create sandbox accounts.
If you are testing PayPal Checkout in a local system without SSL, temporarily set up SSL for it.
Generating PayPal sandbox accounts
To use the PayPal sandbox, do the following:
In the PayPal Developer Portal, view the automatically generated credentials for your Personal and Business Sandbox accounts.
With the Business account (sandbox merchant account), generate the webhook and test incoming payments.
With the Personal account (sandbox customer account), make test payments.Optional: Test the PayPal sandbox accounts.
Displaying Sandbox customer and merchant account credentials
Display the credentials for your PayPal sandbox test accounts in the PayPal Developer Portal.
Procedure
Access the PayPal Developer Portal under developer.paypal.com.
Choose Log Into Dashboard.
Log in with the credentials of your real PayPal account.
Your PayPal account can be a merchant or customer account. You will need a merchant account only to unlock the live operation.Choose .
Result
Two sandbox test accounts are displayed, a business (merchant) and a personal (customer) sandbox account (Figure: Displaying Business and personal sandbox accounts).
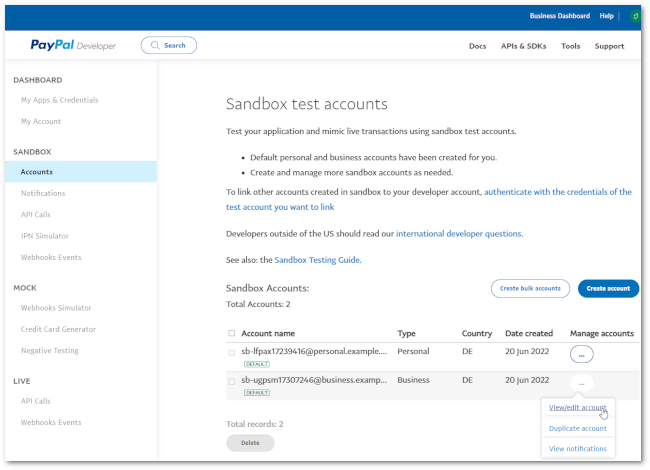
Figure: Displaying Business and personal sandbox accounts
If required, create additional sandbox accounts for testing.
If required, change the passwords under View/edit account.
Optional: Testing PayPal sandbox accounts
Log in to the PayPal “mirror” system, the sandbox platform, with the two accounts.
Procedure
Choose sandbox.paypal.com and log in.
Result
The sandbox platform sandbox.paypal.com is displayed (in our example Figure: Displaying the business sandbox account a sandbox merchant account).
The Sandbox platform is technically identical to the live PayPal system https://www.paypal.com.
Both accounts are equipped with Sandbox money credits, Sandbox credit cards and so on.
When you start the Sandbox onboarding process in the module with the Sandbox merchant account (for example sb-abcde12345678@business.example.com), you connect your test store to this business account.
That means, for example, you will find the created webhook of the module in this sandbox merchant account at sandbox.paypal.com.
When you make payments in the frontend, you take the Sandbox customer account (for example, sb-fghijklm876544@personal.example.com`) for payment.
After payment you will see in your Sandbox customer account (on sandbox.paypal.com) the outgoing payments and in the Sandbox merchant account (on sandbox.paypal.com) the incoming payments.
Since sandbox.paypal.com is a mirror system, all functions and API are identical.
This means, any error you can generate here will also exist in the live system.
Conversely, any error not generated will not occur in the live system either.
Therefore, we strongly recommend testing the integration with a sandbox system first (see Testing PayPal Checkout).
Only if everything works, repeat the onboarding process in the live system with your PayPal merchant account (see Unlocking PayPal Checkout).
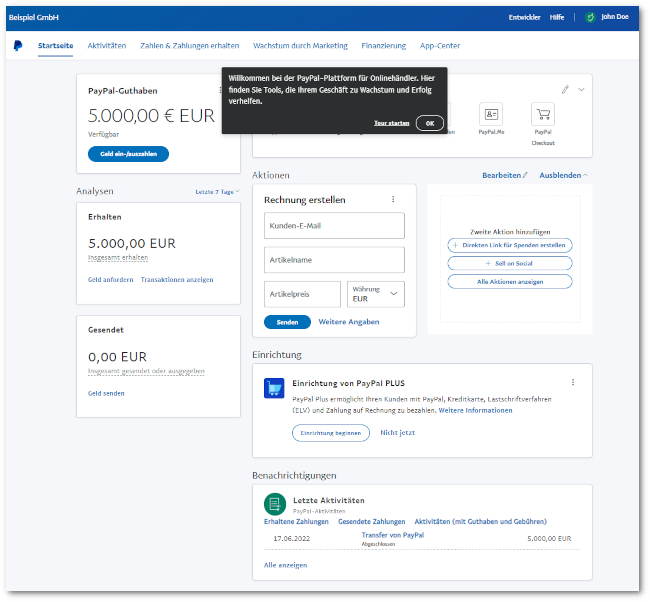
Figure: Displaying the business sandbox account
Setting up temporary SSL
Your test system doesn’t have SSL?
To add SSL and web access to a local OXID eShop URL, for testing in the PayPal sandbox, use, for example, NGROK.
How you generate the temporary URL depends on your system. We describe the following NGROK examples:
You have an alias below
localhost.
Example:http://localhost/myproject/You have a virtual host.
Example:http://myproject.local
Procedure
Create an account under ngrok.com.
Follow the instructions for installing and setting up NGROK.
Start NGROK.
Enter one of the following commands:
If you have an alias, type ngrok http 80.
The temporary URL will be displayed, for examplehttps://6f62-2003-c7-cf2e-9900-d19c-904a-e54c-64fe.eu.ngrok.io.
You will be able to reach your store using a URL according to the following scheme:
https://6f62-2003-c7-cf2e-9900-d19c-904a-e54c-64fe.eu.ngrok.io/myproject/If you have a virtual host, enter a command according to the following schema: ngrok http --host-header=myproject.local 80.
Example: ngrok http --host-header=localhost.local 80 (Figure: Generating a URL with NGROK)
Figure: Generating a URL with NGROK
The temporary URL is displayed under Forwarding, in our example
https://60a6-2001-9e8-4739-1e00-1d18-1876-eae4-2f5d.eu.ngrok.io(Figure: Displaying the temporary URL).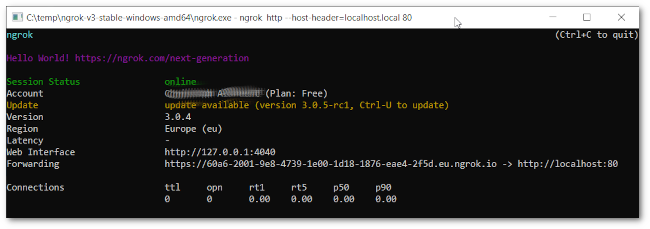
Figure: Displaying the temporary URL
Make sure your test store is running.
Enter the temporary URL into your browser.
You go to a redirect page (Figure: NGROK forwarding page).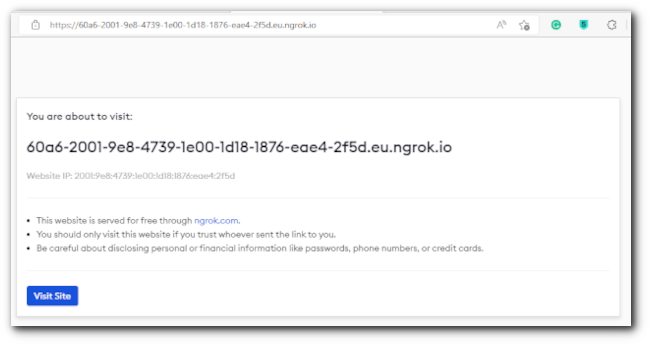
Figure: NGROK forwarding page
Choose Visit Site.
Your store is displayed only with the elements accessible without SSL (Figure: OXID eShop without SSL).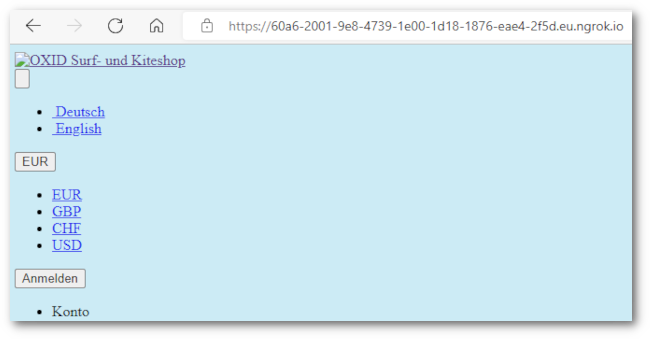
Figure: OXID eShop without SSL
In the directory
<root directory of the eShop>/source, open the fileconfig.inc.php.For the duration of your session, change the value of the $this->sShopURL parameter from your default to the temporary NGROK URL (Figure: Customizing config.inc.php).
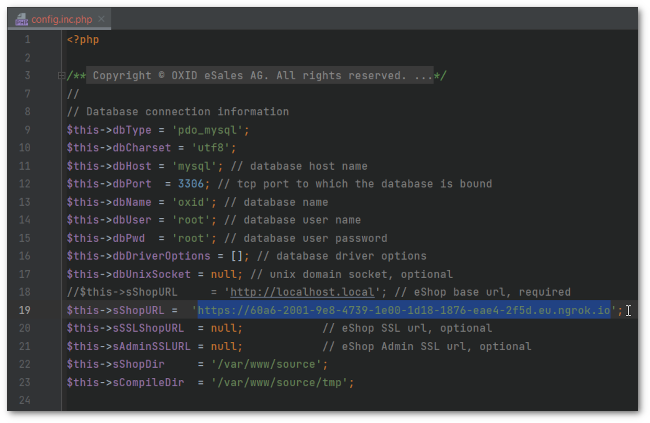
Figure: Customizing config.inc.php
Reload the temporary URL of your store.
Result
You can generate the webhook for testing PayPal Checkout in the PayPal sandbox (see API Credentials).
Once you close the NGROK window, the temporary channel is finished, and you need to generate a new temporary URL.
Note
Generating a webhook in the PayPal sandbox.
If you use the temporary URL to generate the webhook for testing PayPal Checkout in the PayPal sandbox (as described in API Credentials), then you are familiar with the process.
This is because the onboarding process works in the live environment with the live account just like in the test environment with the temporary URL.
Example: You are an OXID partner and want to help your customer switch to PayPal Checkout.
Ask your customer to start a screen sharing session where you look over their shoulder.
Passwords remain hidden, but you can assist if your customer encounters questions when generating and entering their PayPal credentials.