Modules configuration and setup
Overview
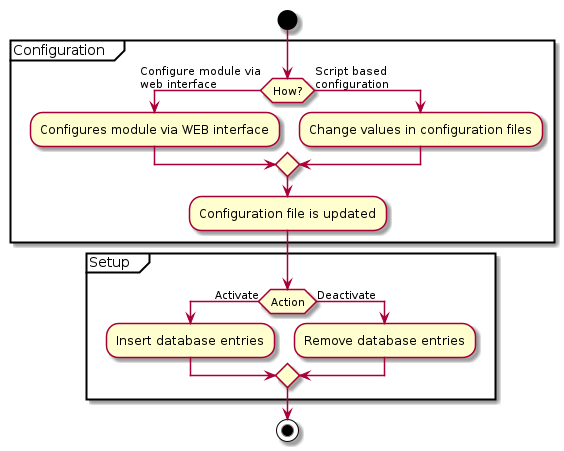
In most cases modules need to be configured before you can proceed with setup and activate it. There are two ways of configuring modules:
The automatic deployment friendly way by Configuring modules via providing configuration files
Configuration
Configuring modules via admin interface
To configure modules via admin interface, please open OXID eShop administration panel and got to , you will see modules list, please select module you want to configure click , you will see list of settings which is possible to change.
Entries in the settings list are loaded and saved in file located in var/configuration/shops. For each shop id there is one file with the complete configuration for the shop. So if the shop has id 1, the file would be named 1.yaml. See the example below:
.
└── var
    └── configuration
        └── shops
           └──1.yaml
           └──2.yaml
           └── ...
During the module setup/activation all of the values are being transferred from file to database.
Note
If var directory has not found in the project directory.
composer update must be executed or it must created manually.
Also, each shop must have their own separate yaml file.
Configuring modules via providing configuration files
Since the complete configuration is in configuration files, you can make it part of the VCS repository of your project and deploy it to your testing, staging and productive systems and then apply configuration for the modules through the command line as described below in the section apply configuration configured modules.
Project configuration files are located in project directory var/shops/<shop-id>.yaml, here “<shop-id>” represents Sub-shop ID. In case you don’t use Sub-shop functionality, it will always be only one file with name 1.yaml.
Configuration might be different in different environment (testing, staging or productive). To solve this problem OXID eShop uses another file located in var/environment/<shop-id>.yaml.
Example structure you can see bellow:
.
└── var
    └── configuration
        └── shops
           └──1.yaml
           └──2.yaml
           └── ...
        └── environment
           └──1.yaml
           └──2.yaml
           └── ...
Configuration files
These files contains information of all modules which are installed. During the installation process all of the information from module metadata.php is being transferred to the configuration files. For example you have OXID eShop without any modules, so this file will be empty. When you will run installation let’s say for OXID eShop PayPal module, files in var/shops/ will be filled with information from metadata.php. An example of stripped down configuration file:
modules:
  oepaypal:
    id: oepaypal
    path: oe/oepaypal
    version: 6.0.0
    configured: false
    title:
      en: PayPal
    description:
      de: 'Modul für die Zahlung mit PayPal.'
      en: 'Module for PayPal payment.'
    lang: ''
    thumbnail: logo.jpg
    author: 'OXID eSales AG'
    url: 'https://www.oxid-esales.com'
    email: [email protected]
    templates:
      order_paypal.tpl: oe/oepaypal/views/admin/tpl/order_paypal.tpl
    templateBlocks:
      -
        template: deliveryset_main.tpl
        block: admin_deliveryset_main_form
        file: /views/blocks/deliveryset_main.tpl
      -
        template: widget/sidebar/partners.tpl
        block: partner_logos
        file: /views/blocks/widget/sidebar/oepaypalpartnerbox.tpl

    moduleSettings:
      blOEPayPalStandardCheckout:
        group: oepaypal_checkout
        type: bool
        value: true
      blOEPayPalExpressCheckout:
        group: oepaypal_checkout
        type: bool
        value: true
    events:
      onActivate: '\OxidEsales\PayPalModule\Core\Events::onActivate'
      onDeactivate: '\OxidEsales\PayPalModule\Core\Events::onDeactivate'
    controllers:
      oepaypalexpresscheckoutdispatcher: OxidEsales\PayPalModule\Controller\ExpressCheckoutDispatcher
      oepaypalstandarddispatcher: OxidEsales\PayPalModule\Controller\StandardDispatcher
    classExtensions:
      OxidEsales\Eshop\Core\ViewConfig: OxidEsales\PayPalModule\Core\ViewConfig
      OxidEsales\Eshop\Application\Component\BasketComponent: OxidEsales\PayPalModule\Component\BasketComponent

moduleChains:
  classExtensions:
    OxidEsales\Eshop\Core\ViewConfig:
      - OxidEsales\PayPalModule\Core\ViewConfig
Option- configured
As you can see in example, most of the things are just reflection of module metadata.php except configured
option. If you want to know more about the usage of this parameter, please read
module configuration deployment documentation.