To unlock your live system, generate new credentials.
To do this, go through the PayPal registration process again with your PayPal merchant account details.
Administering existing PayPal or PayPal Plus orders
If you already use the PayPal or PayPal Plus module, please note the following limitation:
To administer existing orders, both modules, PayPal Checkout and PayPal for example, must be active at the same time.
However, to prevent that, in our example, the PayPal payment method redundantly displayed in the frontend, you must deactivate the payment methodPayPal.
Procedure
We recommend the following procedure.
Tip
Scheduling a downtime
Schedule a short downtime for the step of deactivating the payment method belonging to PayPal or PayPal Plus.
Install PayPal Checkout.
Activate and configure PayPal Checkout as described below under Basic procedure.
Result: To administer your orders, under Administer Orders ‣ Orders you find separate tabs for PayPal Checkout and for PayPal or PayPal Plus (depending on which of the two modules you use).
Note
Administering orders in the PayPal merchant account
Nothing can go wrong if you disable PayPal or PayPal Plus as described below.
You can administer orders in your PayPal merchant account at any time.
Technical dependencies
On the separate tab for PayPal or PayPal Plus you can edit your old orders until you deactivate your previously used module.
Once you deactivate your previously used module, you can still view your old orders on the PayPal Checkout tab, but not edit them.
If you clean up your system after deactivating your previously used module and therefore also delete the module’s database, your old orders will also no longer be displayed on the PayPal Checkout tab.
After deleting the database, you will still be able to view and administer the old orders in your PayPal merchant account.
Identify the payment methods corresponding to PayPal or PayPal Plus:
PayPal (ID: oxidpaypal)
PayPal Plus (ID: payppaypalplus)
Hint
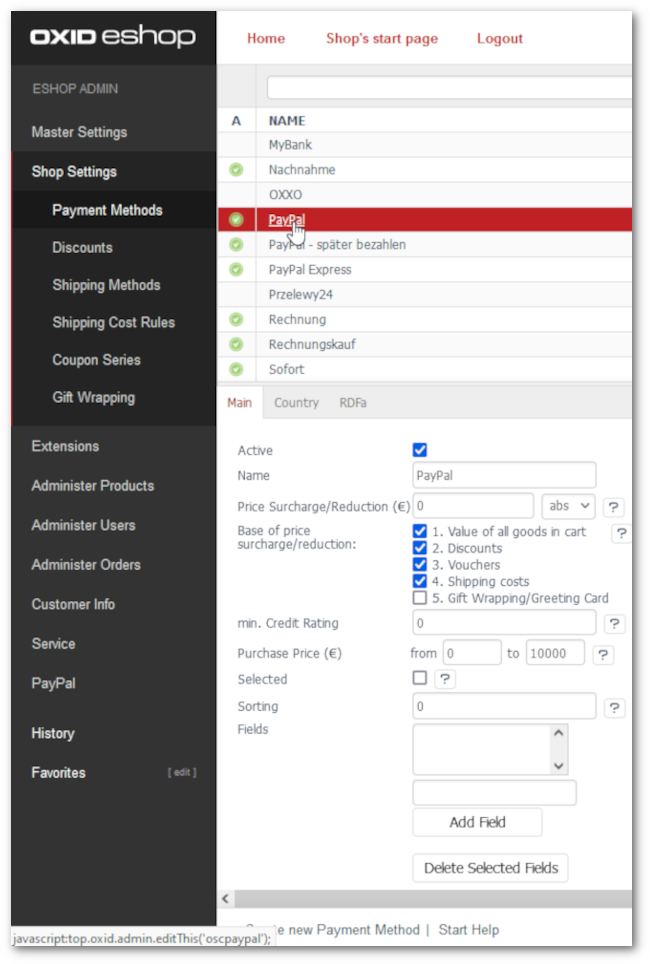
The ID is displayed in the lower left corner of the window when you hover over the payment type name.
Disable the payment type corresponding to PayPal or PayPal Plus.
To do this, on the Main tab, uncheck the Active checkbox.
Result: The PayPal or PayPal Plus module is still active, but the associated payment methods are no longer offered to your customers. Only the payment methods of PayPal Checkout are offered.
You can still edit existing orders as usual under Administer Orders ‣ Orders on the tab corresponding to the payment module.
Recommended: As soon as you are sure that existing orders will no longer require any actions (refunds, for example), under Extensions ‣ Modules disable PayPal or PayPal Plus.
Operating PayPal Checkout in subshops with the OXID eShop Enterprise Edition
You have the OXID eShop Enterprise Edition and run subshops for different countries?
In this case, note the order of the subshops for which you connect to PayPal (onboarding).
Background
For technical reasons restrictions of the onboarding in the first subshop apply to the onboarding in all further subshops.
Example
You have both a German and a Swiss PayPal merchant account.
You perform the onboarding first for your Swiss subshop with your Swiss PayPal merchant account.
This makes the PayPal Checkout payment methods available to you that PayPal offers worldwide (see Market coverage by country).
Then you perform the onboarding for your German subshop using your German PayPal merchant account.
In this case, the PayPal Checkout payment method Pay upon Invoice will not be available for your German subshop.
Reason: You can only offer the PayPal Checkout payment method Pay upon Invoice if you have a German PayPal merchant account.
You only have a German PayPal merchant account.
You perform the onboarding first for your German subshop and then for your Swiss subshop.
During onboarding, it appears that the PayPal Checkout payment method Pay upon Invoice is also available for your Swiss subshop.
But this is not the case. Your customers with a Swiss billing address will not be offered Pay upon Invoice.
Procedure
Proceed as follows:
You have a German PayPal merchant account?
Perform the onboarding for your German subshop first even if you have a non-German main store.
This will ensure that PayPal will also enable those PayPal Checkout payment methods for your German subshop that are not available for non-German PayPal merchant accounts.
You only have a non-German PayPal merchant account?
Perform the onboarding for your subshops.
For each subshop, check how important the restriction of PayPal Checkout payment methods for non-German PayPal merchant accounts is for you in that particular market.
If the restriction is critical for your business model, contact PayPal support to get an activation for the required PayPal Checkout payment method.
Activate the module.
The most important payment methods are automatically activated.
Connect to PayPal via a webhook.
Attention
Do not use the credentials for PayPal Plus to establish the connection.
Test PayPal Plus in the PayPal sandbox first.
Optional: Disable the express checkout feature of PayPal Checkout if needed.
If necessary, contact PayPal Customer Service to determine the best way for PayPal to handle 3D Secure authentication in your case (see Fig.: Configuring 3D Secure authentication).
Configure the payment methods provided by PayPal Checkout as payment methods in your eShop:
Enable the countries you want to cover.
Link the payment methods to your shipping methods and shipping rules.
Run test payments in the PayPal Checkout sandbox. and adjust the configuration until all payment processes works as you want.
Enable PayPal Checkout:
If you do not have a merchant account yet, create one for live operation.
Switch to Live operation mode.
If required: If you have particularly privacy-sensitive customers, implement a consent procedure, for example with Usercentrics.
To start the configuration, choose PayPal ‣ Configuration.
Note
In order to be able to configure the module, it must first be activated.
After activation, the new menu item PayPal appears on the left navigation menu.
Register a webhook to connect your eShop with PayPal.
The webhook allows PayPal to contact your OXID eShop and provide real-time status messages about, for example, completed transactions.
Hint
It’s possible to let the shop track the incoming webhooks by setting the config parameter $this->sLogLevel in the file config.inc.php to debug.
In this way, the webhook calls by PayPal are written to the file oxideshop.log.
In the first run, you test the payment methods provided with PayPal Checkout with test credentials in a sandbox.
Hint
What does testing in the sandbox do for me?
sandbox.paypal.com is a mirror system.
All functions and the API are identical to sandbox.paypal.com.
This means that any error you can create here will also exist in the live system.
Conversely, any error not generated will not occur in the production system either.
Therefore, test your PayPal Checkout integration with a sandbox system first.
Nothing can go wrong:
Test payments in the sandbox cost nothing.
You avoid chargebacks as they would be necessary with test payments with the live account.
Only when everything works as you want, use the credentials for live operation.
Prerequisites
On PayPal’s developer page, you have created a sandbox merchant account and a sandbox customer account.
For more information, see Generating PayPal sandbox accounts.
Your test environment has SSL.
If you are testing PayPal Checkout in a local development environment that is only accessible via http:// (i.e. without SSL via https://), then use, for example, NGROK to provide your test environment with temporary SSL.
For more information, see Setting up temporary SSL.
Procedure
We describe the process using a sandbox account as an example. The live process is analogous.
Attention
Operating PayPal Checkout in subshops with the OXID eShop Enterprise Edition
You have the OXID eShop Enterprise Edition and run subshops for different countries?
In this case, note the order of the subshops for which you connect to PayPal (onboarding).
Background
For technical reasons restrictions of the onboarding in the first subshop apply to the onboarding in all further subshops.
Example
You have both a German and a Swiss PayPal merchant account.
You perform the onboarding first for your Swiss subshop with your Swiss PayPal merchant account.
This makes the PayPal Checkout payment methods available to you that PayPal offers worldwide (see Market coverage by country).
Then you perform the onboarding for your German subshop using your German PayPal merchant account.
In this case, the PayPal Checkout payment method Pay upon Invoice will not be available for your German subshop.
Reason: You can only offer the PayPal Checkout payment method Pay upon Invoice if you have a German PayPal merchant account.
You only have a German PayPal merchant account.
You perform the onboarding first for your German subshop and then for your Swiss subshop.
During onboarding, it appears that the PayPal Checkout payment method Pay upon Invoice is also available for your Swiss subshop.
But this is not the case. Your customers with a Swiss billing address will not be offered Pay upon Invoice.
Procedure
Proceed as follows:
You have a German PayPal merchant account?
Perform the onboarding for your German subshop first even if you have a non-German main store.
This will ensure that PayPal will also enable those PayPal Checkout payment methods for your German subshop that are not available for non-German PayPal merchant accounts.
You only have a non-German PayPal merchant account?
Perform the onboarding for your subshops.
For each subshop, check how important the restriction of PayPal Checkout payment methods for non-German PayPal merchant accounts is for you in that particular market.
If the restriction is critical for your business model, contact PayPal support to get an activation for the required PayPal Checkout payment method.
Hint
Availability of all payment methods
To make all PayPal payment methods available to you, generate the webhook as described below using the Signup Merchant PayPal Integration (Sandbox) button.
Background: Technically, it is also possible to enter already existing credentials manually instead of generating them again. But this would lead to restrictions (see “Credit card” and “Purchase upon invoice” not available).
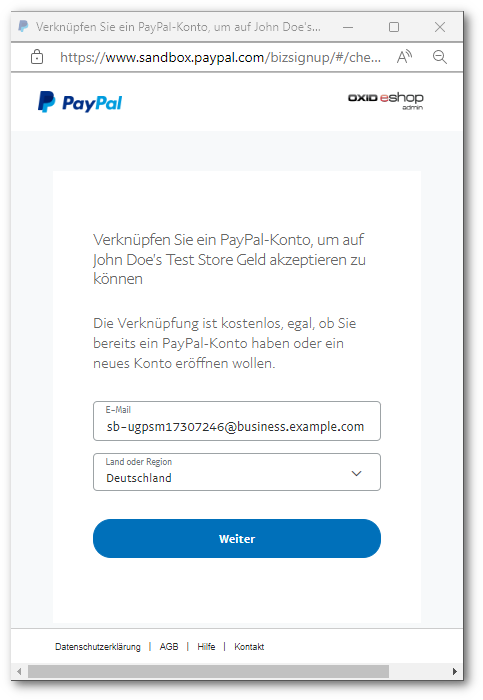
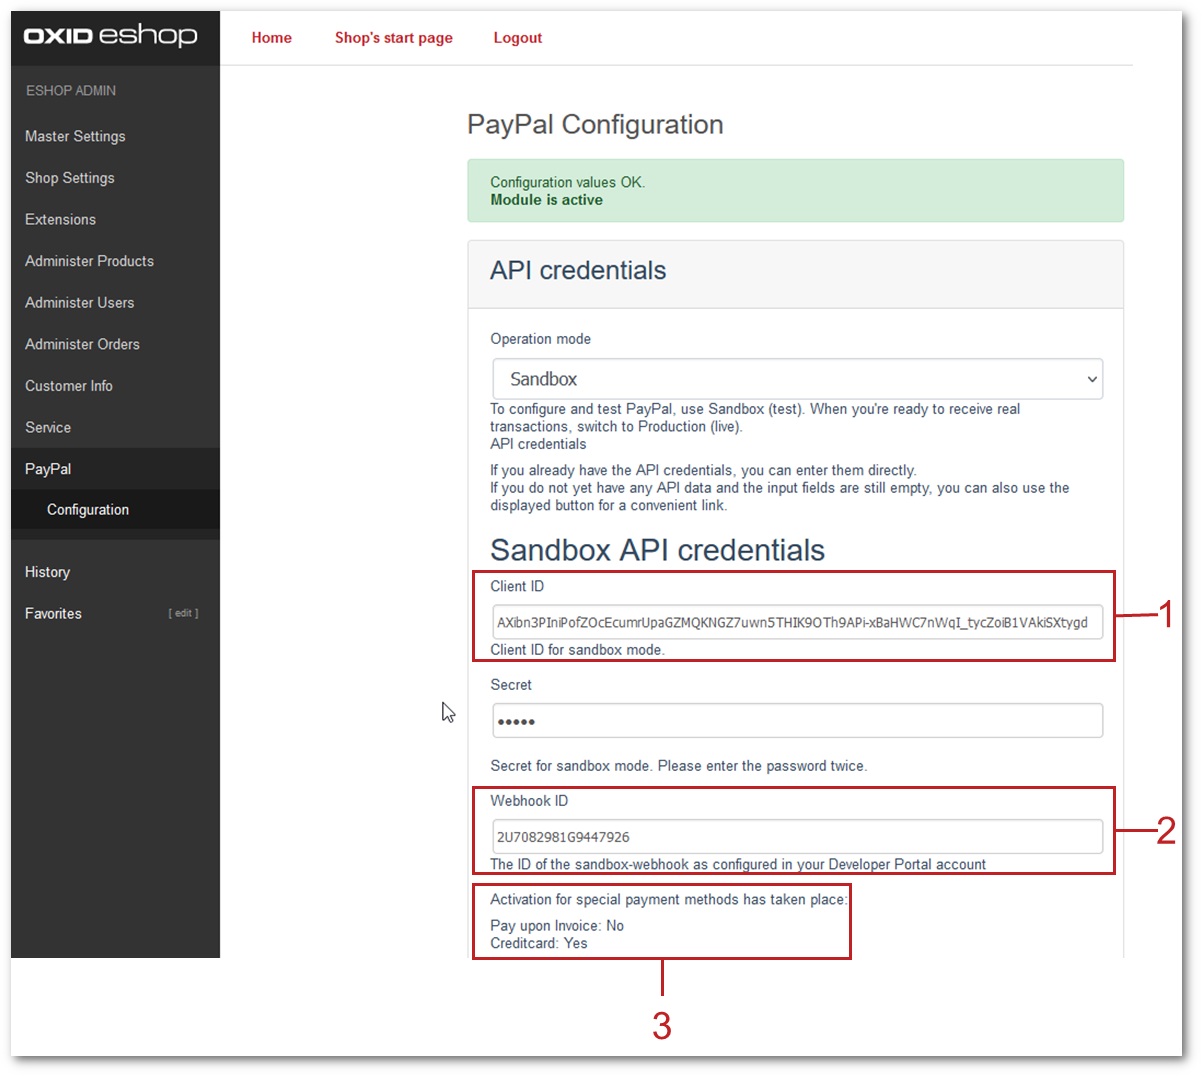
To log in to the sandbox, under API credentials, choose the Sign Up Merchant Integration (Sandbox) button (Fig.: Starting the webhook generation, item 1).
If you want to use the payment methods Pay upon Invoice or credit card, under Activation for special payment methods has taken place (Fig.: Webhook created, item 3), check whether the activation has been done.
Hint
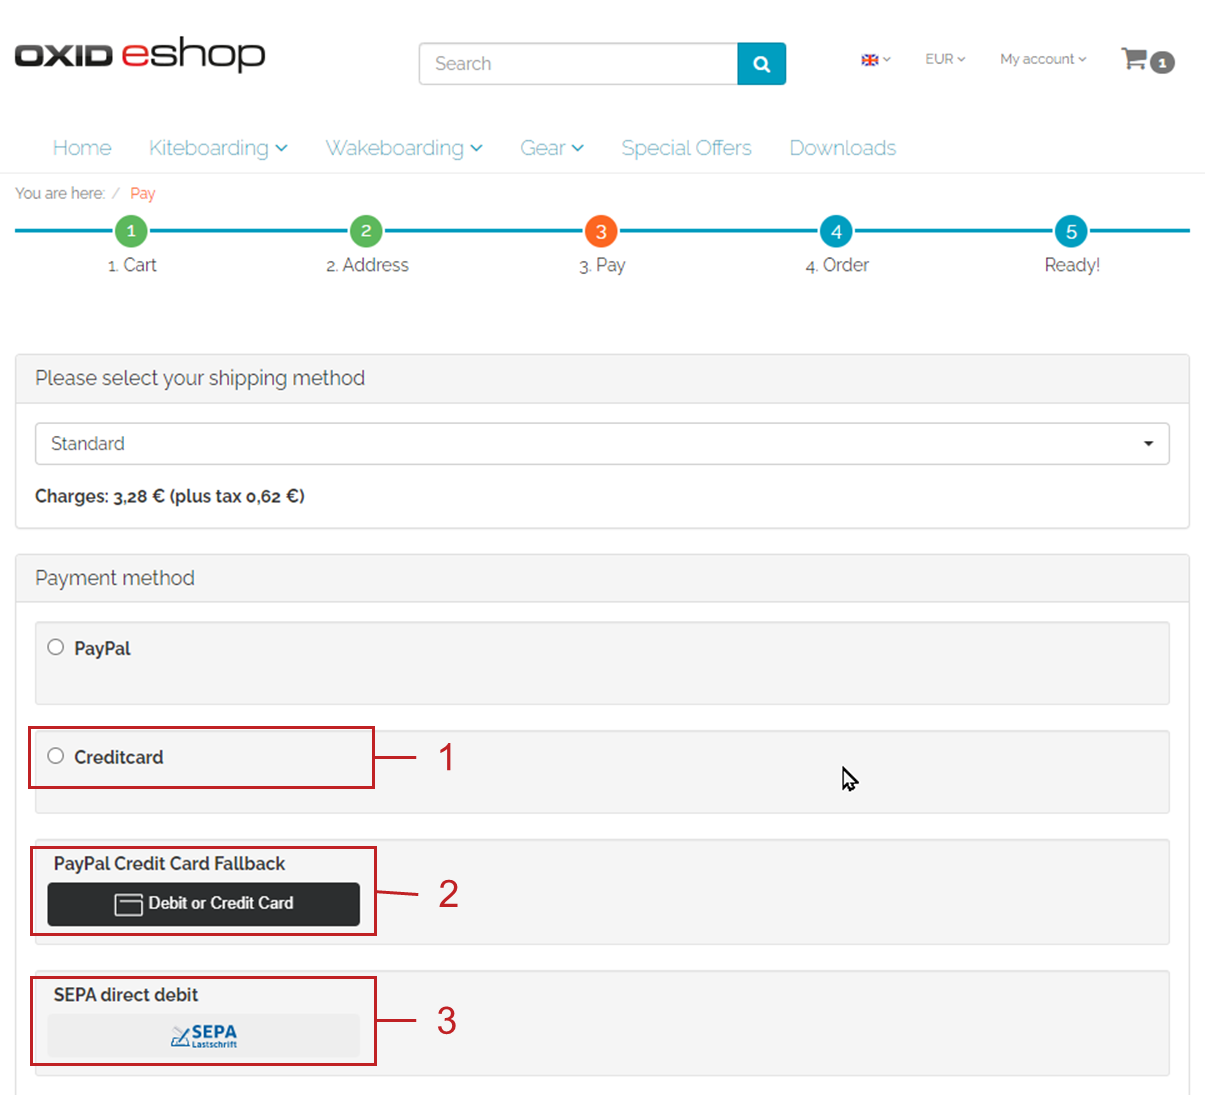
Payment method fallback credit card.
If the activation did not happen automatically (credit card: No), contact your PayPal representative.
PayPal offers the payment method Purchase upon invoice only to store operators from Germany.
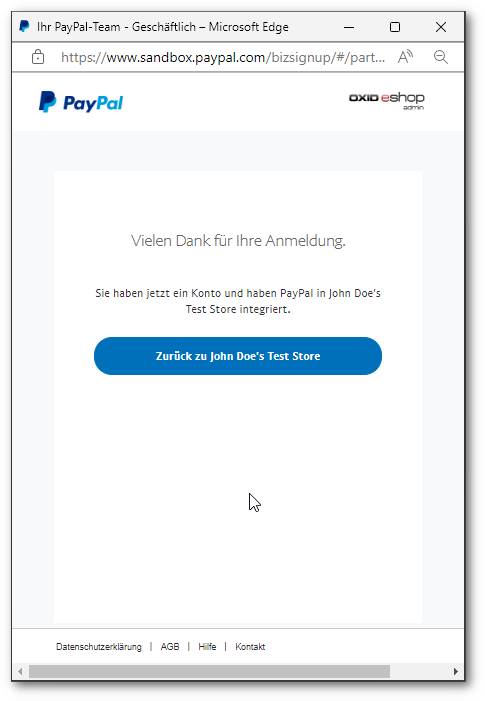
Result
Once you have given PayPal permission to connect your sandbox account to the PayPal test store, the API credentials are displayed, and the module is active Fig.: Webhook created.
Under Shop Settings ‣ Payment Methods, the payment method PayPal (technical name oscpaypal) is active (Fig.: Payment method PayPal active).
Sometimes it may be necessary to delete the existing webhook and generate a new one.
To delete a webhook, delete the credentials and select Save.
The Register Merchant PayPal Integration button appears, and you can regenerate the webhook.
Hint
Identifying issues with the connection to PayPal
If, for example, you experience connection problems, or payment transactions do not work as expected, switch on the debug mode and contact PayPal support.
Decide if you want to offer the quick purchase feature of PayPal Checkout.
With the quick purchase feature, your customers skip logging into your eShop.
Example
Your customers typically have only one item in their shopping cart when they place an order?
In this case it makes sense to guide customers to their destination as quickly and barrier-free as possible and activate the quick purchase function.
Do you generate a significant portion of sales or margin from accessory items?
In this case it may make sense to delay payment and offer the PayPal buttons only in the shopping cart and checkout, for example.
So, you determine,
whether customers have to go through your checkout process and register in your eShop
or
whether customers can directly trigger the order without registering with their PayPal account (quick purchase).
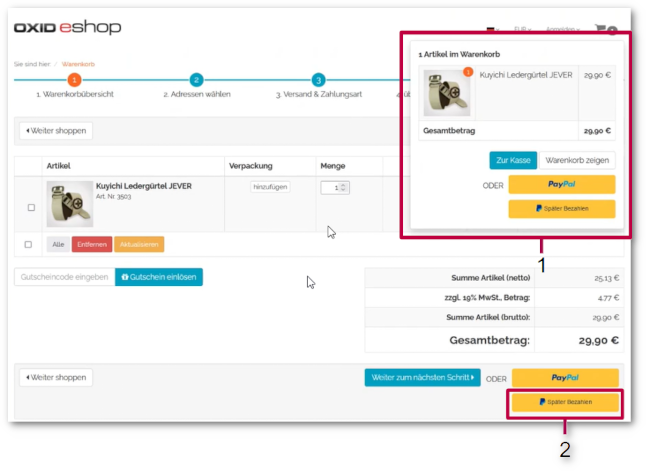
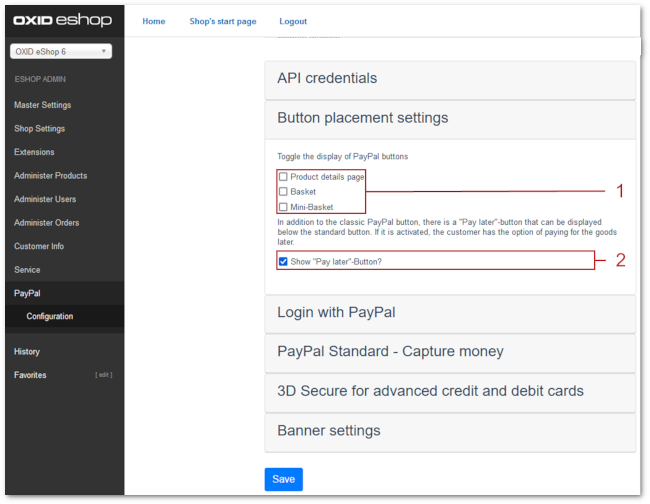
By default, the Quick Purchase feature is active, and the PayPal button appears on the following pages:
Set customers to be automatically logged into your OXID eShop
if the email address of the PayPal account and the eShop account are identical
and
as soon as your customer is logged in to their PayPal account.
Benefit: You make the signup process more convenient for your customers.
Your customers will skip the login mechanism. Your customers log in to your OXID eShop without having to enter their password.
Disadvantages:
Often spouses, for example, use the same PayPal account.
One of the partners could thereby view the partner’s order history or other customer data in the OXID eShop.
So potentially there is a privacy risk.
If your customers do not have to log in to your eShop, you will lose customer order history data.
You could otherwise use such data for statistical analysis to target your customers.
If you do not enable Login with PayPal, the following happens:
If the customer’s PayPal email address is known, the PayPal payment process will be interrupted, and the customer will have to log in to your eShop.
The PayPal session is created, and your customer is logged into your eShop.
The customer’s identity is clearly established, and the current order is added to the customer’s order history.
If the customer’s PayPal email address is not known, your customer will complete the order using a guest account.
Your customer lands on the checkout page with the PayPal address data. The data is stored only once for the current order, no customer account is created in the eShop.
Procedure
Attention
The Login with PayPal function is enabled by default.
Check what can go wrong in the worst case if several users use the same PayPal account and can see each other’s data in your eShop.
There is no serious risk if your customers conveniently log in to your eShop automatically with their PayPal accounts?
Then leave the Automatically log in to shop during checkout checkbox selected.
Otherwise, deselect the checkbox.
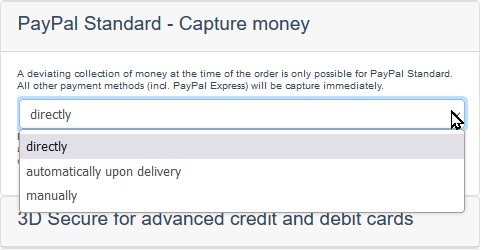
For the PayPal payment type, specify whether payments are to be collected immediately, or whether payments should be deferred for a maximum of 30 days.
Example
Typically, the invoice amount is collected immediately.
However, in certain cases it makes sense that the payment is only triggered by the delivery:
You sell certain individualized products that you do not manufacture, commission or order until the order is received.
You have an eShop for business customers. Here, the delivery quantities and payment amounts are larger than for private customers.
In the event of an error, returns management would be correspondingly more difficult.
That’s why you want to make sure that payment is only triggered when the goods are there or on their way to be shipped.
Important
If you choose deferred capture, you must deliver the product within 30 days and complete the transaction or find a solution together with the customer.
Background: By placing an order, PayPal is initially authorized to collect the money from your customer for 3 days. The authorization is automatically extended up to a maximum of 29 days after ordering.
After thirty days, the authorization expires, and PayPal can no longer collect the invoice amount.
To have payments always triggered directly, choose Directly.
To reserve the payment only and trigger it later, you have the following options:
automatically upon delivery: The payment is triggered as soon as you have set the ordered item to the status delivered in your eShop.
manually: The payment is triggered when you select the order under Administer Orders ‣ Orders and, on the PayPal Checkout tab, choose the Collect button.
Reservation is not possible for the Quick Purchase function of PayPal Checkout (payment method PayPal Express). The invoice amount is always collected immediately for PayPal Express payment method.
Make sure you have assigned the PayPal payment method only to the customized products in your eShop.
The delayed payment for PayPal Checkout payments will take effect for all items in your eShop to which you have assigned this payment method.
Reservation is not possible for the Fast Checkout feature of PayPal Checkout (payment method PayPal Express). For the PayPal Express payment method, the invoice amount is always collected immediately.
Assign the PayPal payment method to the customized products in your eShop.
It is technically not possible to assign certain payment methods exclusively to certain items. We suggest the following workaround:
Create a dedicated shipping cost rule and assign the items in question to it.
Make sure that the Quantity condition is correctly specified.
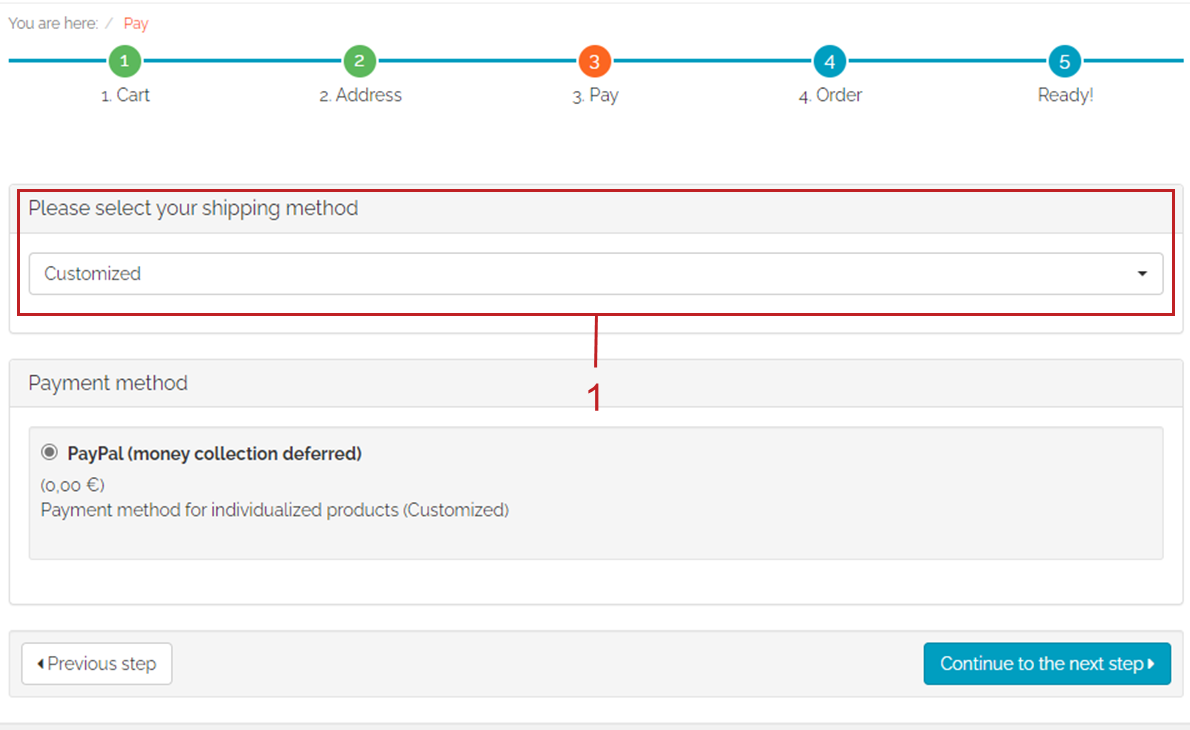
Create a dedicated shipping method and assign the PayPal payment method and shipping cost rule for individualized products to it.
Fig.: Choosing a dedicated shipping method in checkout
Result
In case of deferred money collection, under Administer orders ‣ Orders, collect the invoice amounts as follows (see Triggering reserved payments manually):
If you have chosen automatically upon delivery: You will trigger the payment as soon as you select the Ship Now button, setting the ordered item to the Delivered status.
If you have chosen manually: You trigger the payment by choosing the order under Administer Orders ‣ Orders and choosing the PayPal Checkout button on the Collect tab.
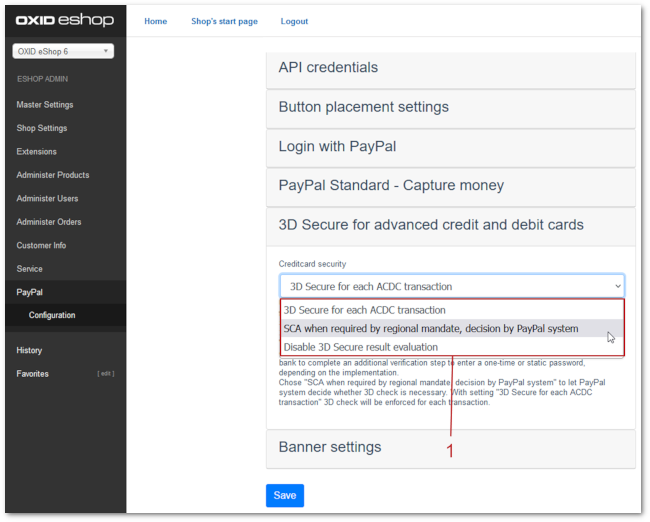
To meet the legal requirements for online payments with credit cards, use 3D Secure authentication.
With 3D Secure authentication, during the transaction, the issuing bank asks the customer to identify himself as the legitimate cardholder by entering a password.
This authentication by the issuing bank is mandatory throughout Europe in certain situations – for example, when depositing a credit card in an e-wallet (PayPal, for example) or for risky transactions.
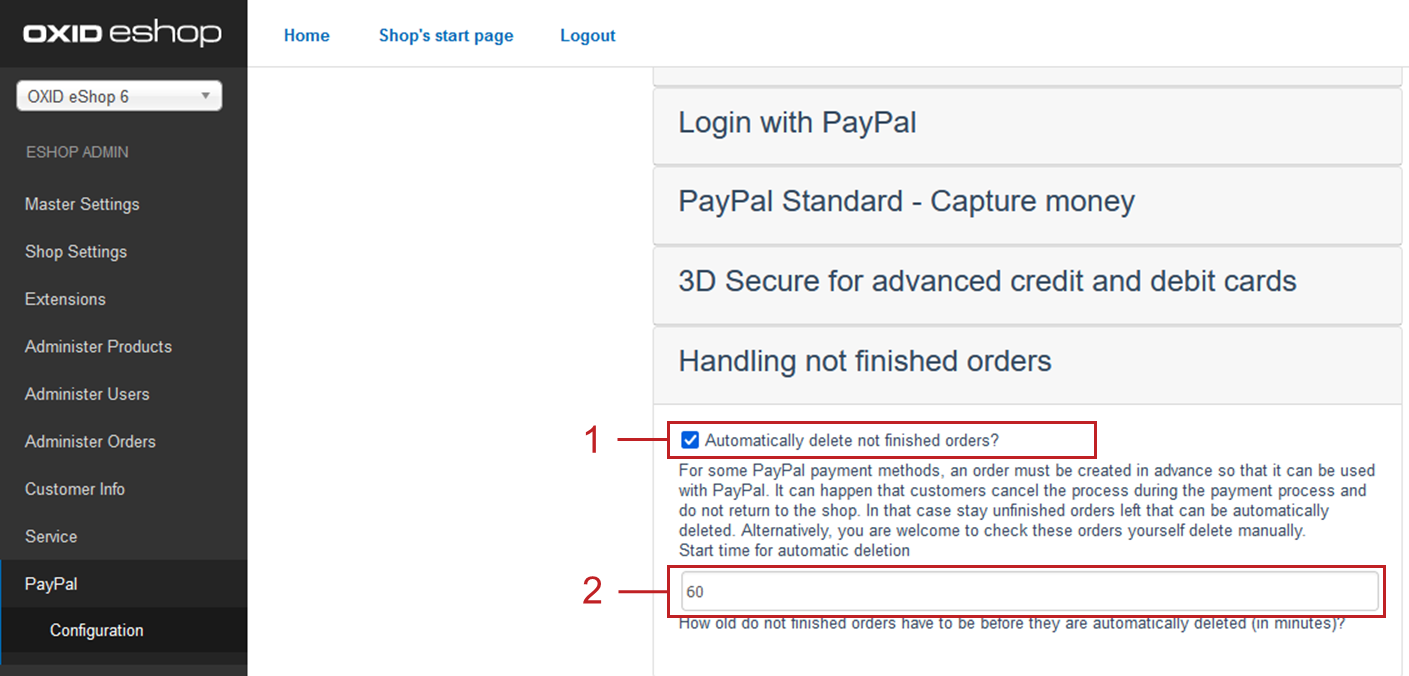
Specify whether to delete incomplete orders automatically or manually.
Background
For technical reasons, PayPal creates orders even if the orders are not completed at the end.
This is the case when the customer chooses the Payment order button in the checkout, but then does not log in to PayPal and complete the payment process.
The automatic deletion is recommended, for example, if you sell low-priced bulk items.
It would be inconvenient for you to manually delete numerous incomplete orders one by one.
manual deletion may be useful, for example, if you sell high-priced goods with small sales volumes.
If customers bounce during the order process, manual deletion allows you to determine if there may be difficulties with certain PayPal payment methods.
Fig.: Configuring automatic deletion of incomplete orders
Banner settings: Re-using your PayPal banner settings
Optional: If you already use the PayPal module, conveniently re-use your banner settings for PayPal Checkout.
Alternatively, set the banner settings manually as described below under Banner settings.
Prerequisites
PayPal is activated.
Procedure
To apply the existing PayPal banner advertising settings, choose the Apply settings from the classic PayPal module button.
The button appears only if the PayPal module is still activated.
If you want to take advantage of advertising PayPal installments, specify where you want the banners to appear, for example, on the home page, on the detail page of items, on category pages, in search results, and/or in the checkout process.
Fig.: Example: installment banner on a category page
Attention
Privacy
To let the banners appear, a permanent communication with the PayPal servers is necessary.
For this purpose, scripts are started with every page view, which observe user behavior and collect the information necessary for the PayPal payment process and transmit it to PayPal.
This communication may be undesirable, for example for reasons of
data protection
performance
In this case, make sure that the feature is disabled.
By default, the feature is turned on.
Procedure
To disable running scripts for PayPal banner ads, uncheck the Enable installment banners checkbox.
If you do not check the box, the scripts will not be executed.
If you allow running scripts for PayPal banner ads, specify on which pages the banner should appear.
To do this, choose the appropriate checkbox.
If you use a custom theme or a customized OXID theme, do the following:
Identify the CSS selector of the page behind which you want to place the banner.
Enter the CSS selector in appropriate input field.
Set the desired color of the banner under Select installment banner’s color.
Save your settings.
Optional: Configuring the country mapping of PayPal Checkout payment methods
Make sure that certain PayPal Checkout payment methods are only available in the countries you choose.
Background
With the initial installation, the PayPal Checkout payment methods are automatically assigned to the corresponding countries.
Most PayPal Checkout payment methods cover multiple countries. For example, the Credit Card payment method is available to customers worldwide, and the Pay Later payment method is available to your customers in countries in Europe, the USA, and Australia, for example.
The basic rule here is: A customer’s billing address, not the shipping address, determines whether a PayPal Checkout payment method is available for the customer.
Example: Only customers with a billing address in Poland will be offered the Przelewy24 payment method.
Procedure
To restrict the accessibility of a PayPal Checkout payment method to specific countries if needed, choose Shop Settings ‣ Payment Methods ‣ <payment method> ‣ Country ‣ Assign Countries.
Configure PayPal Checkout according to your needs and test the result.
Procedure
Under Master Settings ‣ Countries, make sure that the markets you want to cover are active.
Under Shop Settings ‣ Payment Methods, do the following:
Assign at least one user group to each of the desired PayPal Checkout payment methods (for example iDEAL (via PayPal).
On corresponding Master tab, make sure that you have set the desired minimum and maximum purchase value for the PayPal Checkout payment methods.
Example: The maximum purchase value for PayPal payment type is limited to €10,000 by default. The minimum purchase value is €10.
Under Shop Settings ‣ Shipping Methods, do the following:
Assign the desired PayPal Checkout payment methods to the respective shipping methods.
Make sure that at least one shipping method is created for payment with the PayPal payment method.
Typically, this is the default payment method.
For more information, see Payment methods of the OXID eShop user documentation.
If required, change the purchase value (€) in 0 to 99999.