Configuration
Make the module Stripe Payment for OXID operational for your OXID eShop.
General procedure
Make sure the module is activated.
Enable communication with Stripe:
Connect your OXID eShop to Stripe via OAuth (see Set up basic configuration).
Create a webhook in the module configuration form by clicking Create webhooks so that Stripe can send status notifications to your OXID eShop (see Create webhook).
Configure the payment methods provided by Stripe as payment types in your eShop:
Activate the countries you want to cover.
Assign the payment types to your shipping methods and shipping cost rules.
Run test payments and adjust the configuration until all payment processes work as desired.
To operate Stripe Payment for OXID in live mode, repeat the process accordingly.
Activate Stripe Payment
Make sure that Stripe Payment for OXID is activated in every subshop where you want to use the module.
Procedure
Go to .
Select the module OXID Payment Base.
If the module is not yet activated, choose .
Select the module Stripe Payment.
If the module is not yet activated, choose .
Important
Activate OXID Payment Base before Stripe Payment. Stripe Payment depends on it and cannot be activated otherwise (see Module cannot be activated).
Make sure that you have run the database migrations (see installation, step “Run the database migrations”).
Configure Stripe Payment
Start the configuration.
Prerequisites
You have activated Stripe Payment.
Procedure
Go to .
Note
Clear cache if needed
If the configuration settings are not displayed correctly, clear the cache.
For more information, see Installation at step Clear cache.
Set up basic configuration
Connect Stripe Payment with Stripe.
Prerequisites
You have contacted Stripe and have access to your Stripe Dashboard at dashboard.stripe.com/dashboard.
Your test environment has SSL.
Procedure
Sign in to the Stripe Dashboard (at dashboard.stripe.com/dashboard).
In the OXID eShop admin area, go to .
Under Basic Configuration, in the field Live or Test API, select the mode Test.
Next to the field Test API Key, click the button Connect with .
You will be prompted to select or create the Stripe account you want to connect with your OXID eShop (Fig.: Select Stripe account).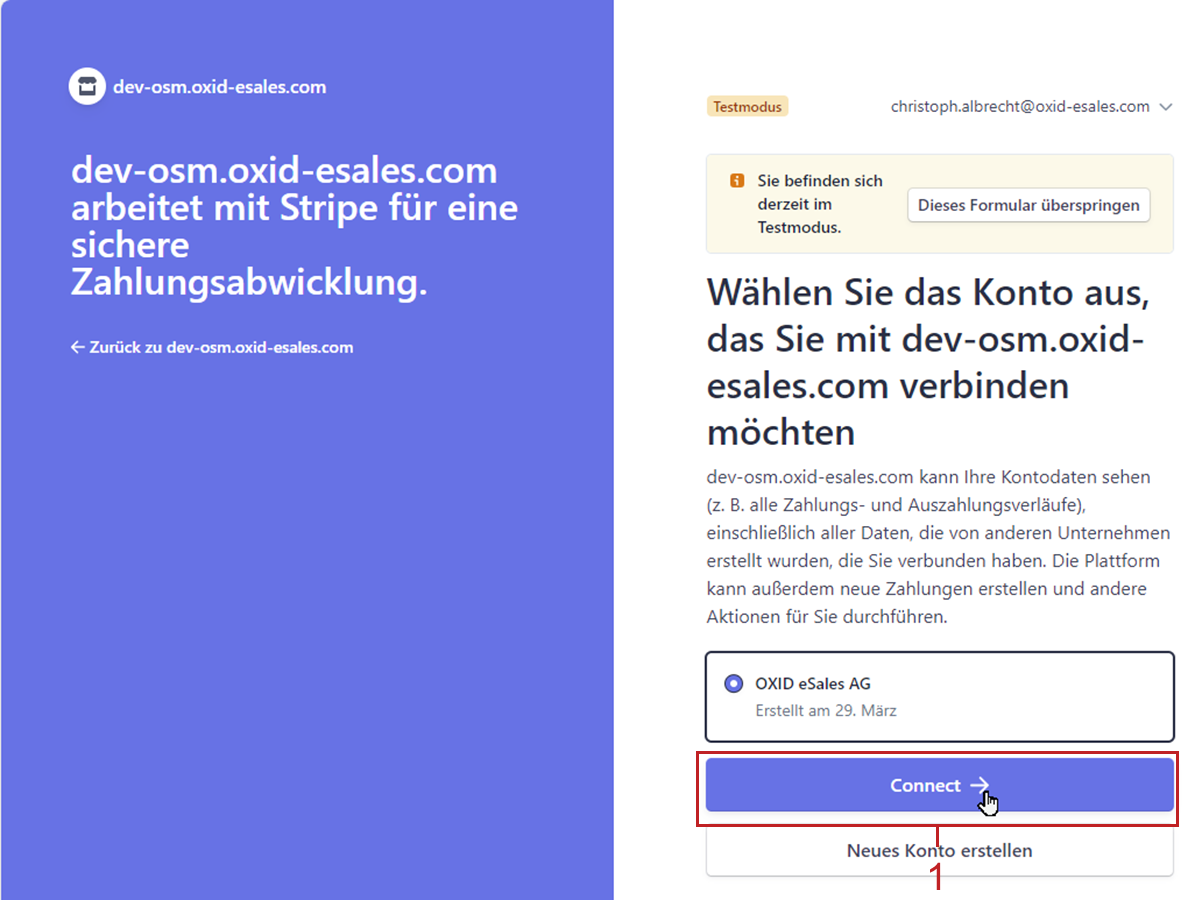
Fig.: Select Stripe account
Select the desired account and confirm with Connect (Fig.: Select Stripe account, Pos. 1).
The system confirms the onboarding (Fig.: Onboarding confirmed).
Fig.: Onboarding confirmed
Click the button Go to Admin Area (Fig.: Onboarding confirmed, Pos. 1).
Go to .
Under Basic Configuration, the fields Test API Key and Test API Publishable Key are automatically populated. Next to the field Test API Key, Connection successful is displayed (Fig.: Basic configuration after successful connection).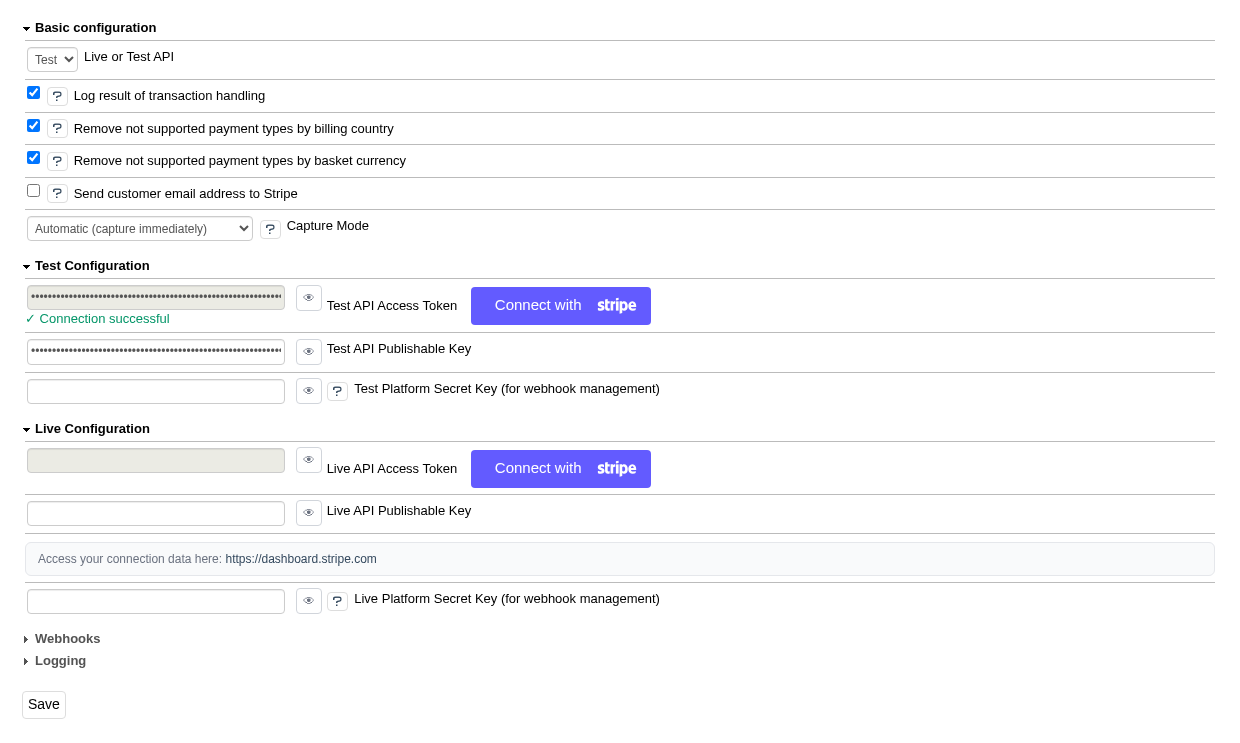
Fig.: Basic configuration after successful connection
Save your settings.
Note
API key conflict
If the test and live keys originate from different Stripe accounts, the system displays a warning. In this case, correct the affected Publishable Key fields manually or re-establish the connection.
Configure additional basic settings
Configure the additional settings under Basic Configuration.
Procedure
Under Capture Mode, select how payments should be processed:
Automatic (capture immediately): The amount is captured immediately when the customer completes the checkout.
Manual (authorize only, capture later): The payment is only authorized. You must capture the payment manually within 7 days on the order detail page in the Payment tab.
Optional: Enable the checkbox Send customer email address to Stripe if Stripe should send notifications to the customer’s email address (instead of the Stripe account email address).
Save your settings.
Note
Removed settings
The following settings no longer exist:
Remove payment methods not supported for billing country and Remove payment methods not supported for currency: Which payment methods your customers see in the Stripe payment form is decided by Stripe, based on the payment methods activated in your Stripe Dashboard.
Log result of transaction handling: Control logging through the Logging group (see Configure logging).
Choose the checkout presentation
Decide whether your customers are redirected to a Stripe-hosted page to pay, or fill in the payment form directly in your eShop.
Background
Stripe Payment supports two presentation modes:
Redirect (default): The customer selects the payment button and is redirected to the Stripe-hosted checkout page. After completing the payment, they return to your eShop.
Embedded (iframe): The payment form (Stripe Embedded Checkout) is displayed directly on the order page of your eShop. The customer never leaves your shop.
The corresponding setting is not part of the Stripe Payment module but of the OXID Payment Base module. It therefore applies across providers: every payment module that supports the embedded presentation follows this switch.
The embedded presentation affects both the standard order page and the OnePage Checkout.
Prerequisites
The module OXID Payment Base is installed and activated. It is installed as a dependency of Stripe Payment.
Procedure
Go to .
Under Iframe checkout, enable the checkbox Use iframe instead of checkout button.
Save your settings.
Result
On the order page, the Stripe payment form is embedded directly instead of showing a button that redirects the customer.
The embedded form carries its own pay button. Stripe Payment therefore does not additionally render one of its own – your customers see exactly one button to pay with.
If the basket changes while the form is open
An embedded payment form quotes the basket it was built from. If the customer changes the basket in another browser tab, or a voucher expires while the form sits open, the amount shown in the form no longer matches the order.
In that situation the form is covered with a notice and a Refresh payment form button. The customer cannot pay the outdated amount; selecting the button rebuilds the form for the current basket.
Note
The cover sits above the payment form, not behind it. This is deliberate: a payment form is an embedded frame that would otherwise still accept input through a purely visual dimming.
Note
Run test payments after switching (see Run test payments). The embedded presentation requires that your theme does not override the order page so heavily that the embedding point is lost.
Skip checkout steps that offer no choice
Shorten the checkout when Stripe Payment is the only payment method your shop offers.
Background
If a customer has exactly one payment method to pick from, the payment step shows a single pre-selected option and asks them to confirm it. The same applies to the shipping method when only one delivery set is available.
The OXID Payment Base module can assign such a single option automatically and leave the step out. Like the presentation switch, the settings are provider-independent: they apply to every payment module in your shop, not only to Stripe Payment.
Both settings are enabled by default. They can only take effect when there is exactly one option, so nothing is taken away from the customer.
Procedure
Go to .
Under Checkout flow, set the two checkboxes as required:
Skip the payment step when only one payment method is available
Skip the shipping-method selection when only one delivery set is available
The two are independent – you can keep one shortcut and switch off the other.
Save your settings.
Result
Where only one option exists, it is assigned automatically. The corresponding block is also left off the order page, where it would otherwise show a single, already selected entry.
Disable a setting to keep the confirmation step even when there is nothing to choose.
Configure logging
Define how much detail Stripe Payment writes to its logs.
Background
The module writes file-based logs to the directory <root directory of your OXID eShop>/log/stripe/. File names carry a daily timestamp, for example stripe_requests_2026-08-13.log.
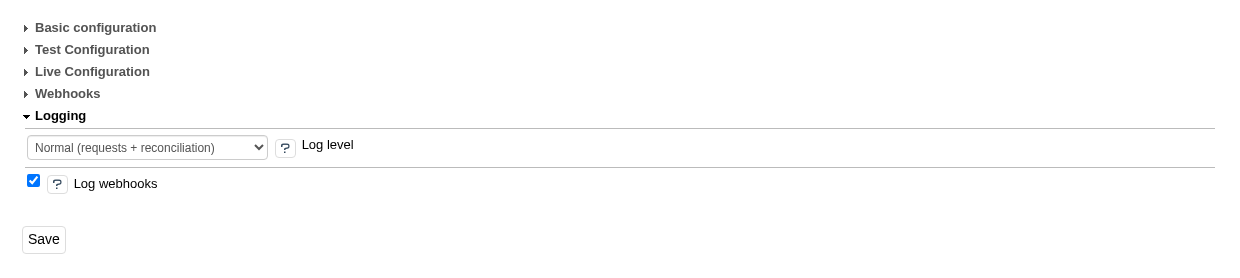
Fig.: Log level and webhook logging
Procedure
Go to .
Under Logging, select the desired scope in the Log level field:
Level
Description
Off (no logging)
No log files are written.
Errors only
Logs exception details only.
Normal (requests + reconciliation)
Logs full request/response cycles and the results of order reconciliation. Default.
Debug (all channels + frontend console)
Additionally logs internal event processing and writes diagnostic messages to the browser console.
Use the checkbox Log webhooks to define whether incoming webhook events are recorded. Default: enabled.
Save your settings.
Result
Depending on the selected level, Stripe Payment writes the following log files:
stripe_requests_YYYY-MM-DD.log– API requests and responsesstripe_webhooks_YYYY-MM-DD.log– incoming webhook calls from Stripestripe_events_YYYY-MM-DD.log– internal event processingstripe_reconciliation_YYYY-MM-DD.log– results of order reconciliation
Note
The Log webhooks setting is independent of the log level. This lets you silence chatty webhook traffic without losing request and reconciliation logs.
The idempotency record for a webhook is always written, regardless of this setting.
Note
Data minimization in live operation
Do not select a higher level than necessary in live operation. The Debug level is intended for time-limited troubleshooting (see Raise the log level for troubleshooting).
Reconcile orders with Stripe
Reconcile the payment status of your orders with Stripe to identify orders that appear as unpaid due to failed or delayed webhooks.
Background
In rare cases, an order in the OXID eShop may appear as unpaid even though the customer has successfully paid via Stripe. The typical cause is failed or delayed webhooks.
For this reconciliation, Stripe Payment provides the console command stripe:reconcile-oxpaid.
Procedure
Set up a cron job on your server that runs the console command regularly, e.g. daily:
# Reconcile orders from the last 7 days (default)
vendor/bin/oe-console stripe:reconcile-oxpaid

# Reconcile orders from the last 14 days
vendor/bin/oe-console stripe:reconcile-oxpaid --max-age=14

# Dry run without changes (preview)
vendor/bin/oe-console stripe:reconcile-oxpaid --dry-run
Result
The command checks all orders within the specified time period that are marked as unpaid in the OXID eShop, and reconciles them with the payment status at Stripe. Successfully paid orders are automatically marked as paid.
The result is logged in the log file log/stripe/stripe_reconciliation_YYYY-MM-DD.log.
Clean up abandoned checkouts
Set up a scheduled cleanup for the orders that customers leave behind when they abandon a payment.
Background
Stripe Payment creates the order before the customer is sent to Stripe, so that an order number already exists when they come back. A customer who closes the Stripe page and never returns leaves that order behind: it stays at the status NOT_FINISHED, and the vouchers it used remain spent.
Two mechanisms clear such orders on their own:
when the same customer starts a new checkout, their previous attempt is cancelled;
after every webhook that Stripe delivers, checkouts that have been in flight for longer than the configured timeout are cancelled as well.
Neither of them helps a shop that receives no webhooks and sees no returning customer. For that case, the OXID Payment Base module provides a console command.
Prerequisites
The module OXID Payment Base is installed and activated. It is installed as a dependency of Stripe Payment.
Procedure
Go to .
Under Cleanup, check the two values:
Setting
Default
Meaning
Cleanup period (days)
7
How old an unfinished order has to be before the console command collects it.
Stale checkout timeout (minutes)
30
How long a checkout may be in flight before the webhook-driven sweep cancels it.
Note
Raise the stale checkout timeout if you offer payment methods where customers legitimately take longer than half an hour, such as bank transfer.
Set up a cron job that runs the cleanup command daily:
# Collect unfinished orders older than the configured period
vendor/bin/oe-console oe:payments:not_finished:cleanup

# Preview without changing anything
vendor/bin/oe-console oe:payments:not_finished:cleanup --dry-run

# A wider period, bounded to 500 orders per run
vendor/bin/oe-console oe:payments:not_finished:cleanup --days=30 --limit=500
Result
For every collected order, the command sets the status to CANCELLED, marks it as cancelled, releases the vouchers it was holding and cancels the associated payment contract. The order row itself is kept, so your order numbers stay free of gaps.
Warning
Stock is not restored by the cleanup. If your shop reserves stock at order creation, plan for this separately.
Note
Before the first scheduled run on an existing shop, run the command with –dry-run to see how many orders have accumulated, and bound the first runs with –limit.
Further reading: OXID Payment Base Documentation.
Prune idempotency records
Remove the expired safety records that protect captures and refunds against duplication.
Background
Every capture and refund is protected against accidental duplication by an idempotency record with a limited lifetime. Once expired, these records serve no purpose.
The OXID Payment Base module removes expired records by itself: every time a new record is created, it deletes up to 500 expired ones. You do not need a cron job for this. You can remove an existing cron job for stripe:prune-idempotency.
Procedure
If you nevertheless want to delete expired records all at once, for example a large backlog, run the console command:
vendor/bin/oe-console stripe:prune-idempotency
Result
Expired records are deleted and the command reports how many. Captures and refunds remain protected: only records whose lifetime has already passed are removed.
Create webhook
Create a webhook. This allows Stripe to contact your OXID eShop and deliver real-time status notifications, for example about completed transactions.
Background
The OAuth connection alone does not yet register a webhook with Stripe. Instead, you explicitly create the webhook via a button in the module configuration. Incoming webhook events are then processed by the provider-agnostic webhook pipeline of the OXID Payment Base module (see OXID Payment Base Documentation).
Prerequisites
You have completed the basic configuration (see Set up basic configuration).
Otherwise, the error message Paste your Stripe secret key (sStripeTestToken / sStripeLiveToken) in Module Configuration first. is displayed.
Procedure
Select .
Under Webhooks, choose the Create webhooks button.
Save your entries.
The module creates the webhook endpoint with the key of your own Stripe account. You do not need a platform secret key for this – leave the fields Test Platform Secret Key (for webhook management) and Live Platform Secret Key (for webhook management) empty.
Note
Special case: your Stripe account is a connected account
If your Stripe account is a connected account of a Stripe Connect platform, Stripe does not allow a webhook to be created with your account’s key.
If you own the platform: Before choosing Create webhooks, enter the platform’s Standard secret key (sk_test_… in test mode, sk_live_… in live mode) under Test Configuration or Live Configuration into the field Test Platform Secret Key (for webhook management) or Live Platform Secret Key (for webhook management), and save. The module checks whether the platform actually controls your account, and then creates the webhook on the platform.
If you do not own the platform: Leave the fields empty. The module then reports the URL and the events with which the webhook endpoint must be created in your account’s Stripe Dashboard.
Result
The Webhook Endpoint is filled in automatically, and the status Configured is displayed next to it. The module stores the associated secret by itself; it does not appear in the form.
Note
Reset and recreate the webhook
If the webhook is misconfigured, click Clear all webhooks under Webhooks, then click Create webhooks again.
If no status notifications arrive from Stripe even though the webhook is configured, see Fix webhook problems for how to proceed.
Run test payments
To verify the connection, run test payments.
Test the payment types provided by Stripe Payment.
Procedure
Under , activate the desired Stripe payment types.
Verify the assignment of payment types to shipping methods and shipping cost rules.
Place an order using, for example, Stripe Credit Card as the payment type and complete the test payment (Fig.: Complete test payment with credit card).
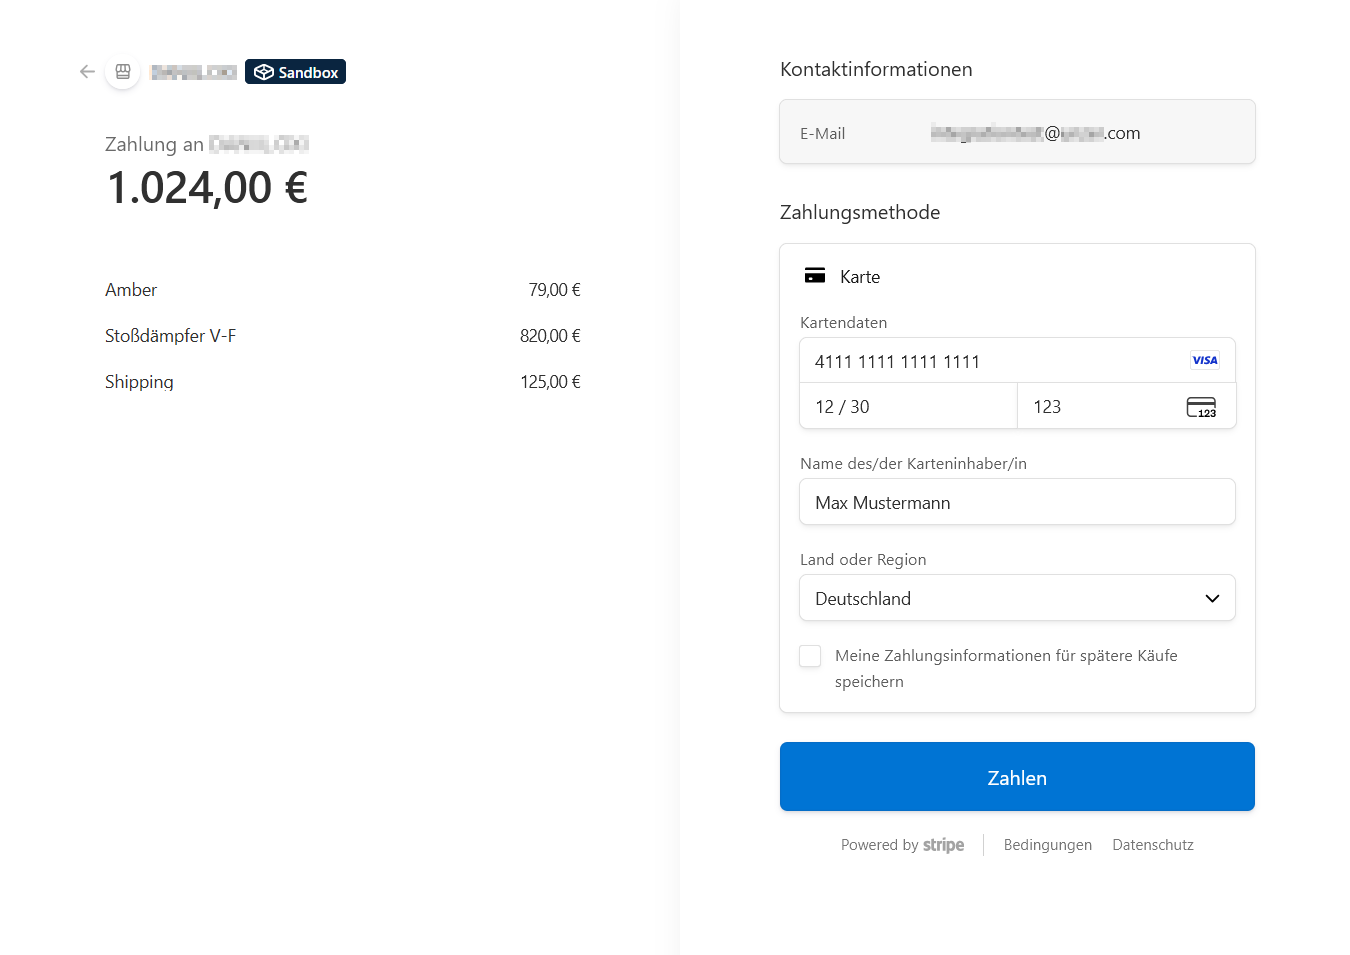
Fig.: Complete test payment with credit card
To verify the order, go to and view the payment details on the Payment tab (Fig.: Check payment details of the test order).
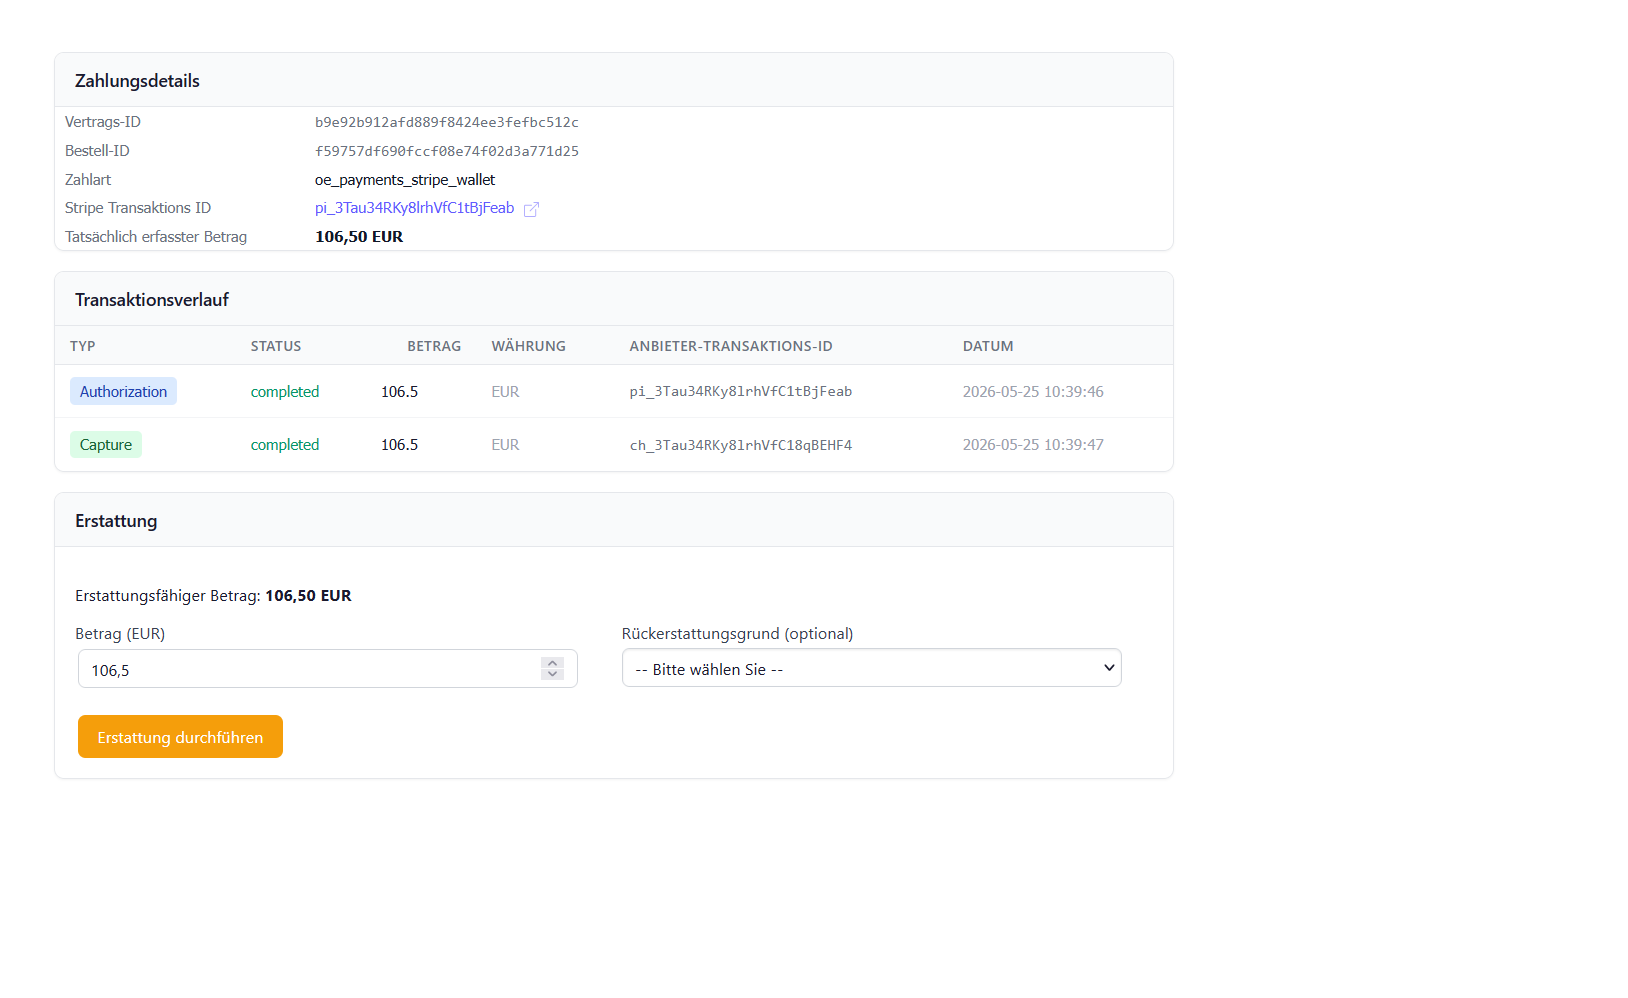
Fig.: Check payment details of the test order
Verify the test orders in the Stripe Dashboard under Payments (dashboard.stripe.com/test/payments, Fig.: Verify test order in Stripe Dashboard).
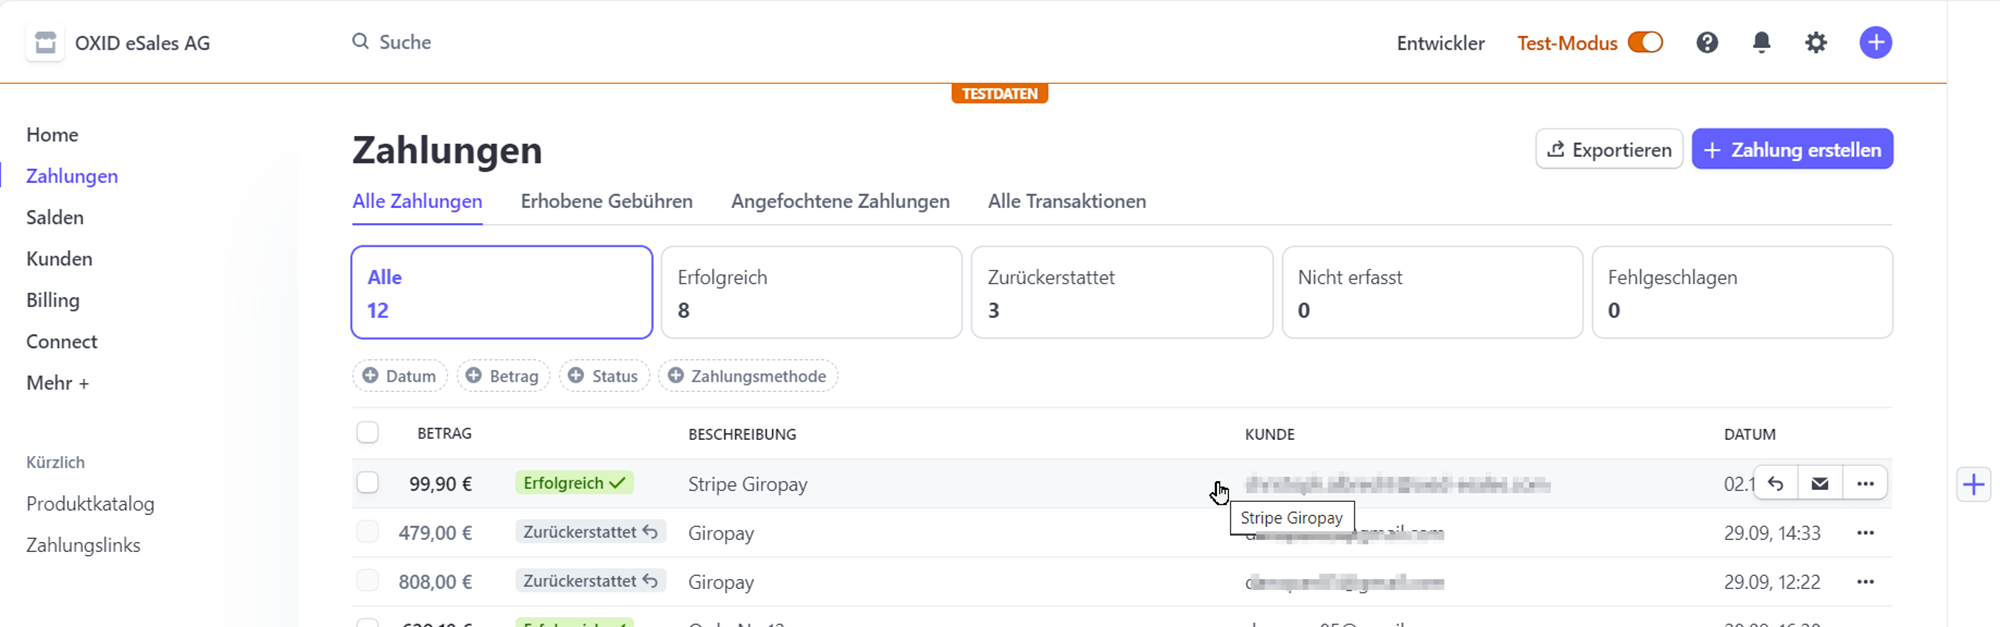
Fig.: Verify test order in Stripe Dashboard
Recommended: Check the transaction logs at
<root directory of your OXID eShop>/log/stripe/, e.g.stripe_requests_YYYY-MM-DD.log.Optional: Reduce the recording of transaction logs if you consider this necessary, for example for security or data minimization reasons.
To do this, set the Log level under Logging to Errors only or Off (no logging) (see Configure logging).
Configure country assignment for Stripe payment methods
Ensure that certain Stripe Payment for OXID payment methods are only available in the countries you want.
Background
Most Stripe payment methods cover multiple countries. The payment method Credit Card, for example, is available to customers worldwide, while the payment method iDeal is available to your customers in the Netherlands, for example.
Which Stripe payment methods are available in which countries depends on your Stripe configuration. For more information, see your Stripe Dashboard and the Stripe Guide to payment methods.
The basic rule is: The billing address, not the shipping address of a customer, determines whether a Stripe payment method is available to the customer.
Example: Only customers with a billing address in Poland are offered the payment method Stripe Przelewy24.
Procedure
To restrict the availability of a Stripe payment method to certain countries, go to .