Configuration
Make the Stripe Payment for OXID module operational for your OXID eShop.
Basic procedure
Make sure that the module is activated.
Enable communication with Stripe:
To connect your OXID eShop with Stripe, generate keys.
Optional: Map the order statuses used by Stripe to your order management folders.
Create cronjobs to, for example, submit shipping status to Stripe or complete unfinished orders.
To allow Stripe to send status messages to your OXID eShop, create a webhook.
Configure the payment methods provided by Stripe as payment methods in your eShop:
Enable the countries you want to cover.
Link the payment methods to your shipping methods and shipping rules.
Make test payments and adjust the configuration until all payment processes work as you want.
To run Stripe Payment for OXID in live mode, repeat the process analogously.
Activating Stripe for OXID
Make sure Stripe Payment for OXID is activated in each subshop where you want to use the module.
Procedure
Choose .
Choose the Stripe Payment module.
If the module is not yet activated, choose .
Configuring Stripe Payment
Start the configuration.
Prerequisites
You have activated Stripe Payment.
Procedure
Choose .
Note
Clear the cache if necessary
If the configuration settings are not displayed correctly, clear the cache.
For more information, under Installation see the Clear cache step.
Setting up the basic configuration
Connect Stripe Payment to Stripe.
Prerequisites
You have contacted Stripe and have access to your Stripe Dashboard at dashboard.stripe.com/dashboard.
Your test environment has SSL.
Procedure
Log in to the Stripe Dashboard (at dashboard.stripe.com/dashboard).
In the OXID eShop admin area, choose .
Under Basic Configuration, choose Connect with stripe.
You are prompted to choose or create the account you want to connect your OXID eShop to (Fig.: Choosing a Stripe account).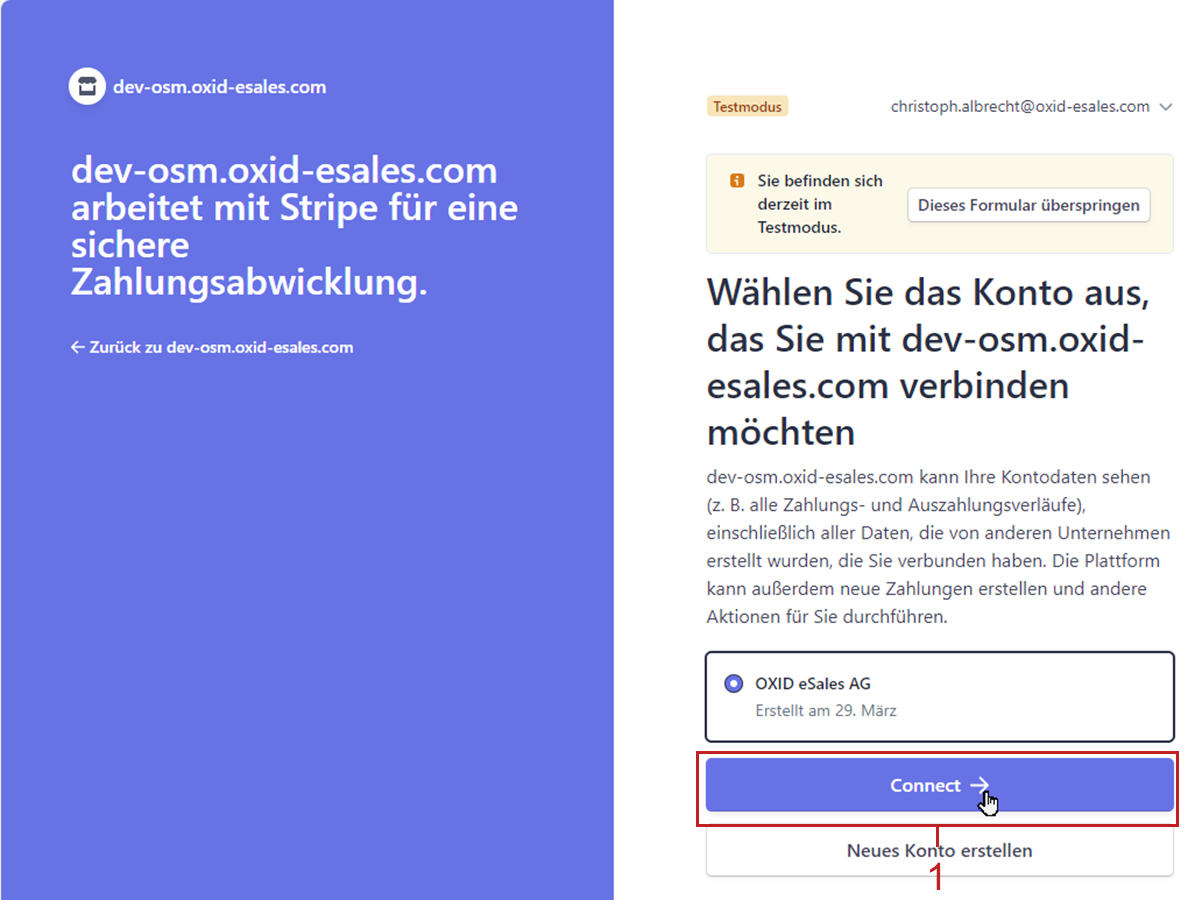
Fig.: Choosing a Stripe account
Choose Connect (Fig.: Choosing a Stripe account, item 1).
The system confirms the onboarding (Fig.: Onboarding confirmed).
Fig.: Onboarding confirmed
Choose the Zum Admin-Bereich button (Fig.: Onboarding confirmed, item 1).
Choose .
Under Basic Configuration you see that the connection is established (Fig.: Verifying the connection and entering the private API key, item 1).Enter your private API key.
In the Stripe dashboard, choose .
Choose the Geheimschlüssel erstellen button.
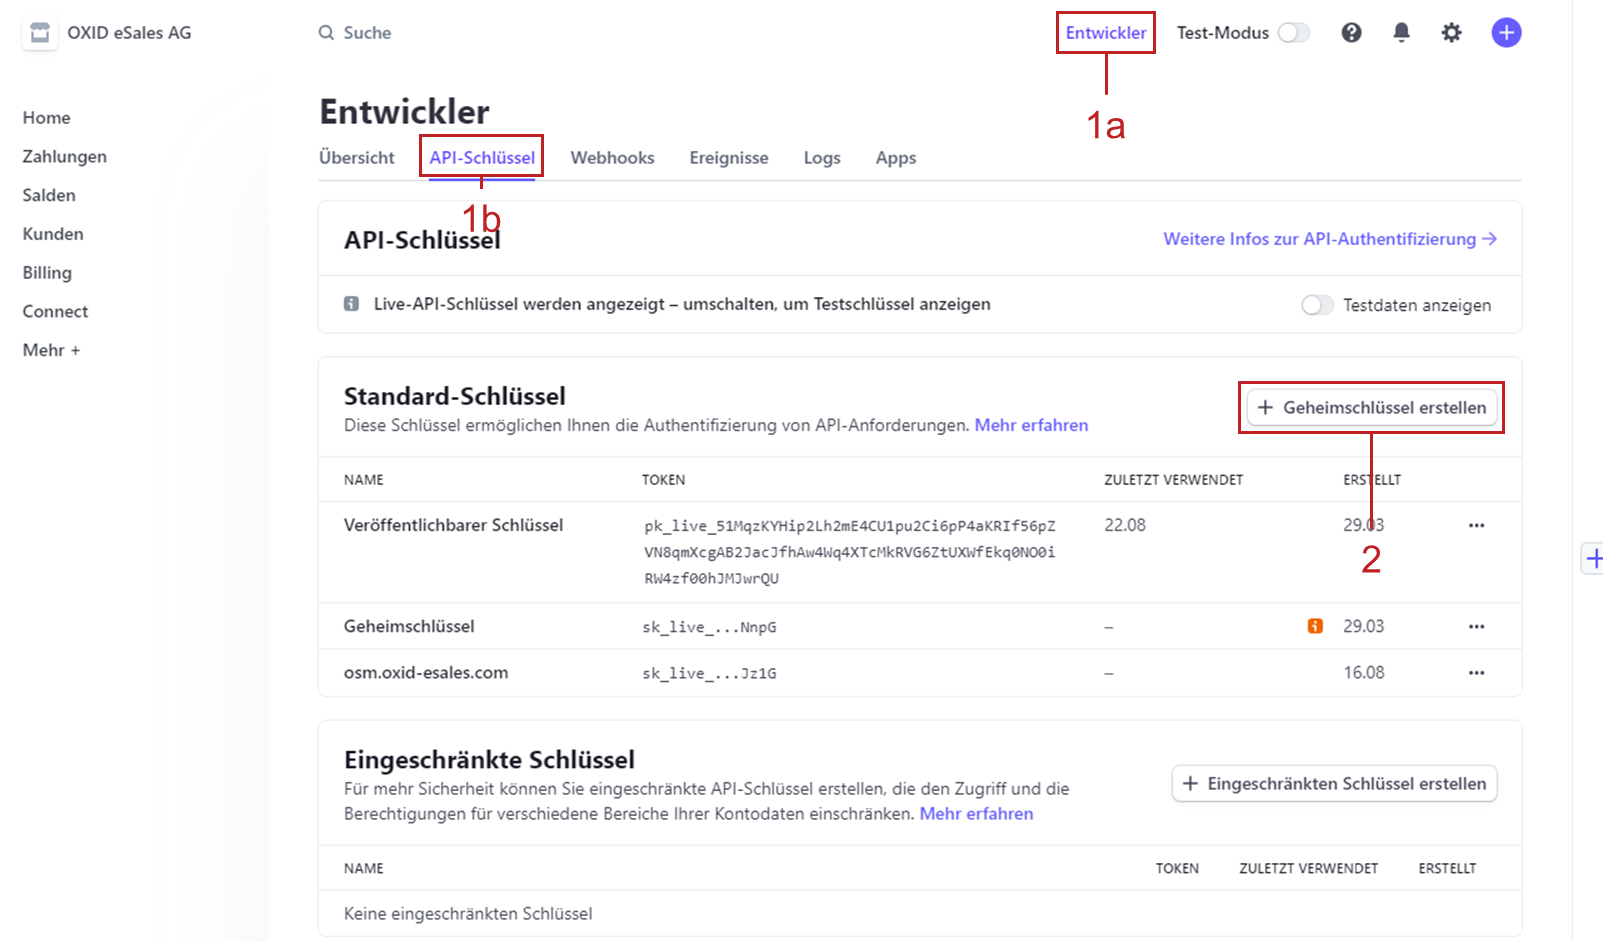
Fig.: Creating a private API key
The private API key is displayed (Fig.: Copying the private API key).
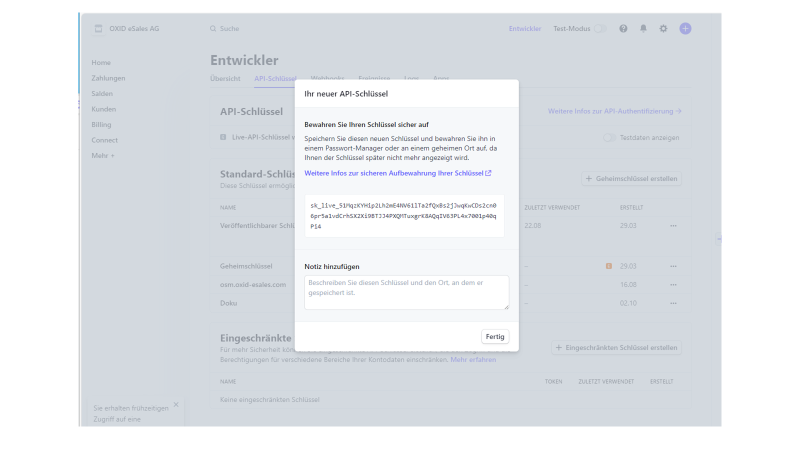
Fig.: Copying the private API key
Follow the instructions to save your private API key and go back to the administrator area of your OXID eShop.
In the Test API Private Key input field (Fig.: Verifying the connection and entering the private API key, item 2), enter your private API key.
Save your settings (Fig.: Verifying the connection and entering the private API key, item 3).
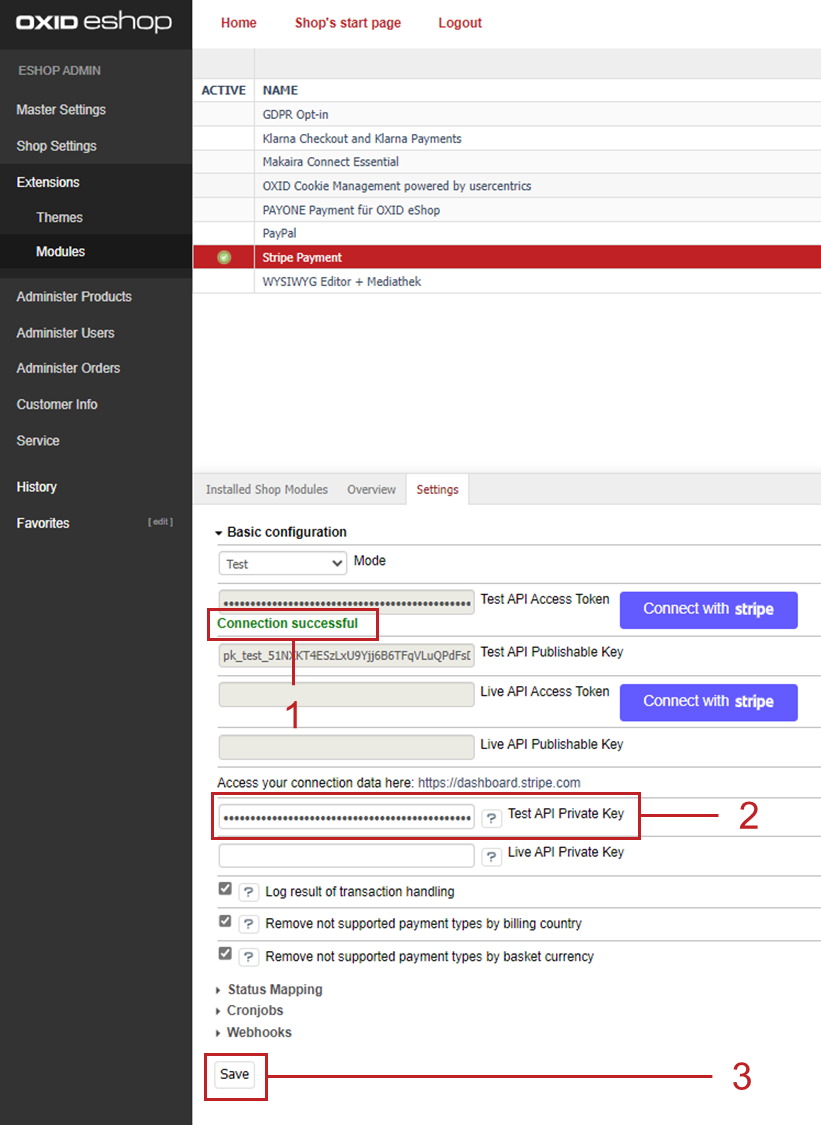
Fig.: Verifying the connection and entering the private API key
Mapping transaction statuses
Map the Stripe payment transaction statuses to the folders in your order administration that you have configured under .
Procedure
Optional: Assign the following order statuses used by Stripe to the folders in your order administration:
Stripe status Pending: Order status before the customer is redirected to the payment gateway.
Stripe status Processing: Order status for completed payments
Stripe status Cancelled: Order status for cancelled orders
Result
Orders processed with Stripe are sorted and classified into the appropriate folders according to their Stripe status (Fig.: Displaying Stripe orders categorized by status.
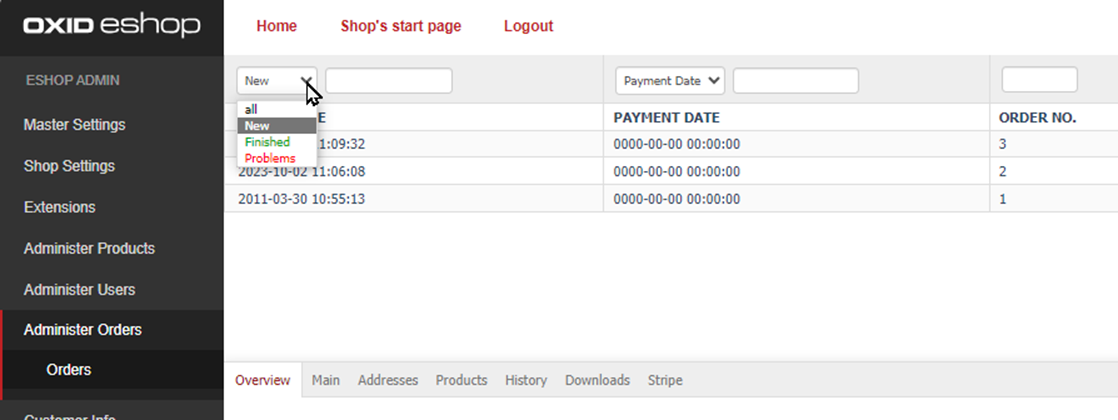
Fig.: Displaying Stripe orders categorized by status
Setting up cronjobs
Set up and enable a cronjob to complete unfinished orders daily, for example.
If you call the cronjob via URL, make sure to add a secureKey GET parameter.
Procedure
Set up a cronjob on your server that points to the file
/source/modules/fc/stripe/Application/Model/Cronjob.phpin the module directory.
Result: The scripts in the/source/modules/fc/stripe/Application/Model/Cronjobdirectory are scheduled to be executed once a day, for example, depending on the cronjob settings.Under Cronjobs, enable the scripts to actually run.
Completion of paid but unfinished order (FinishOrders.php)
Finalize orders where the customer has successfully paid but does not appear to have returned to the store for completion of the order process.
To avoid changing orders that have probably already been processed manually, the cronjob only finalizes orders from the last 24 hours.
Dispatch of payment reminder email (SecondChance.php)
Automatically send payment reminder emails if a payment has not yet been made. Your customer will get back to the payment process and can complete the order.
If required, change the subject line in the
modules/fc/stripe/Application/translations/en/stripe_lang.phpfile.If required, change the cover letter text of the e-mail under in the Stripe Second Chance Email module (Fig.: Customizing the e-mail template for Stripe payment reminders).
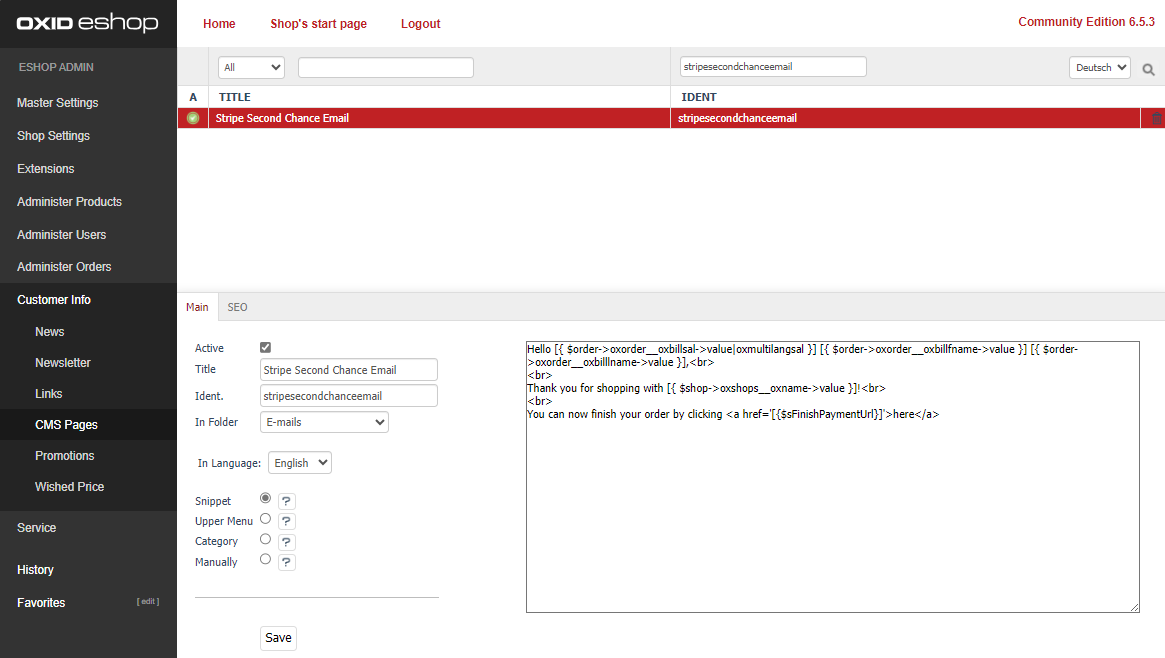
Fig.: Customizing the e-mail template for Stripe payment reminders
The sender -email address used is the e-mail address configured under .
Transmission of shipping status to Stripe (OrderShipment.php)
If you set the shipping status in your store via an external system and not manually via the Ship Now button in the order administration of your OXID eShop under , submit the shipping status automatically via cronjob.
Example: You process the transactions via an ERP system.
If you activate the Dispatch of payment reminder email script, in the Time window after which payment reminder email is sent input field, enter the appropriate value.
If you need to call the cronjob via URL (instead of using the PHP command line), do the following:
Add the secureKey GET parameter to the call to the cronjob.
Example:
https://YOUR-SHOP-URL-HERE/modules/fc/stripe/cron.php?secureKey=YOUR-SECURE-KEYEnter the value of the secureKey parameter into the Cronjob secure key field.
Save your entries.
Creating a webhook
Create a webhook. This allows Stripe to contact your OXID eShop and provide real-time status updates about, for example, completed transactions.
Prerequisites
You have completed the basic configuration (see Setting up the basic configuration).
Otherwise, the error message Your private Stripe key has not been configured yet will appear.
Procedure
Under Webhooks, choose the Create Webhook button.
Result
The system indicates that the webhook endpoint is configured (Fig.: Webhook endpoint configured, item 1).
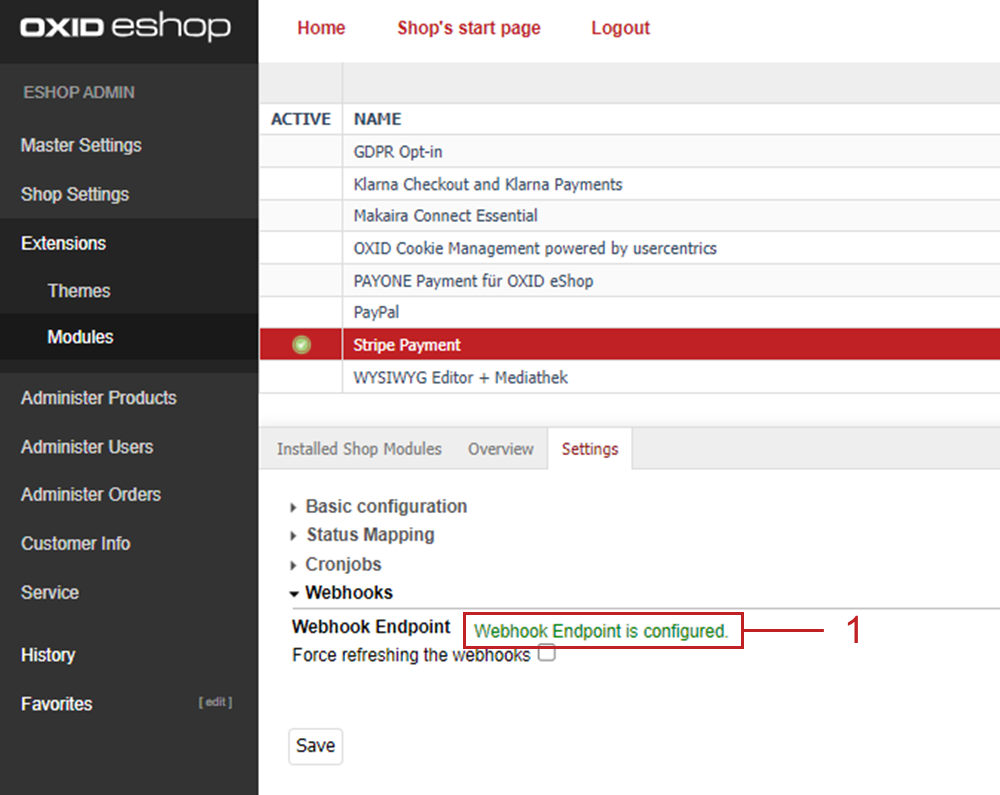
Fig.: Webhook endpoint configured
Making test payments
To verify the connection, perform test payments.
Test the payment types provided with Stripe Payment.
Procedure
Under , activate the desired Stripe payment types.
Verify the mapping of the payment types to the shipping types and shipping rules.
Run an order with, for example, Stripe GiroPay as the payment type and authorize the test payment (Fig.: Authorizing a test payment).
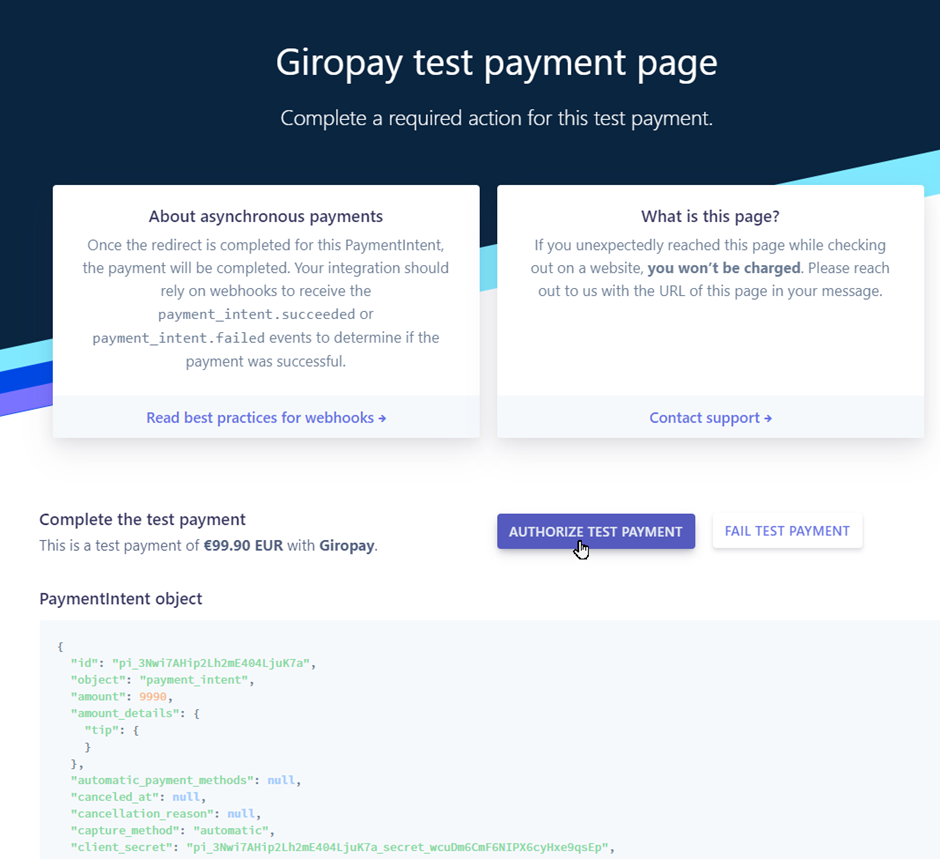
Fig.: Authorizing a test payment
To verify the order, under on the Stripe tab (Fig.: Verifying the test order, item 1), display the payment details.
To check the cronjobs, make an order without completing it.
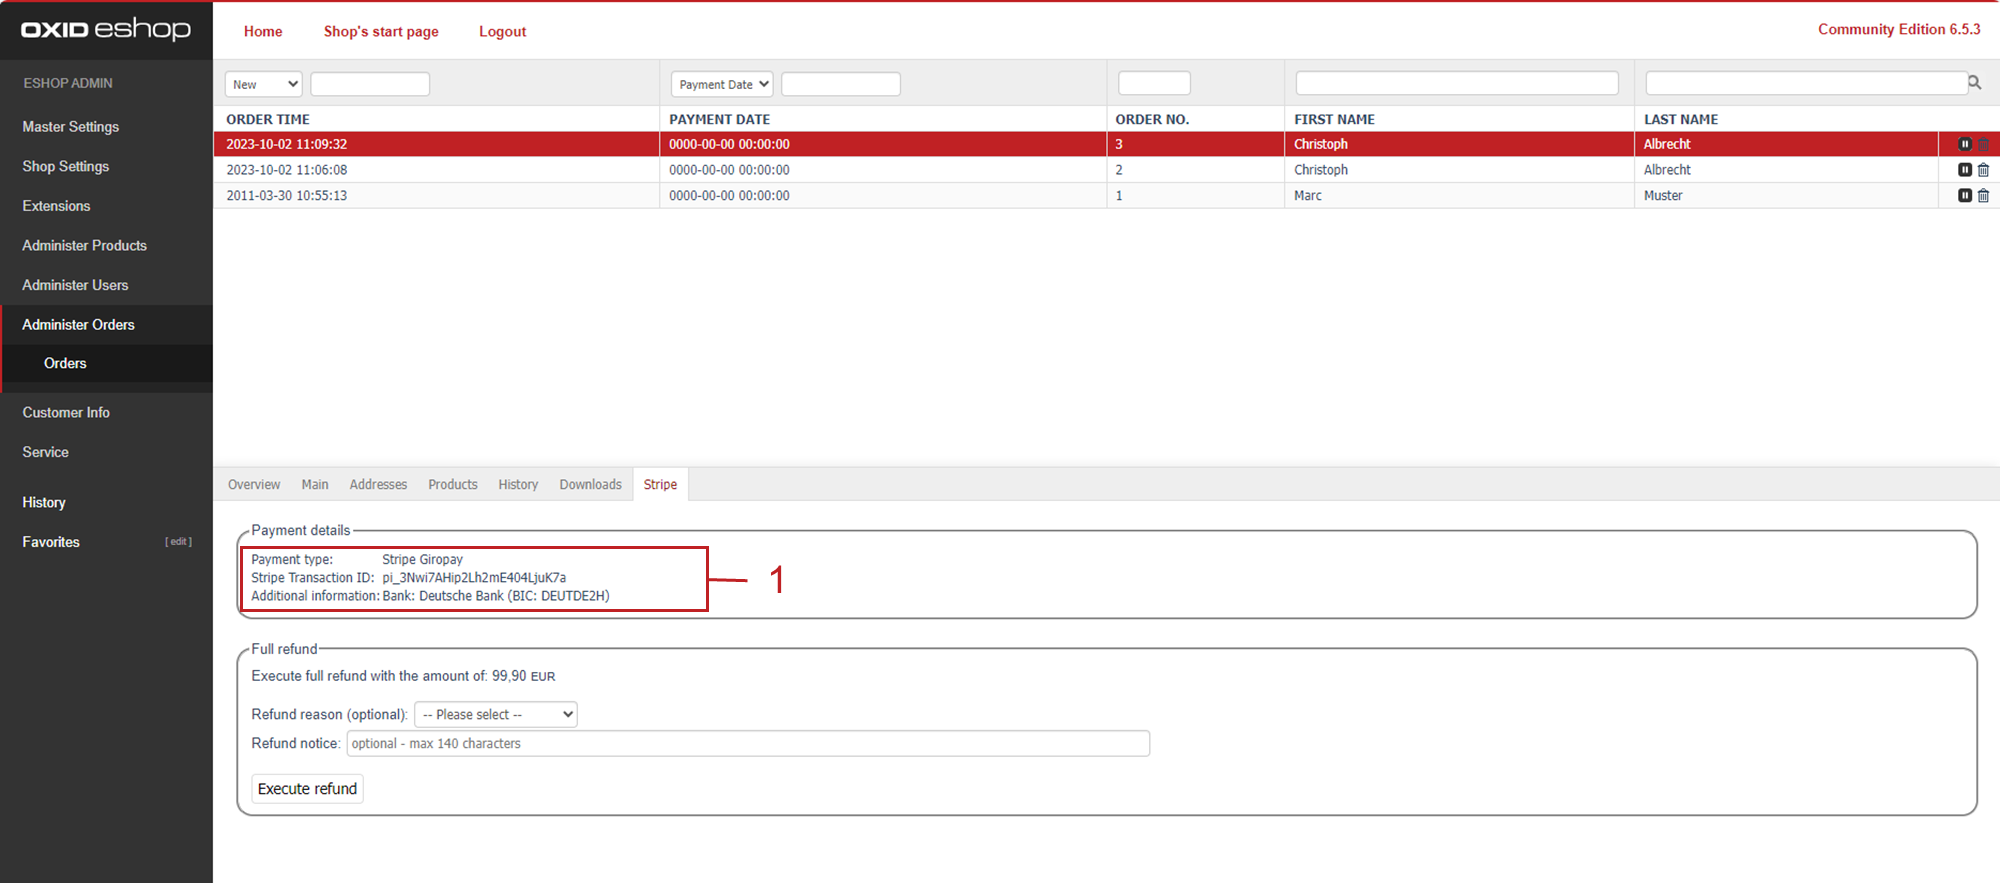
Fig.: Verifying the test order
Verify the test orders in your Stripe dashboard under payments (dashboard.stripe.com/test/payments, Fig.: Verifying test orders in the Stripe dashboard).
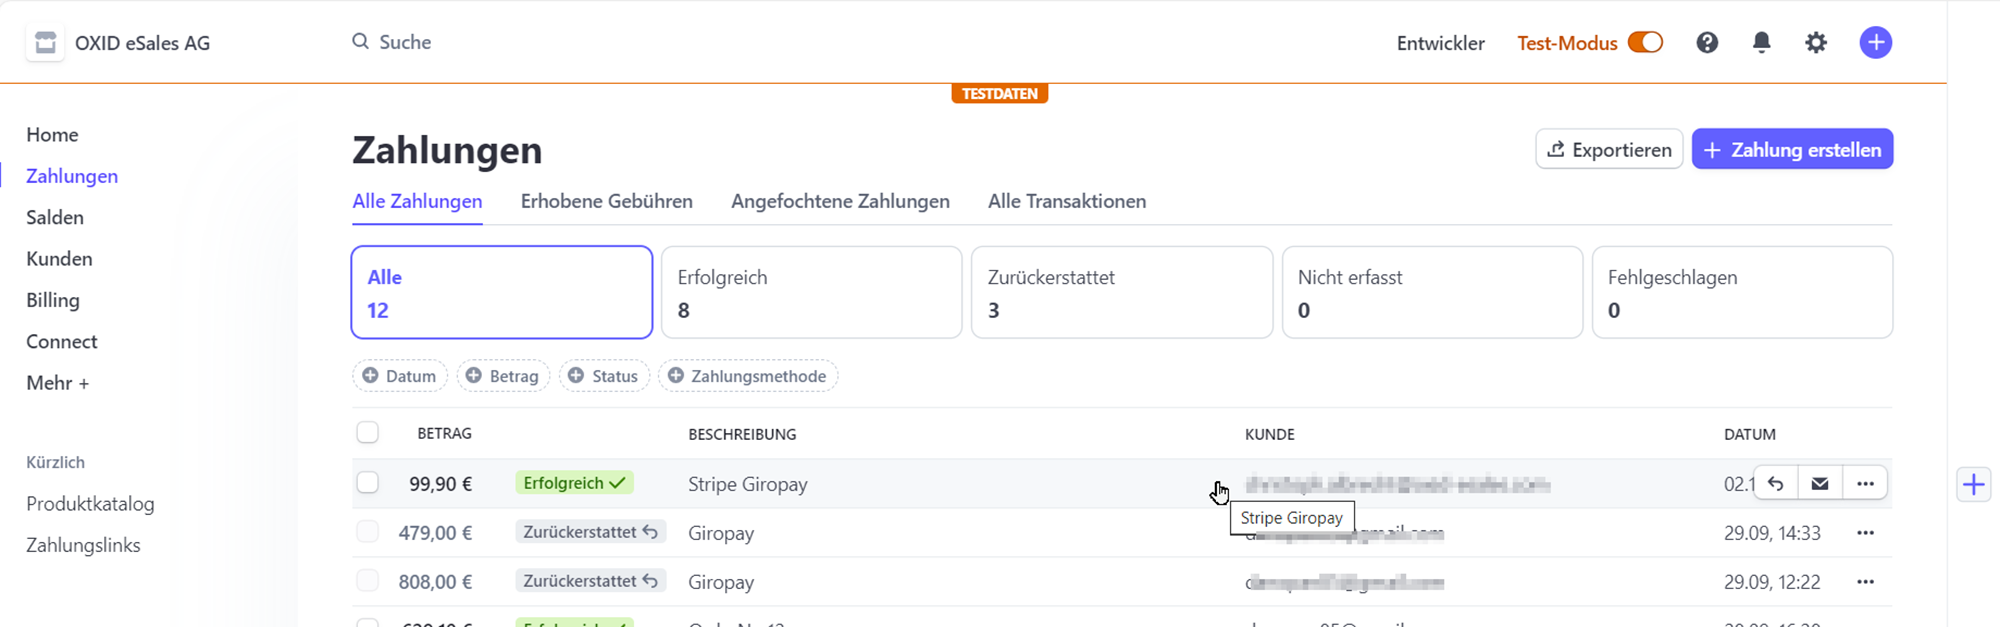
Fig.: Verifying test orders in the Stripe dashboard
Recommended: Check the transaction log under
<root directory of your OXID eShop>/log/StripeTransactions.log.Optional: Check if you have configured your payment methods and currency settings as desired.
To do so, create possible error cases which by default are automatically suppressed:To create these possible error cases, temporarily uncheck the following checkboxes under Basic Configuration:
Remove payment types not supported by billing country.
Remove not supported payment types by basket currency.
Check for errors with test payments and adjust your configuration if necessary.
Recommended: After your tests, make sure the checkboxes are re-enabled.
Optional: Disable the recording of transaction logs if you feel that this is necessary, for example, for security or data-saving reasons.
To do this, uncheck the Log results of transaction processing checkbox.
Configuring the country mapping of Stripe payment methods
Ensure that certain Stripe Payment for OXID payment methods are available only in the countries you want.
Background
Most Stripe payment methods cover multiple countries. For example, the credit card payment method is available to customers worldwide, while the iDeal payment method is available to your customers in the Netherlands, for example.
For more information about the country coverage of each Stripe payment method, see Market coverage by payment method.
As a general rule, it is the billing address and not the shipping address of a customer that determines whether a Stripe payment method is available to the customer.
Example: Only customers with a billing address in Poland will be offered the Stripe Przelewy24 payment method.
Procedure
To restrict the accessibility of a Stripe payment method to certain countries, choose .