Configuration
Make Adyen Payment for OXID operational.
Basic procedure
Configure and test Adyen Payment for OXID in sandbox mode, then switch on live mode.
Procedure
Activate the module and test Adyen Payment for OXID in sandbox mode: Testing Adyen Payment for OXID in sandbox mode.
Optional: Set up delayed or manual money capture if needed (for business customers, for example): Configuring capture delay for selected payment methods.
Under Language configuration make sure that messages from Adyen are displayed in the correct language: Setting up the language configuration.
Link the payment methods provided by Adyen to your shipping types and shipping rules and run test payments in the Adyen sandbox.
Test Adyen in the Adyen sandbox and adjust the configuration until all payment processes work the way you want.
When you have completed your tests, configure live operation: Activating Adyen Payment for OXID in live mode and configuring payment methods.
Testing Adyen Payment for OXID in sandbox mode
Test Adyen Payment for OXID in sandbox mode.
Procedure overview
Create access data in the Adyen Customer Area.
To do this, generate the following data that you will need during configuration:
API key
Client key
Optional: HMAC code (key hash message authentication code).
For more information about the HMAC code, see https://docs.adyen.com/development-resources/webhooks/verify-hmac-signatures#enable-hmac-signatures.
Enter the credentials in Adyen Payment for OXID.
Configure the desired payment methods.
To verify the connection with Adyen, perform test payments.
Creating and entering access data
Generate credentials in the Adyen Customer Area, create a webhook URL for Adyen Payment for OXID, and register the webhook URL again in the Adyen Customer Area.
Prerequisites
You have Adyen Payment for OXID installed (see Installation).
You have https.
If you want to offer PayPal, you have
a PayPal Private Sandbox account for test payments
a PayPal Business Sandbox account for activities in the PayPal backend.
If you want to offer Google Pay, for test payments you have
a Google account
a credit card
When you make payments with your credit card in sandbox mode, your credit card will not be charged. Google will replace your credit card number with a sample credit card number.
For more information, see the Adyen documentation under Development resources –> Integration –> Testing –> Test card numbers –> Google Pay.
Procedure
Choose , and do the following:
Activate the module.
Choose .
Under https://www.adyen.com/signup, create an Adyen test account.
For more information, see https://docs.adyen.com/get-started-with-adyen#test-account.
Under https://ca-test.adyen.com/ca/ca/overview/default.shtml, log in to the Adyen Customer Area.
Under your test account (Fig.: Choosing a merchant account, item 1), choose a merchant account (with the suffix ECOM, Fig.: Choosing a merchant account, item 2).
Background: Adyen distinguishes the Point of Sales (POS) account, which manages multiple merchant accounts, from the individual merchant (ECOM) accounts. By default, after logging in, you are in the POS account.
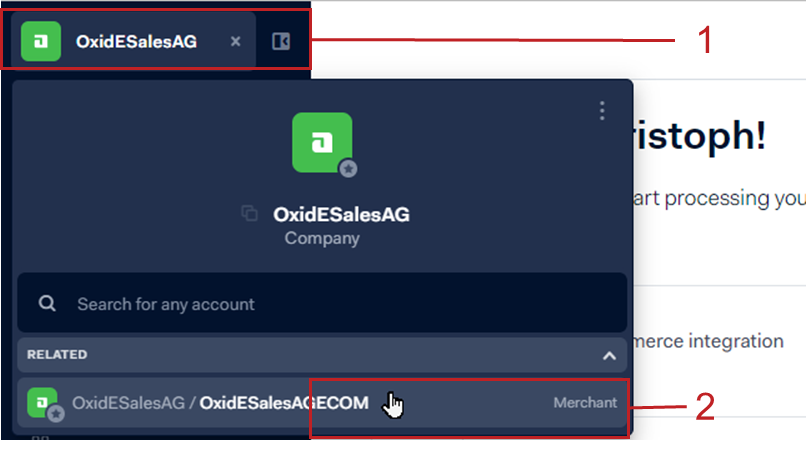
Fig.: Choosing a merchant account
Choose .
Choose the ws web service user (Fig.: Choosing the web service user, item 1).
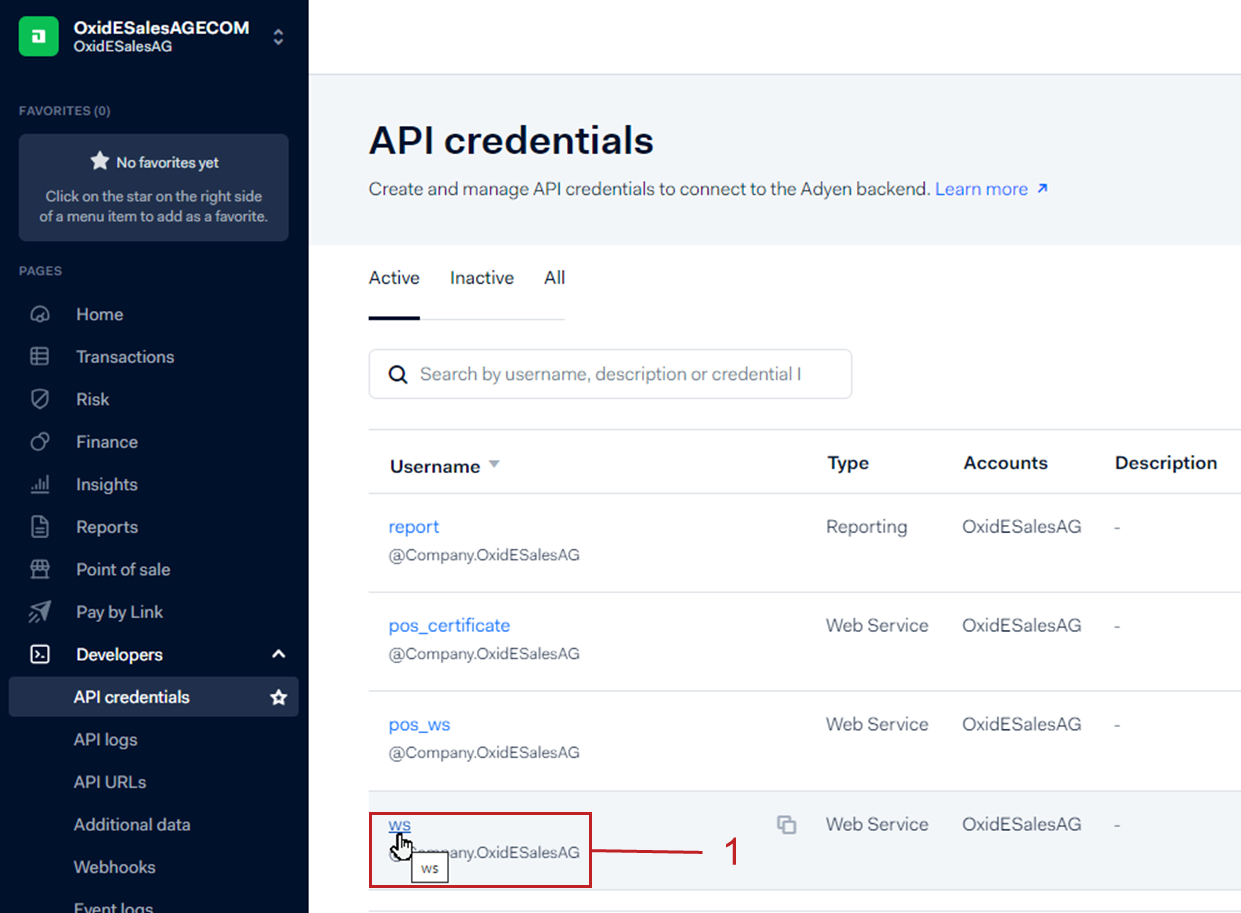
Fig.: Choosing the web service user
Under Server Settings (Fig.: Generating the API key, item 1), generate an API key and paste it into the API Key field (Fig.: Entering Adyen access data, item 1).
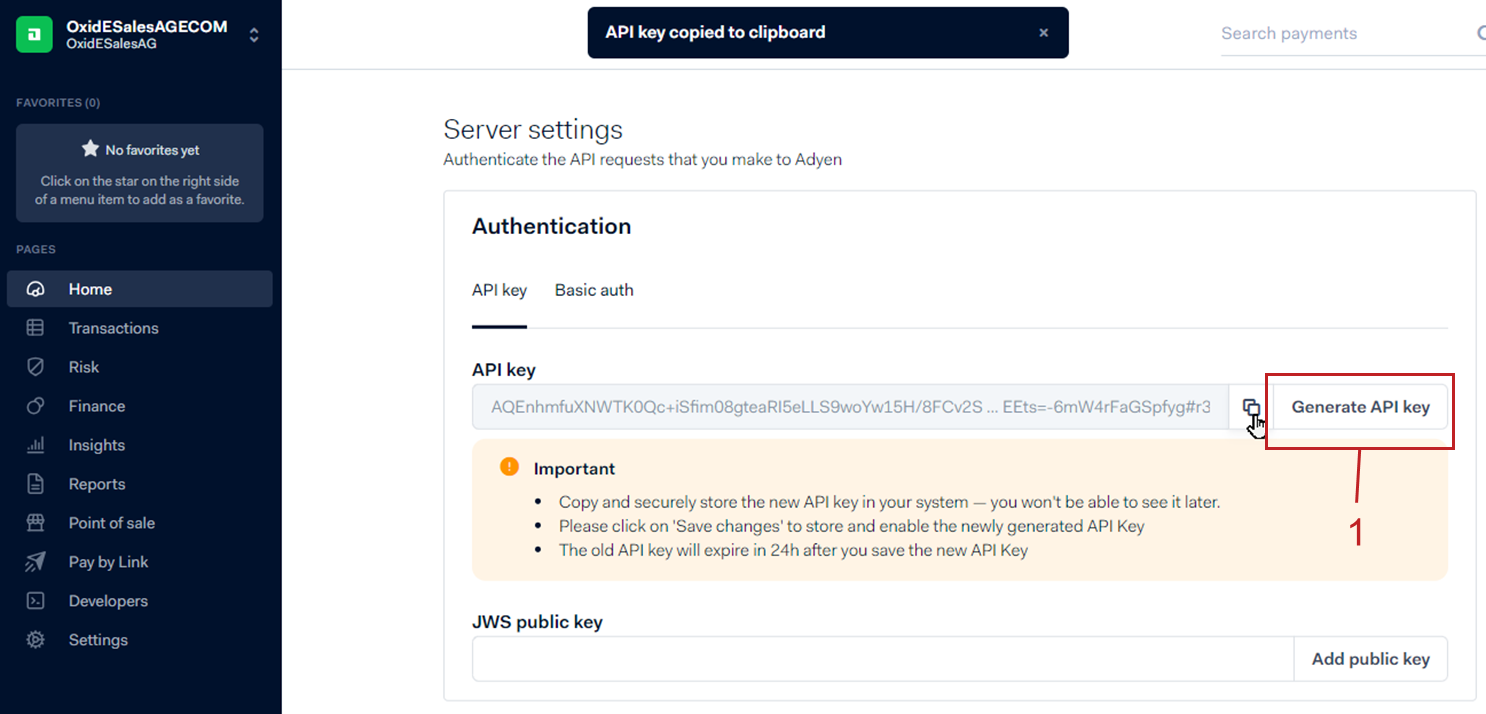
Fig.: Generating the API key
Under , generate a client key (Fig.: Generating the client key, item 1) and insert it into the Client Key field (Fig.: Entering Adyen access data, item 2).

Fig.: Generating the client key
Under , enter the root URL of your OXID eShop test store, choose the Add button (Fig.: Generating the client key, item 2), and save your entries (Fig.: Generating the client key, item 3).
Under , in the Account dropdown menu (Fig.: Activating the Payment methods read role, item 1), make sure the Payment methods read checkbox is activated (Fig.: Activating the Payment methods read role, item 2).
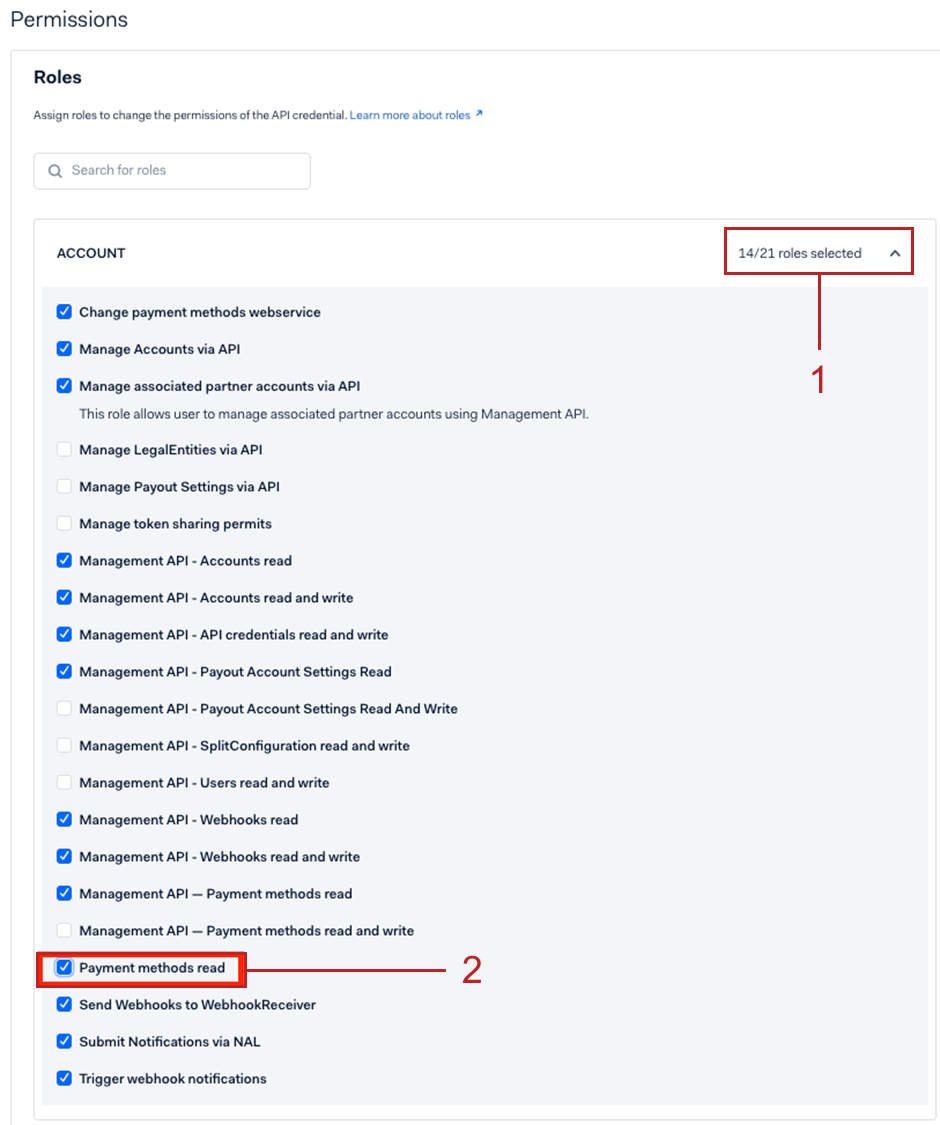
Fig.: Activating the Payment methods read role
In the Shop Operator Account field (Fig.: Entering Adyen access data, item 4), enter your Adyen Merchant Account Code (Fig.: Choosing a merchant account, item 2).
In the PayPal Merchant Id field (Fig.: Entering Adyen access data, item 5), enter your PayPal Merchant ID.
Find your PayPal Merchant Id in your PayPal Business Sandbox account under Settings.
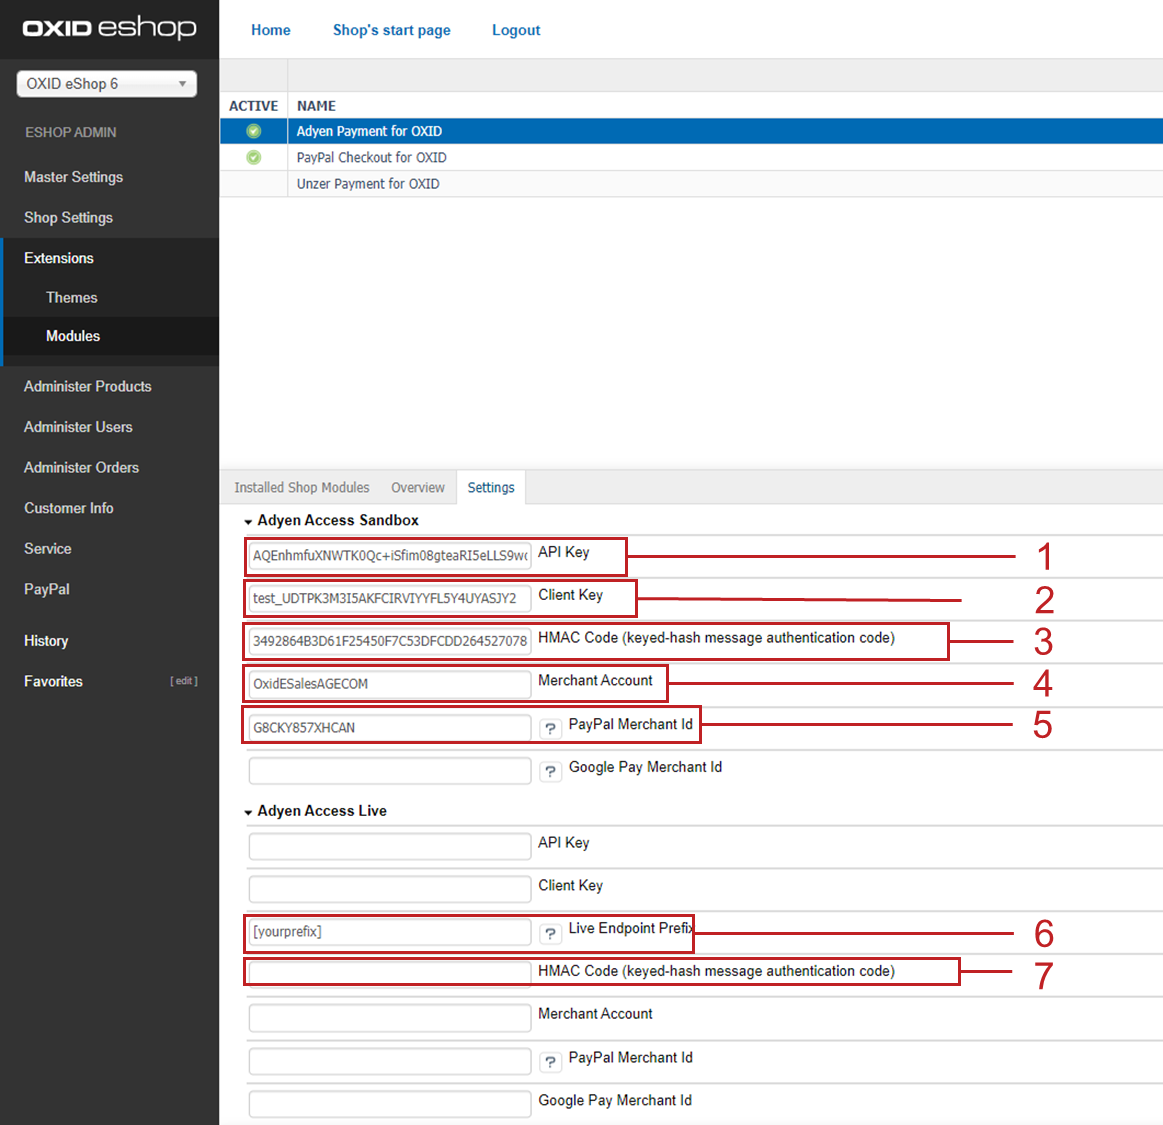
Fig.: Entering Adyen access data
Save your entries.
Copy the webhook URL displayed under Important module information (Fig.: Copying the webhook URL, item 1).
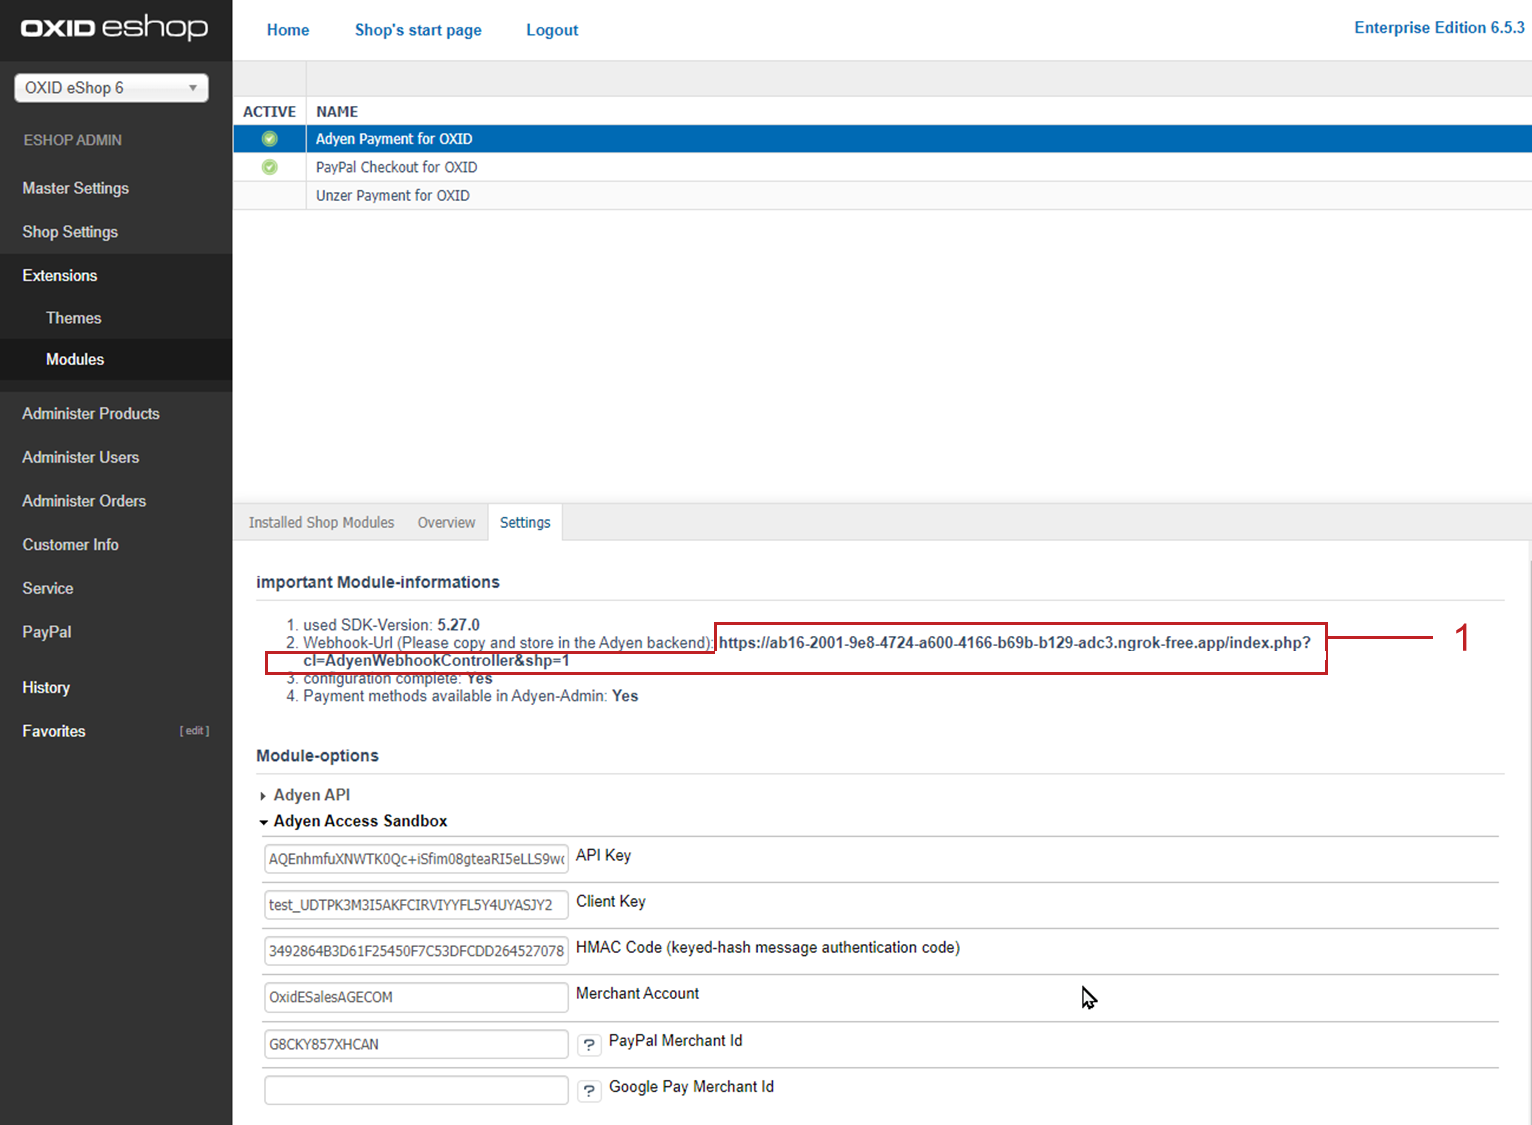
Fig.: Copying the webhook URL
In the Adyen Customer Area, under , choose Webhook (Fig.: Adding a webhook at Adyen, item 1).
The Create new webhook dialog box appears.Choose the Add button (Fig.: Adding a webhook at Adyen, item 2) for the Standard webhook type.
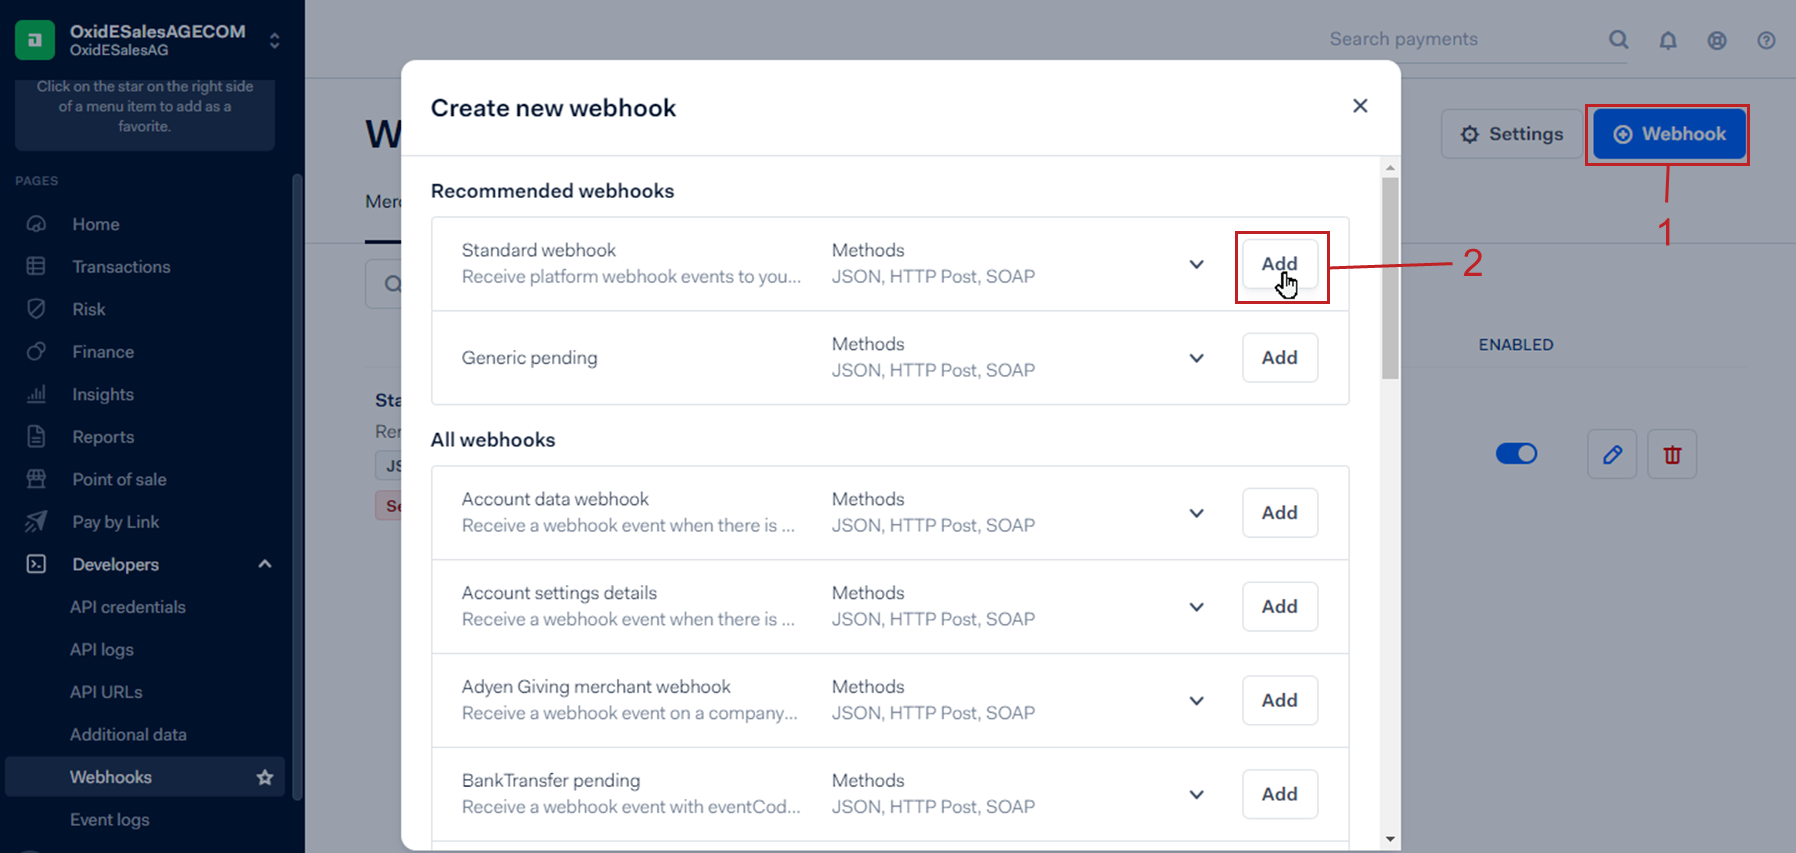
Fig.: Adding a webhook at Adyen
Register your webhook:
Under Server configuration, in the URL field (Fig.: Registering the webhook with Adyen, item 1), enter the webhook URL.
Choose JSON (Fig.: Registering the webhook with Adyen, item 2).
Choose Apply (Fig.: Registering the webhook with Adyen, item 3).
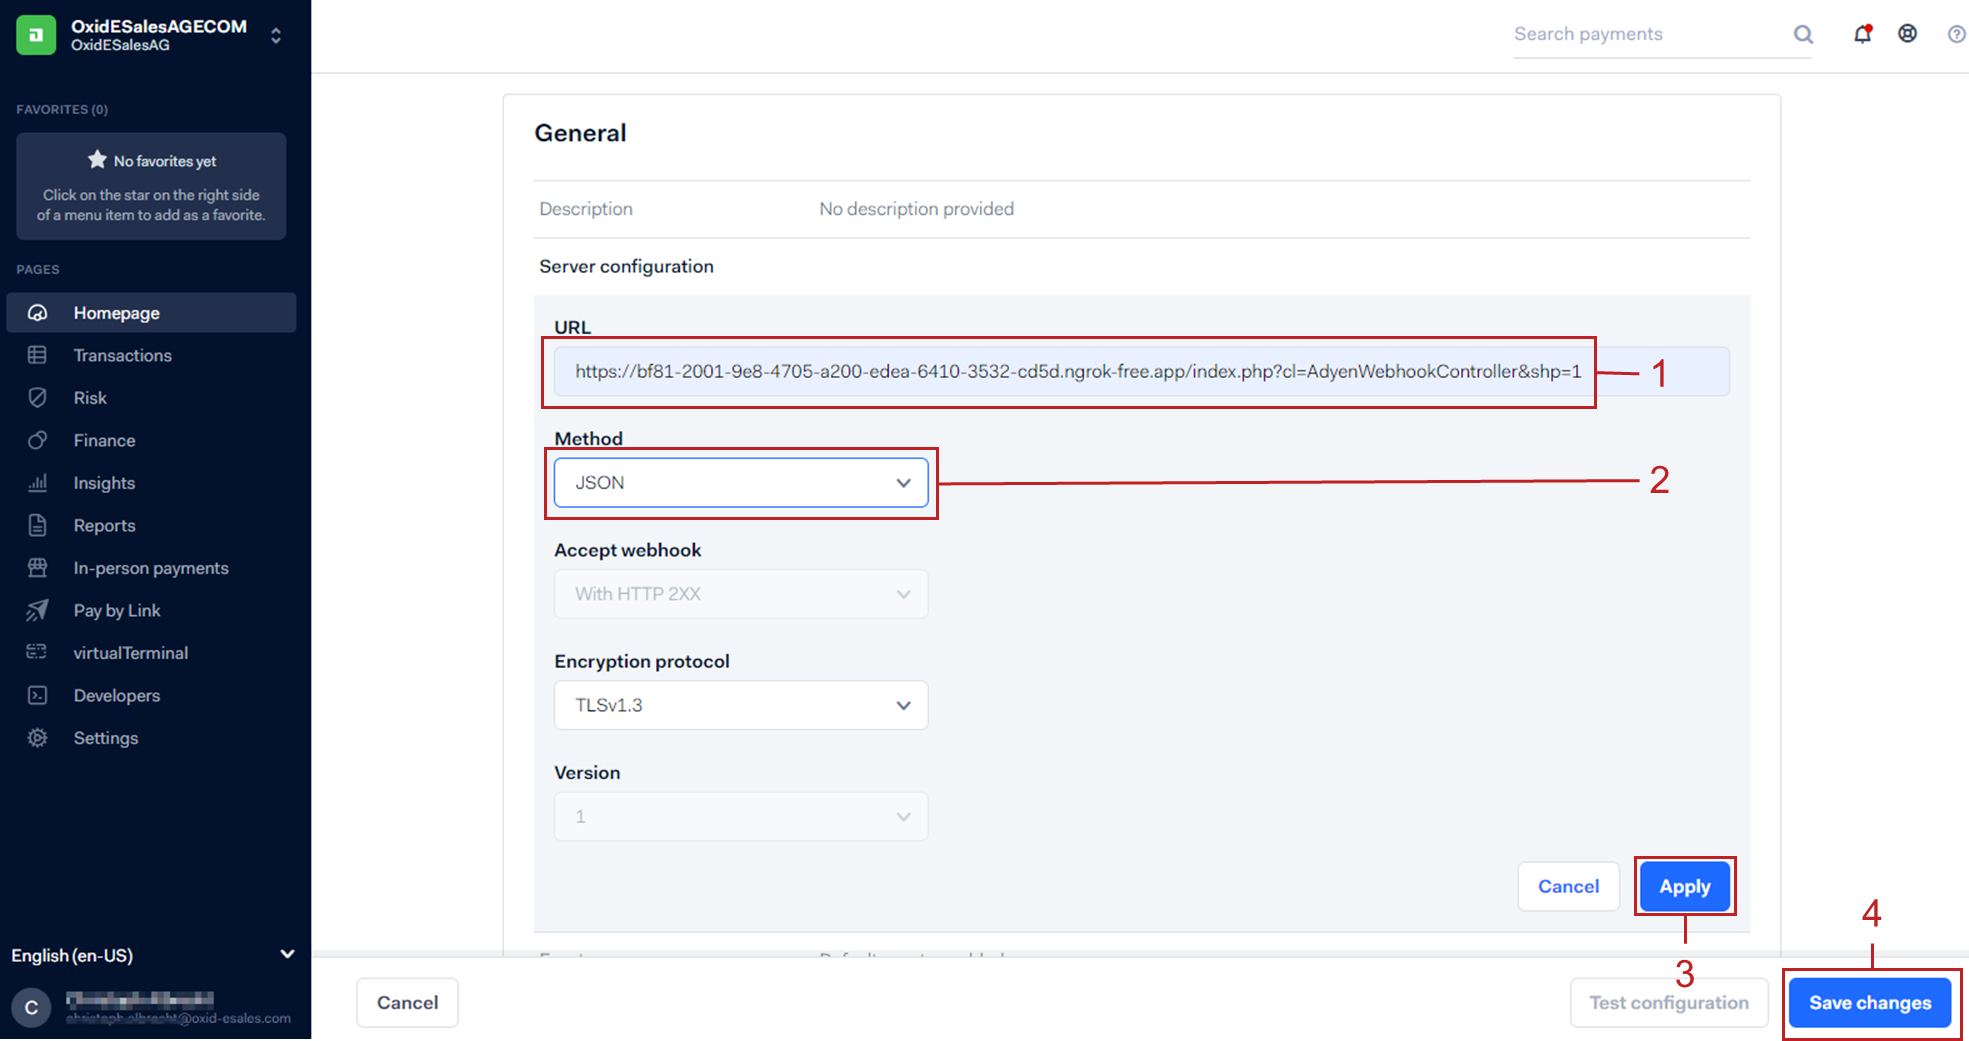
Fig.: Registering the webhook with Adyen
Choose Save changes (Fig.: Registering the webhook with Adyen, item 4).
The ID of the webhook is displayed (Fig.: Displaying the Webhook ID, item 1).
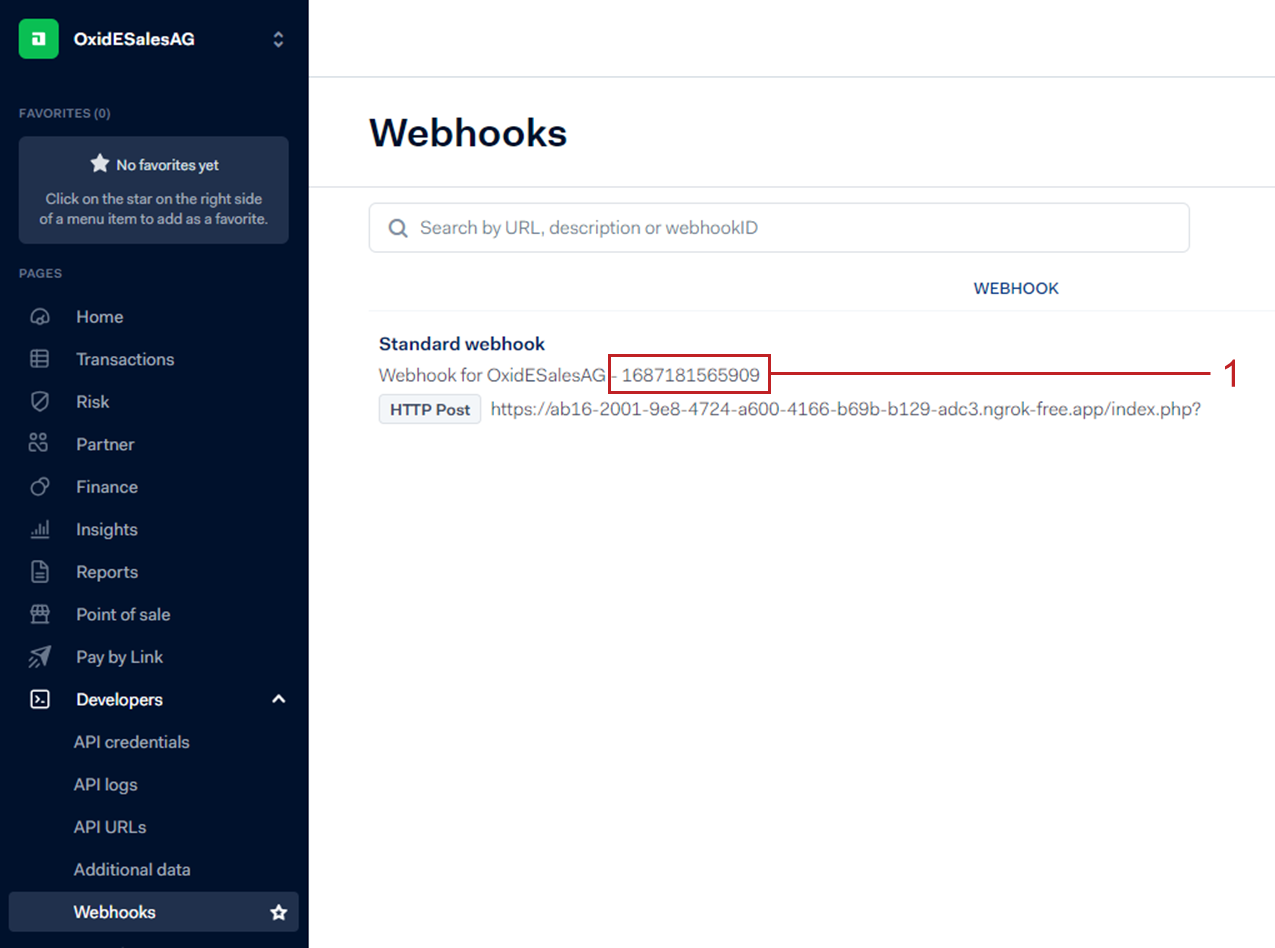
Fig.: Displaying the Webhook ID
Optional: Generate an HMAC key.
The HMAC key is required only in live operation.
Choose .
The webhook you registered is displayed.
Choose Edit Webhook.
Choose and click Generate (Fig.: Generating the HMAC key, item 1).
Choose Apply (Fig.: Generating the HMAC key, item 2)
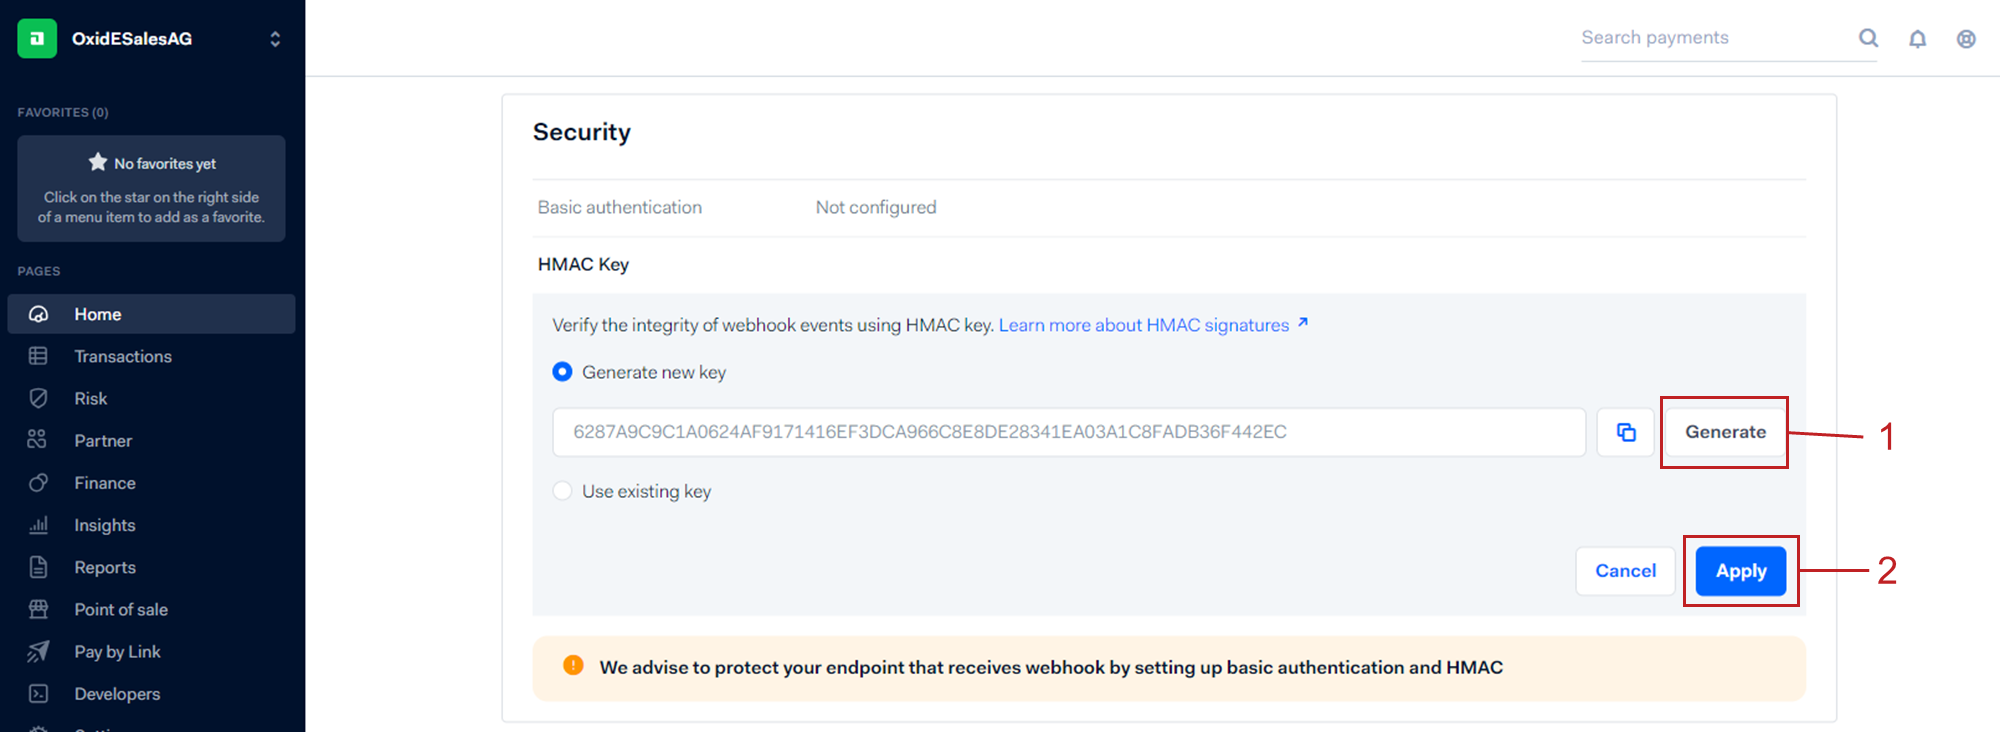
Fig.: Generating the HMAC key
Copy the HMAC key, enter it in the HMAC Code (keyed hash message authentication code) field (Fig.: Entering Adyen access data, item 3), and choose Save.
Activating Apple Pay as payment method
If you want to offer Apple Pay, follow the instructions in the Adyen documentation.
Prerequisites
You have an Apple device for testing.
Background: Payments via Apple Pay can only be made with an Apple device.
Procedure
You have the following options:
The easiest and fastest way is to use a ready-made Apple certificate from Adyen.
To do so, follow the instructions in the Adyen documentation under Set up Apple Pay.
Alternatively, you can generate keys yourself using your own certificate and register them with Apple. This gives you full control over secure communication with Apple Pay.
To do so, follow the instructions in the Adyen documentation under Enable Apple Pay with your own certificate.
Configuring payment methods and making test payments
Configure the desired payment methods.
To verify that the connection to Adyen is established, make test payments.
Prerequisites
If you want to offer PayPal or Google Pay, you have a test payments account to test the connection with Adyen.
If you want to offer Apple Pay, you have generated Apple merchant ID and certificates in your Apple developer account (see Activating Apple Pay as payment method).
Procedure
In the Adyen Customer Area, configure payment methods.
To do so, choose .
The preconfigured payment methods are displayed.
Check if the payment methods covered by Adyen Payment for OXID (see Which markets are covered?) are active.
If a payment method is missing, choose Request payment methods and enter the required credentials.
The button is active only if you are in your merchant account (with suffix ECOM, Fig.: Choosing a merchant account, item 2).
In your OXID eShop, under , enable, for example, the PayPal payment method.
Make a test order, in our example with PayPal.
In our example, we configured capture delay with manual triggering of the payment (see Configuring capture delay for selected payment methods).
Review the order and payment flow:
Choose and highlight your test order.
Choose the Adyen tab.
In our example, the order is configured with delayed money capture and therefore still in status authorized (Fig.: Displaying an order, item 1)
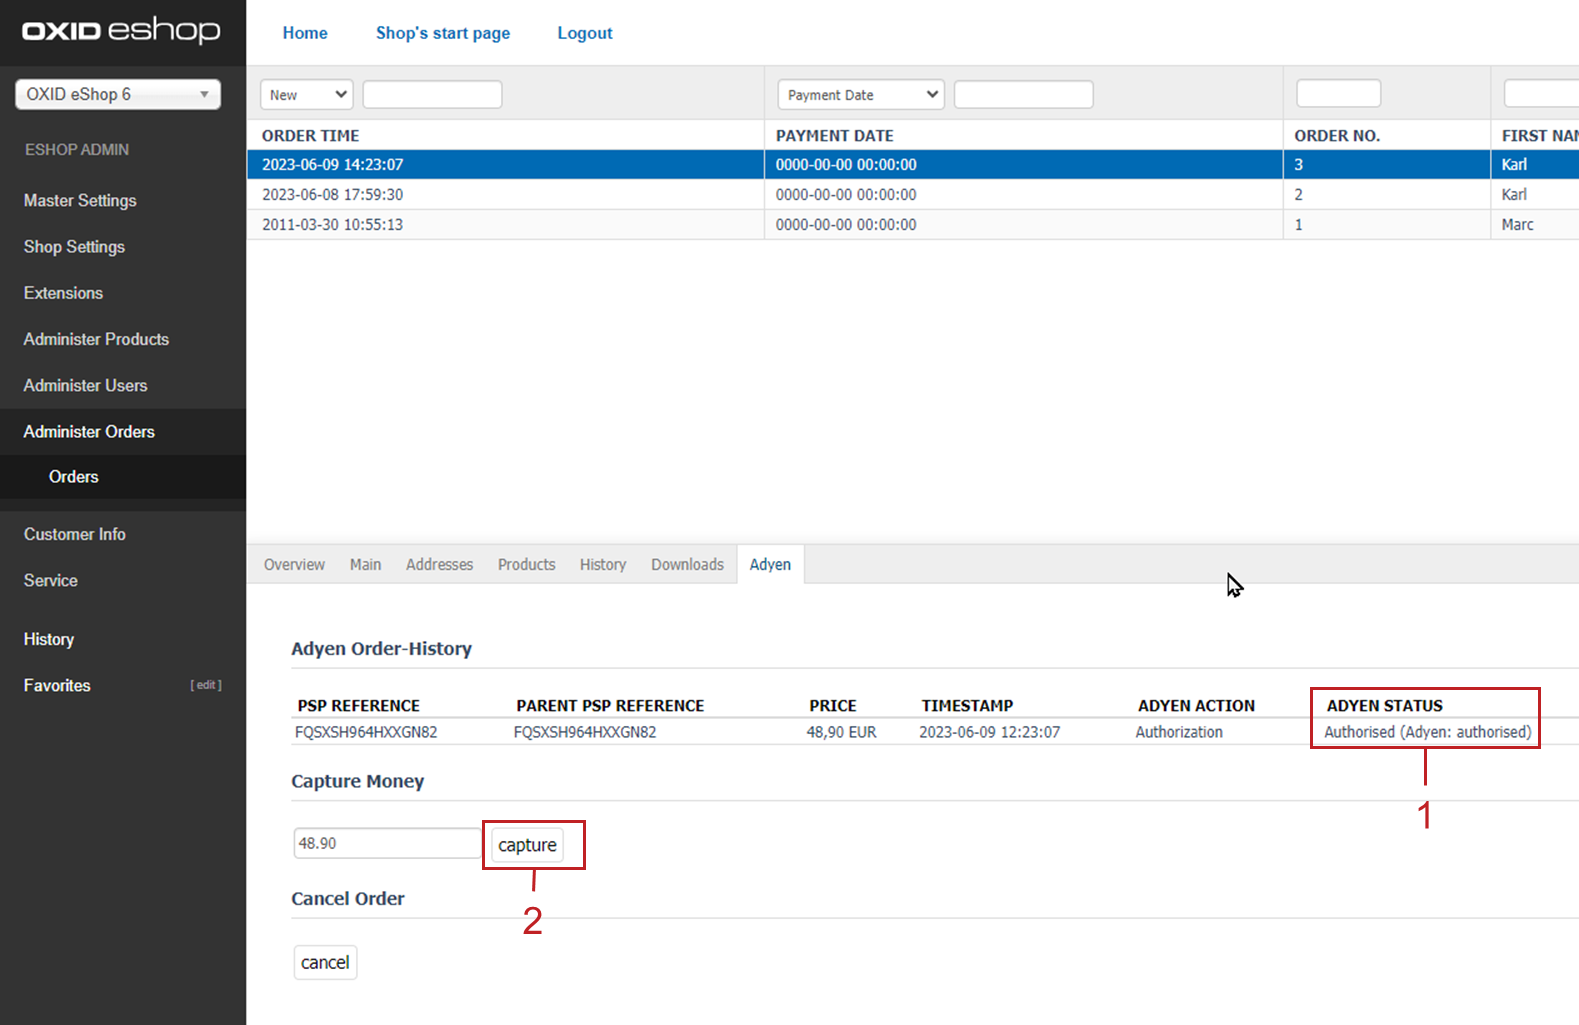
Fig.: Displaying an order
To trigger the capture of the invoice amount manually, choose Capture (Fig.: Displaying an order, item 2).
The payment has been made, the order is in Adyen: received status (Fig.: Capturing money manually (example: PayPal), item 1).
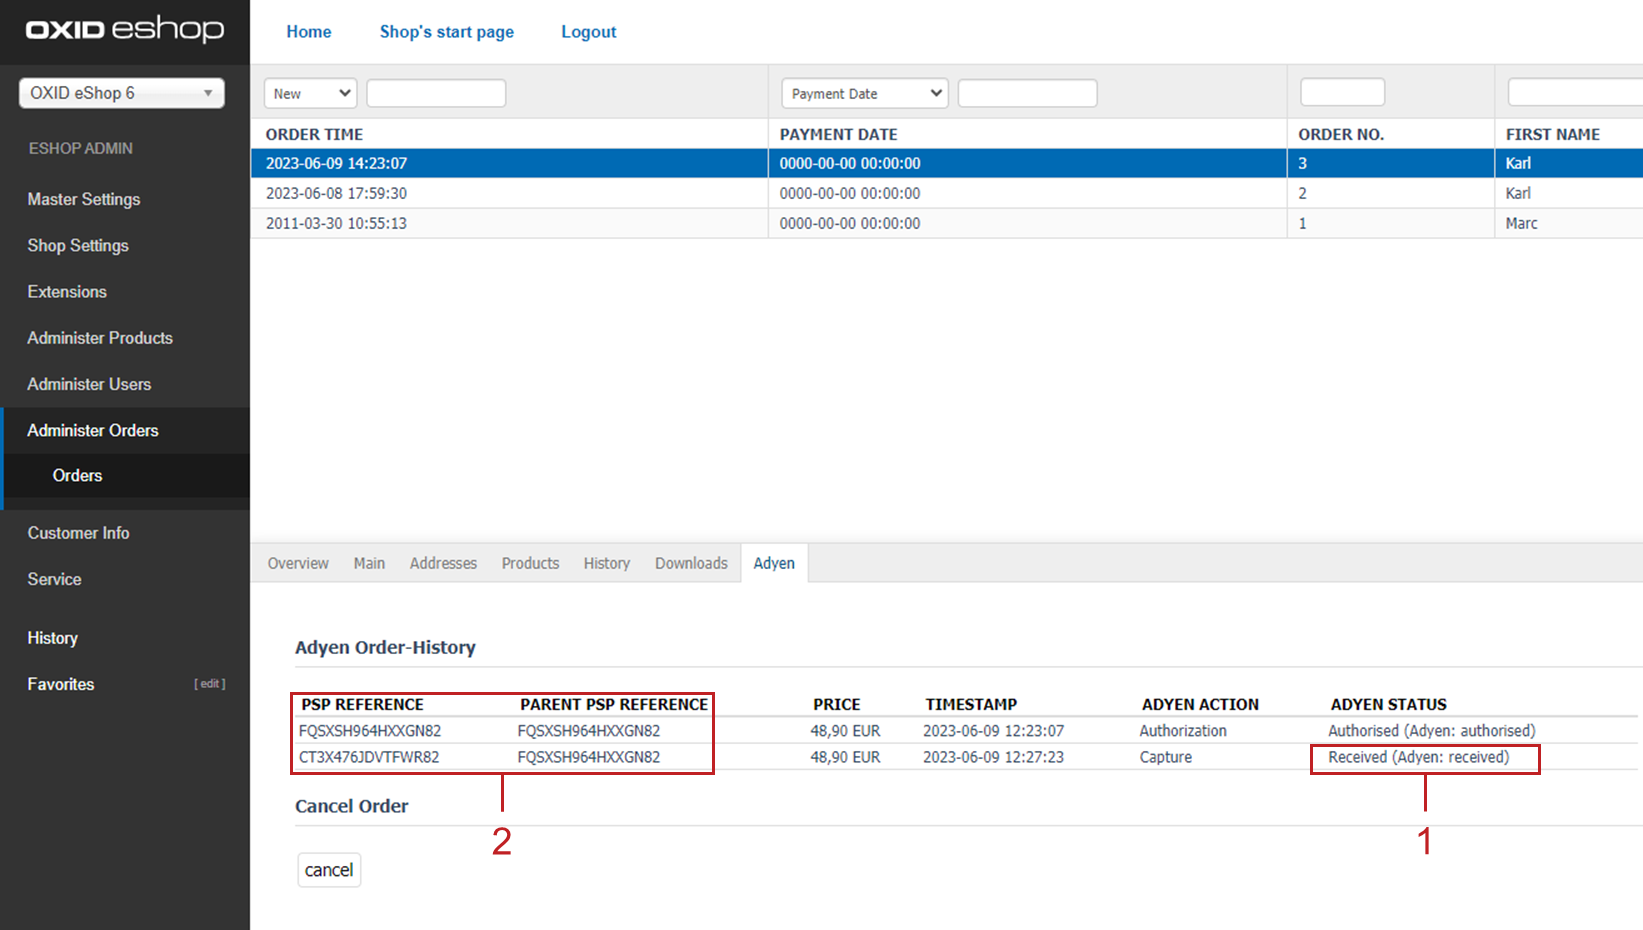
Fig.: Capturing money manually (example: PayPal)
Result
You have successfully completed the test payment. The connection with Adyen is verified.
Configuring capture delay for selected payment methods
For specific payment methods, specify whether the amount should be captured automatically (automatic capture), or whether payments should only be reserved and triggered with a delay (separate captures).
For capture delay (separate captures), specify how it should be triggered:
manually
or
automatically after a certain number of days (delayed automatic capture).
Example
By default, the money is captured immediately (automatic capture).
In certain use cases it makes sense that the payment is only triggered by the delivery:
You sell certain individualized products that you only manufacture, commission or order after the order has been received.
You have an OXID eShop for business customers. Here, the delivery quantities and payment amounts are larger than for private customers.
In the event of an error, returns management would be correspondingly more difficult.
Therefore, you want to make sure that the payment is only triggered when the goods are there or on their way to be shipped.
Procedure
Configure the desired capture delay in the Adyen Customer Area (for example Manual).
For more information, in the Adyen documentation see Delayed automatic capture.
The capture delay affects all Adyen payment methods that support this feature.
To see which Adyen payment methods allow capture delay (separate captures), see the Adyen documentation under Payment methods overview.
Choose .
To specify for a payment method that capture should be delayed, choose the capture type.
The type of capture you make in the module overrides the setting you made in the Adyen Customer Area. So, you can configure payment methods with different types of capture delay.
However, make sure that the payment method supports capture delay in the first place.
To find out which Adyen payment methods allow capture delay (separate captures), see the Adyen documentation under Payment methods overview.
Save your settings.
Assign capture delay methods to the customized products in your eShop.
It is technically not possible to assign certain payment methods exclusively to certain items. We suggest the following workaround:
Create a dedicated shipping rule and assign the relevant items to it.
Make sure that the quantity condition is correctly specified.Create a dedicated shipping type.
Assign to it the payment method with capture delay and the shipping rule for individualized products.
In the description text of the item, instruct your customers to choose only the dedicated shipping method for payment (Fig.: Choosing the dedicated shipping method in the checkout, item 1).
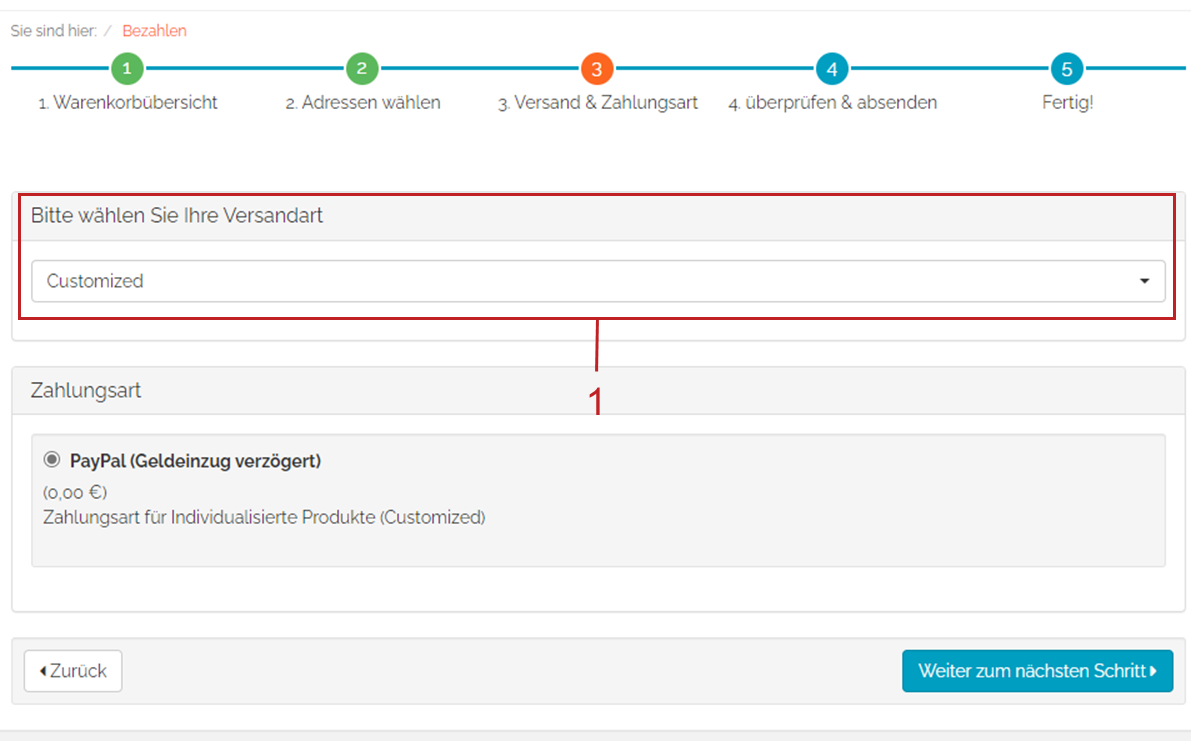
Fig.: Choosing the dedicated shipping method in the checkout
Result
For manual money capture, collect the invoice amounts under (see Capturing money manually).
Setting up the language configuration
By default, German and American English are configured as languages in which customers are prompted to enter, for example, their credit card information.
If you have configured additional languages under , make sure you configure the appropriate one (language abbreviation according to ISO 639-1 and country according to ISO 3166-1, for example fr_CA for Canadian French) for messages from Adyen Payment for OXID.
Procedure
Under , check the languages you have configured.
In the module settings, under , in the Language localizations matching the OXID language field, enter the appropriate language abbreviations in the format <language abbreviation>_<country abbreviation>.
Or customize the default language abbreviations. If your OXID eShop targets customers in the UK, for example, enter the language abbreviation for English in en_UK.
Activating Adyen Payment for OXID in live mode and configuring payment methods
Activate Adyen in each subshop where you want to use the module.
Establish the live connection with Adyen.
Activate the correct payment methods.
Prerequisites
You have a live account with Adyen.
For more information, see Get started with Adyen, Step 3. Apply for your live account.
Contact Adyen at adyen.com/contact/sales.
You have generated an HMAC code.
For more information, see Generating and entering the HMAC code.
You have determined the Live Endpoint Prefix.
For more information, see the Adyen documentation at Live endpoints.
Procedure
Choose .
Choose the Adyen Payment for OXID module and choose .
Activate Adyen in each subshop where you want to use the module.
Under , enter the API access credentials for live operation in the same way as described under Testing Adyen Payment for OXID in sandbox mode.
In addition, perform the following steps:
Enter the Live Endpoint Prefix in the field of the same name (Fig.: Entering Adyen access data, item 6).
Enter the HMAC key required in live mode (see Fig.: Entering Adyen access data, item 7).
Under , make sure that only those payment methods are activated that you have
activated in the Adyen Customer Area (see Configuring payment methods in the Adyen Customer Area).
are supported by Adyen Payment for OXID (see Which markets are covered?).
Important
Conversion at risk
If a payment method is enabled that Adyen Payment for OXID does not support or that you have not enabled in the Adyen Customer Area, your customer will not be able to complete a purchase with that payment method. He will have to choose another payment method and may bounce.
Optional: Allow Adyen to collect data about your module to improve system performance.
To do this, under Adyen API, check the Analytics active? checkbox.
For more information, see the Adyen documentation at Analytics and data tracking.