Creating a Child Theme
Besides completely custom themes you can also create child themes that inherit from a parent theme. This gives you the opportunity to modify only the parts you desire to, while the rest stays the same. Please keep in mind that there’s only one layer of inheritance with child themes. This means you can extend one installed parent theme with a child but not the child with another child again.
composer.json
A child theme is an extension like a normal theme, module or component and must be encapsulated in a Composer package. The whole process to generate a Composer installable theme is described in the previous section. We focus on the must-have contents here:
{
    "name": "oxid-esales/child",
    "description": "This is a child theme",
    "type": "oxideshop-theme",
    "extra": {
        "oxideshop": {
            "target-directory": "child"
            "assets-directory": "out/child",
        }
    }
}
We name our child theme simply child. The type stays the same as with a standard theme. As target-directory we also use our theme’s name and the assets-directory begins with out followed by the name again. Currently it’s just a normal theme installable via Composer.
theme.php
The theme.php is now where the configuration as a child theme takes place.
declare(strict_types=1);

$aTheme = [
    'id' => 'child',
    'title' => 'CHILD',
    'description' => 'A child theme from APEX.',
    'parentTheme' => 'apex',
    'parentVersions' => ['1.2.0','1.3.0'],
];
As id, title and description you set the usual things but what’s new now are the keys parentTheme and parentVersions. These two array keys make the theme a child theme.
parentThemeis a string and must contain theidof the parent theme.parentVersionsis an array and must contain at least one compatible version of the corresponding parent theme.
In this example we use our current APEX theme and support versions 1.2.0 as well as 1.3.0.
If you wish, you can also add theme setting as usual.
Overwrite Templates
To overwrite templates you follow the same structure as the parent theme and simply put the same template into your child theme. Let’s say we want to overwrite the template header.html.twig. The APEX (parent) theme follows this structure:
apex
  ├── de
  ├── en
  ├── out
  └── tpl
  .  ├── layout
  .     ├── footer.html.twig
  .     ├── header.html.twig
  .     └── ...
  .  └── ...
This means we must copy the exact same structure in our child theme fot the template header.html.twig:
child
  ├── de
  ├── en
  ├── out
  └── tpl
     └── layout
        └── header.html.twig
If we activate our child theme now, the template header.html.twig from CHILD is taken while the template footer.html.twig is still taken from APEX. This means we only copy and modify the templates we desire so.
Example of start.html.twig overwrite
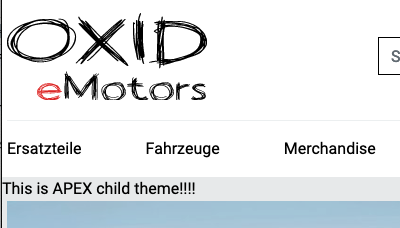
The child theme’s start.html.twig template might, for example, get an additional block.
{% capture append = "oxidBlock_content" %}

{% block child_theme_block %}
    <div>
        This is APEX child theme!!!!
    </div>
{% endblock %}

{% include_content 'oxstartslot1' ignore missing  %}

 ...
The template engine renders the child theme’s start.html.twig file while using all other templates from the parent theme.

Overwrite Assets
Overwriting assets follows the same principle. Let’s take the image logo.svg as an example in APEX:
apex
  ├── de
  ├── en
  ├── out
  .  └── apex
  .     └── img
  .        ├── logo.svg
  .        └── ...
  └── tpl
And so we use the same structure for CHILD:
child
  ├── de
  ├── en
  ├── out
  .  └── child
  .     └── img
  .        └── logo.svg
  └── tpl
While logo.svg is now loading from CHILD all other assets still coming from APEX.
Overwrite Translations
Last thing you can overwrite are translations but this time you must use a little bit different structure. The original parent theme uses lang.php files in corresponding language directories like en for english or de for german.
apex
  ├── de
  .  └── lang.php
  ├── en
  .  └── lang.php
  └── ...
You now use the same directory structure again but name the files cust_lang.php.
child
  ├── de
  .  └── cust_lang.php
  ├── en
  .  └── cust_lang.php
  └── ...
Inside the cust_lang.php files you can change single translations. So the file may contain a few translations like follows:
$sLangName = 'English';

$aLang = [
    'charset' => 'UTF-8'

    'TRUST_BADGES' => 'Our Trust Badges',
    'SOCIAL_MEDIA' => 'Social Platforms',
];
Important
If some changes do not take effect directly, take care to update the template cache:
./vendor/bin/oe-console oe:cache:clear
Important
If you are in development phase and run composer update remember to answer the questions to overwrite files in source with yes. Otherwise your changes from your child theme will not be transfered to Application/views and out directory.
Extend a theme via module
All you can achieve with a child theme can also be done with a module. In all OXID eShop Version 7 installations, module settings fully reside in YAML configuration files, which are much easier to deploy than theme configurations that are still stored in the database (oxconfig table).
Note
With the twig extension mechanism you can only extend existing template blocks. Regarding the ‘I want to completely exchange a template by child theme’ case. That’s also possible via module, you need to add a module own template and chain extend the shop controller in question using the module’s template instead of the original theme template.
A module can extend templates for each theme, but we also have a ‘one size fits all’ approach by using the special directory name default.
To learn more about theme extensions for modules, check the following documentation: