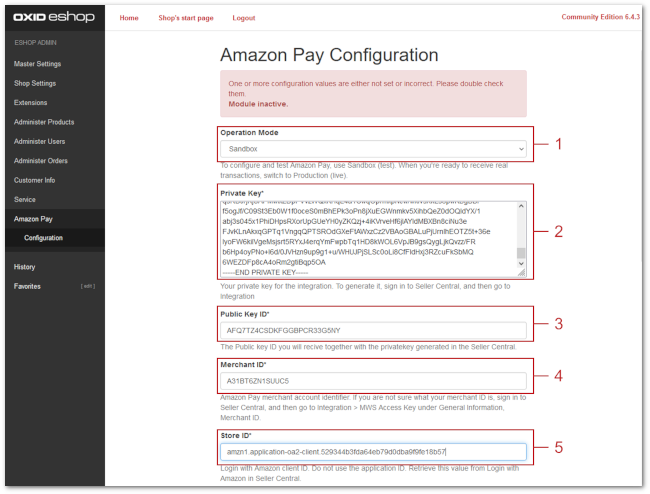
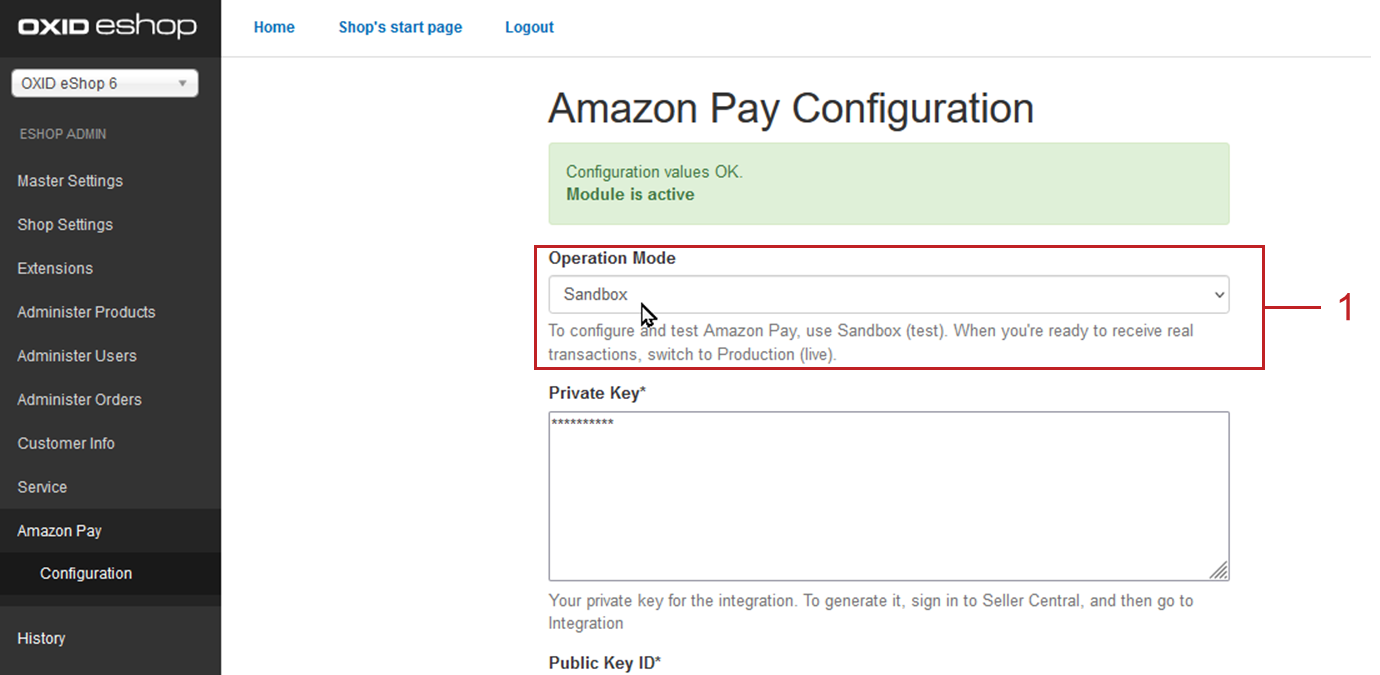
Under Operation Mode, make sure Sandbox is selected for configuring and testing Checking the operating mode.
The Sandbox operation mode is set by default after activation.
Optional: If required, under Capture Type, configure payments to be triggered on a delayed basis (for business customers, for example): Capture Typ: Enabling reservation.
Link the AmazonPay payment method to your shipping methods, check the currency settings, and make test payments in the Amazon Sandbox: Optional: Ensuring correct currency settings.
If you use the AmazonPay Express payment method: Repeat step 8 for the AmazonPay Express payment method.
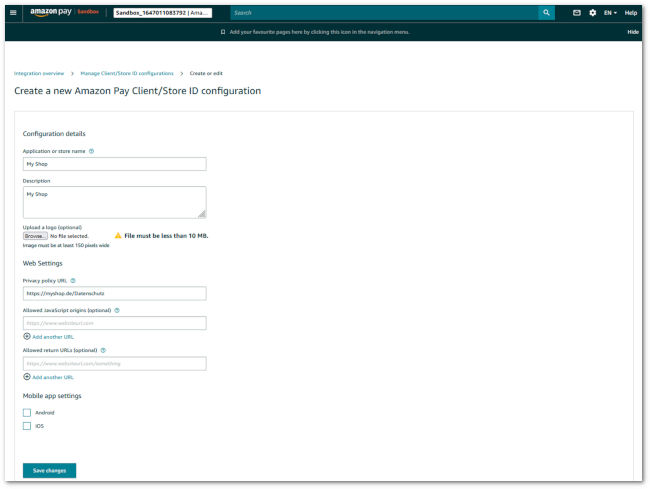
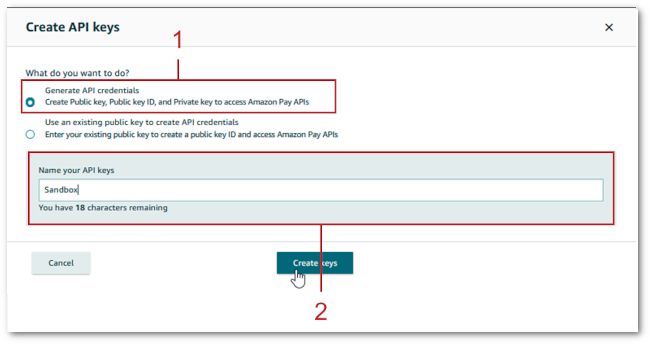
Application or store name: Enter a publicly visible name of your OXID eShop.
Typically, enter your company name.
Description: Enter the store name you entered under Master Settings ‣ Core Settings.
Privacy policy URLs: Enter the URL of the privacy policy you created under Customer Info ‣ CMS Pages (for example, https://myshop.de/Datenschutz).
Fig.: Creating a new Amazon Pay Client/Store ID configuration
Choose Save changes.
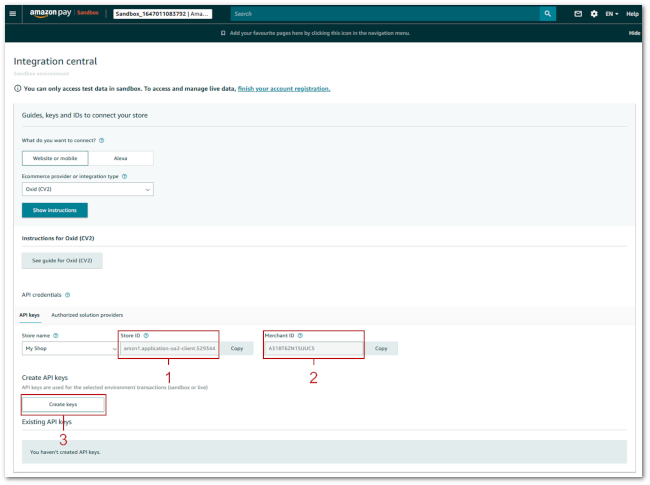
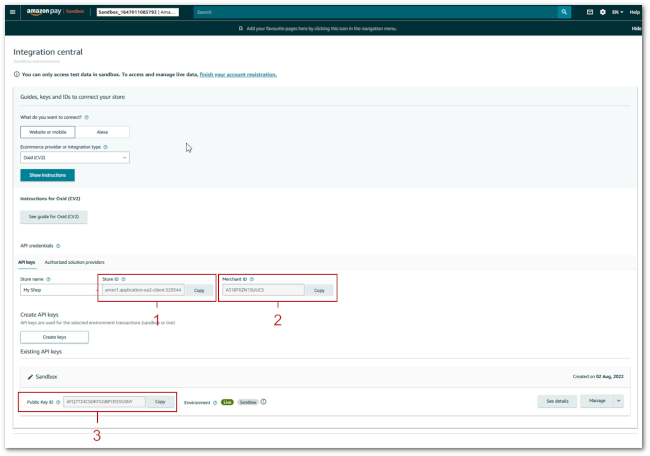
Navigate back to the Integration Central page.
The Store ID and Merchant ID are displayed in the corresponding display fields (Fig.: Displaying store ID and merchant ID, items 1, 2).
Letters and numbers are possible, but no special characters (spaces, for example).
The API key name can help you distinguish API keys if you use more than one.
Example: To have a better overview of payment transactions, create separate API keys for your different subshops.
Tip
If you use a developer account, make that clear in the API key name to avoid confusion.
Result
Your entries are checked, the module is active.
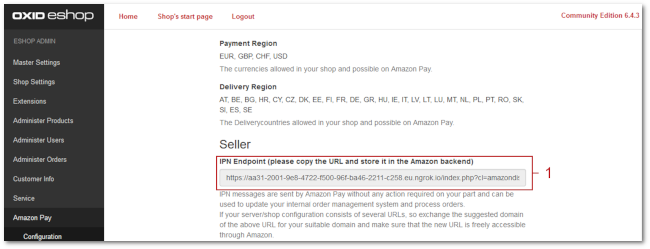
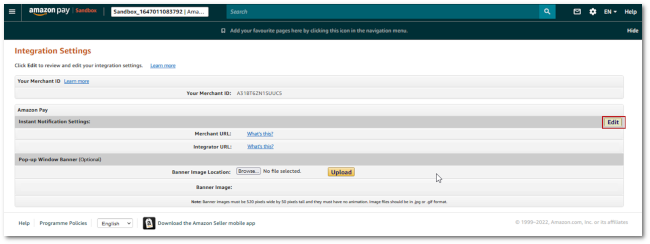
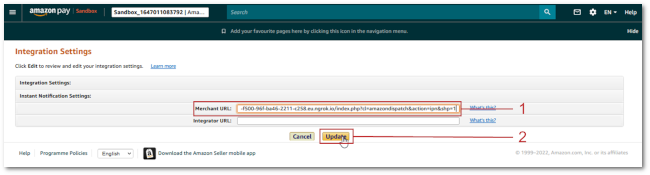
In the IPN Endpoint field, the webhook is displayed (Fig.: Displaying the IPN endpoint, item 1).
Under Amazon Pay ‣ Configuration, in the IPN Endpoint field, a URL is displayed.
Attention
Missing status messages
If you have tested the features of Amazon Pay on a dedicated test system, the URL displayed as the IPN endpoint is different from that of your production system.
In production mode, with the test system IPN endpoint, your OXID eShop would not receive notifications about the status of customer payments. You would need to manually check the status in Amazon Seller Central.
When you switch to production mode, ensure that you register the IPN endpoint of your production system.
If necessary, adjust the configuration of your currencies or your payment methods.
Background
In the configuration step below, Optional: Ensuring correct currency settings, you will make sure that the currencies your OXID eShop supports match the currencies that Amazon Pay supports.
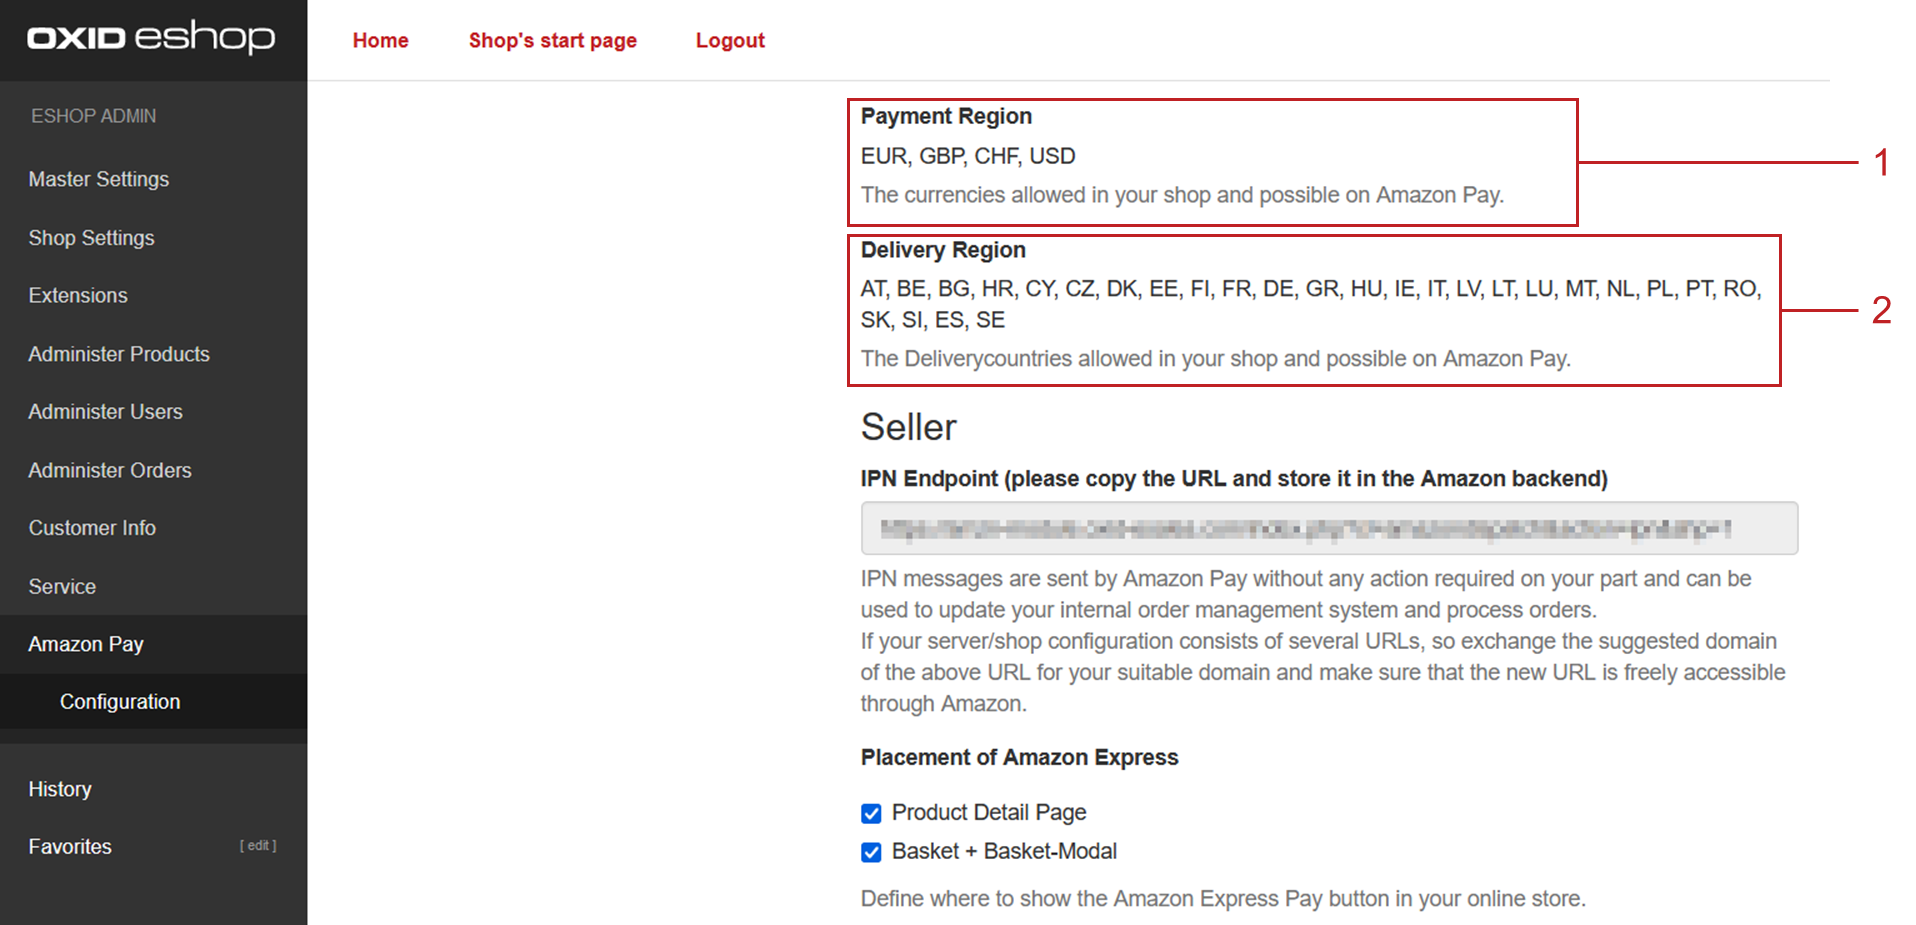
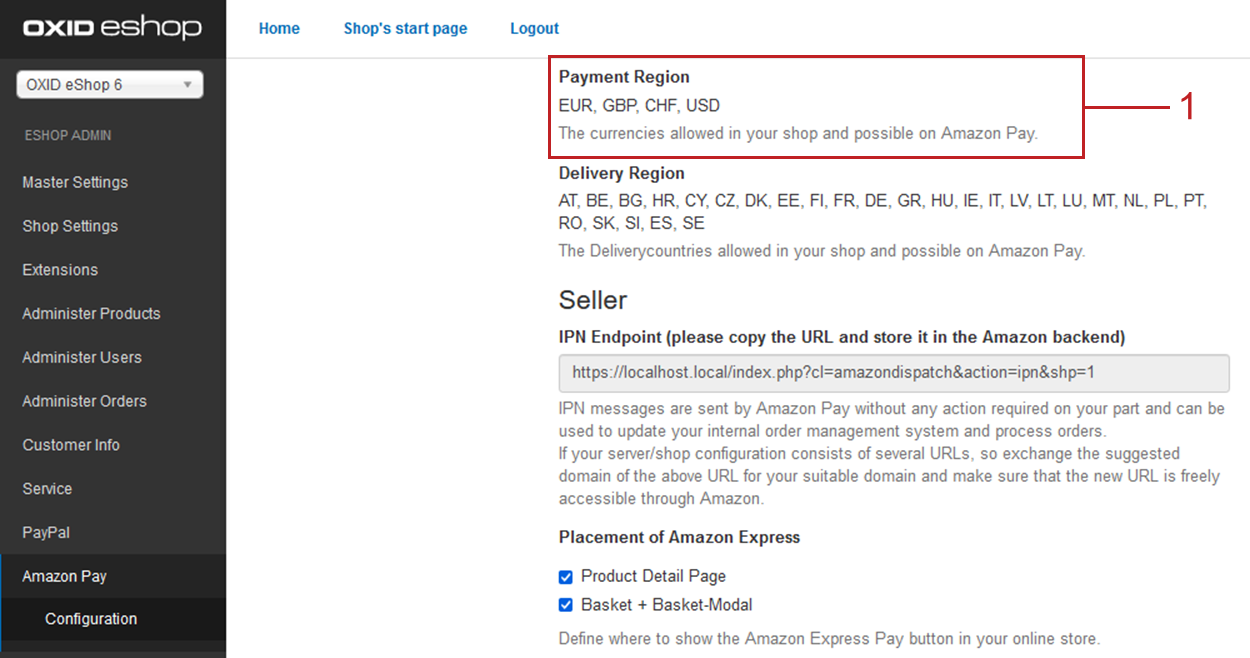
Under payment range, the result is displayed (Fig.: Checking supported currencies and countries, item 1). These are the currencies that simultaneously supported by Amazon Pay and that you configured in the basic settings of your Oxid eShop.
Fig.: Checking supported currencies and countries
Attention
Conversion at risk.
Example: You have configured Hungarian Forint as allowed currency in your OXID eShop.
Amazon Pay does not support Hungarian Forint. Therefore, if your customer selects Forint as the currency, the Amazon Pay button will not be displayed.
If there is no alternative payment method to pay, your customer bounces.
Adjust the configuration of your currencies or your payment methods.
Procedure
If your Oxid eShop supports currencies that Amazon Pay does not support, you have the following options:
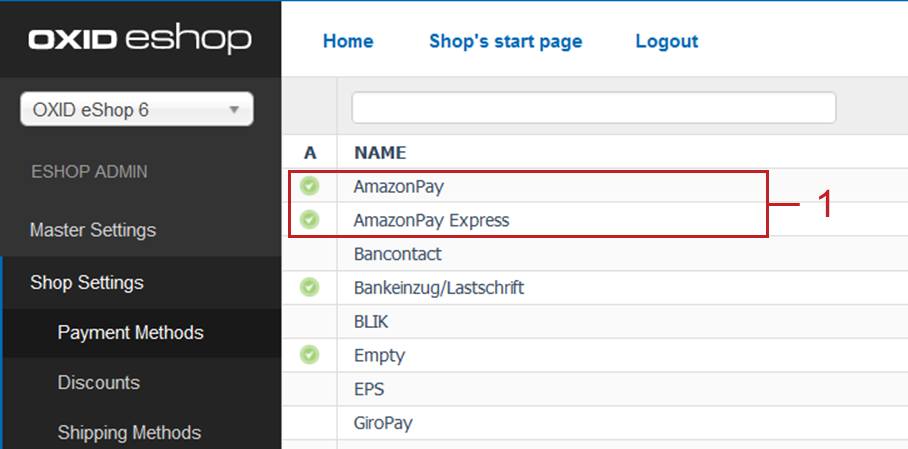
Under Shop Settings ‣ Payment Methods, make sure you offer the necessary alternative payment methods in addition to AmazonPay and AmazonPay Express.
For example, to allow your foreign customers to pay in local currency, you could offer pay upon invoice.
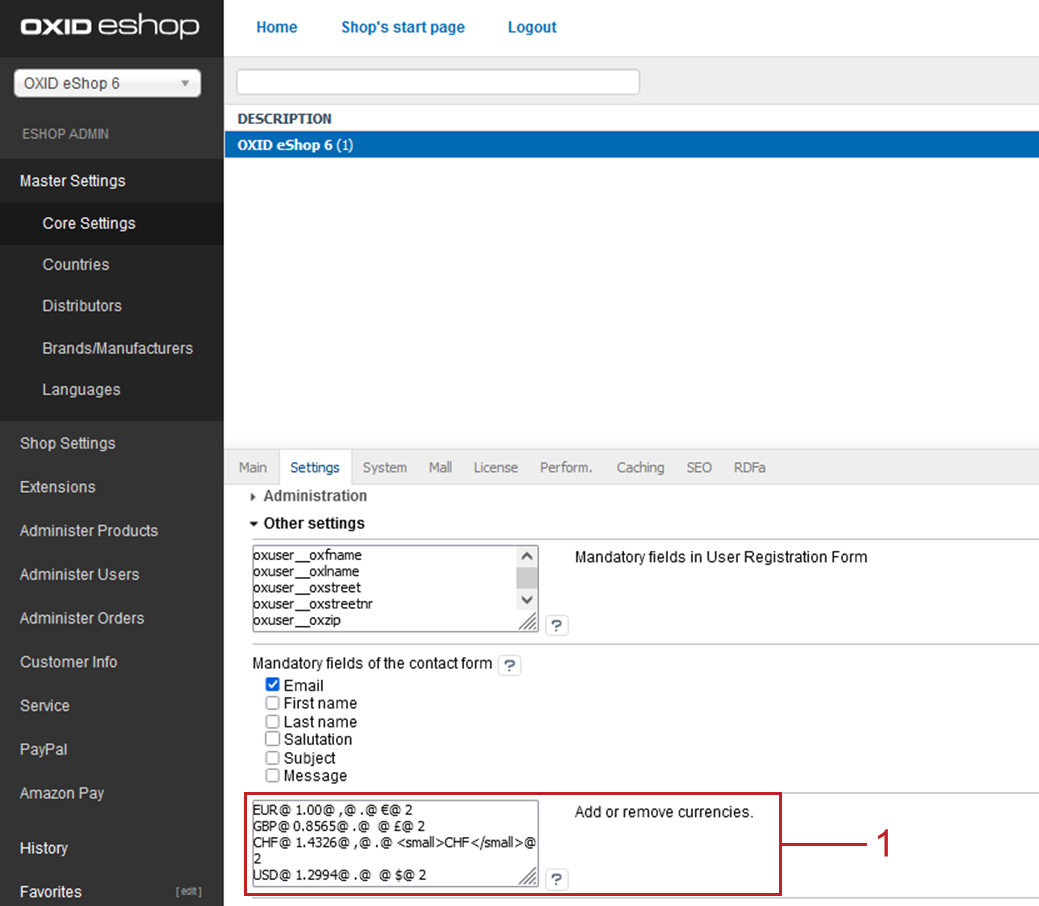
Under Master Settings ‣ Core Settings ‣ Settings ‣ Other settings, remove the currencies that are not supported by Amazon Pay.
Customers in Hungary, for example, would have to pay in euros with Amazon Pay.
This means that of the delivery addresses that your customer has stored with Amazon, only those that are in the countries displayed under Delivery Region will be offered to your customer for selection when paying with Amazon Pay.
So it may happen that the Amazon Pay button is displayed, but the customer cannot choose a delivery address.
To be able to pay with Amazon Pay, your customer would have to specifically enter a different shipping address in Amazon. The conversion is at risk.
Therefore, if you want to serve customers whose shipping addresses are in countries that are not supported by Amazon Pay, provide alternative payment methods.
Procedure
If you want your Oxid eShop to support delivery countries that are not supported by Amazon Pay, do the following:
Choose Shop Settings ‣ Payment Methods.
Make sure you offer alternative payment methods besides AmazonPay and AmazonPay Express, for example, pay upon invoice.
Your customers typically have only one item in their shopping cart when they place an order?
In this case, it makes sense to guide customers to their destination as quickly and barrier-free as possible and display the Amazon Pay Express button.
Do you generate a significant portion of sales or margin from accessory items?
In this case, it may make sense to delay payment and offer the Amazon Pay Express buttons only in the shopping cart and checkout, for example.
So you determine,
whether customers have to go through your checkout process and register in your eShop
or
whether customers can trigger the order directly without registering with their Amazon account (quick purchase).
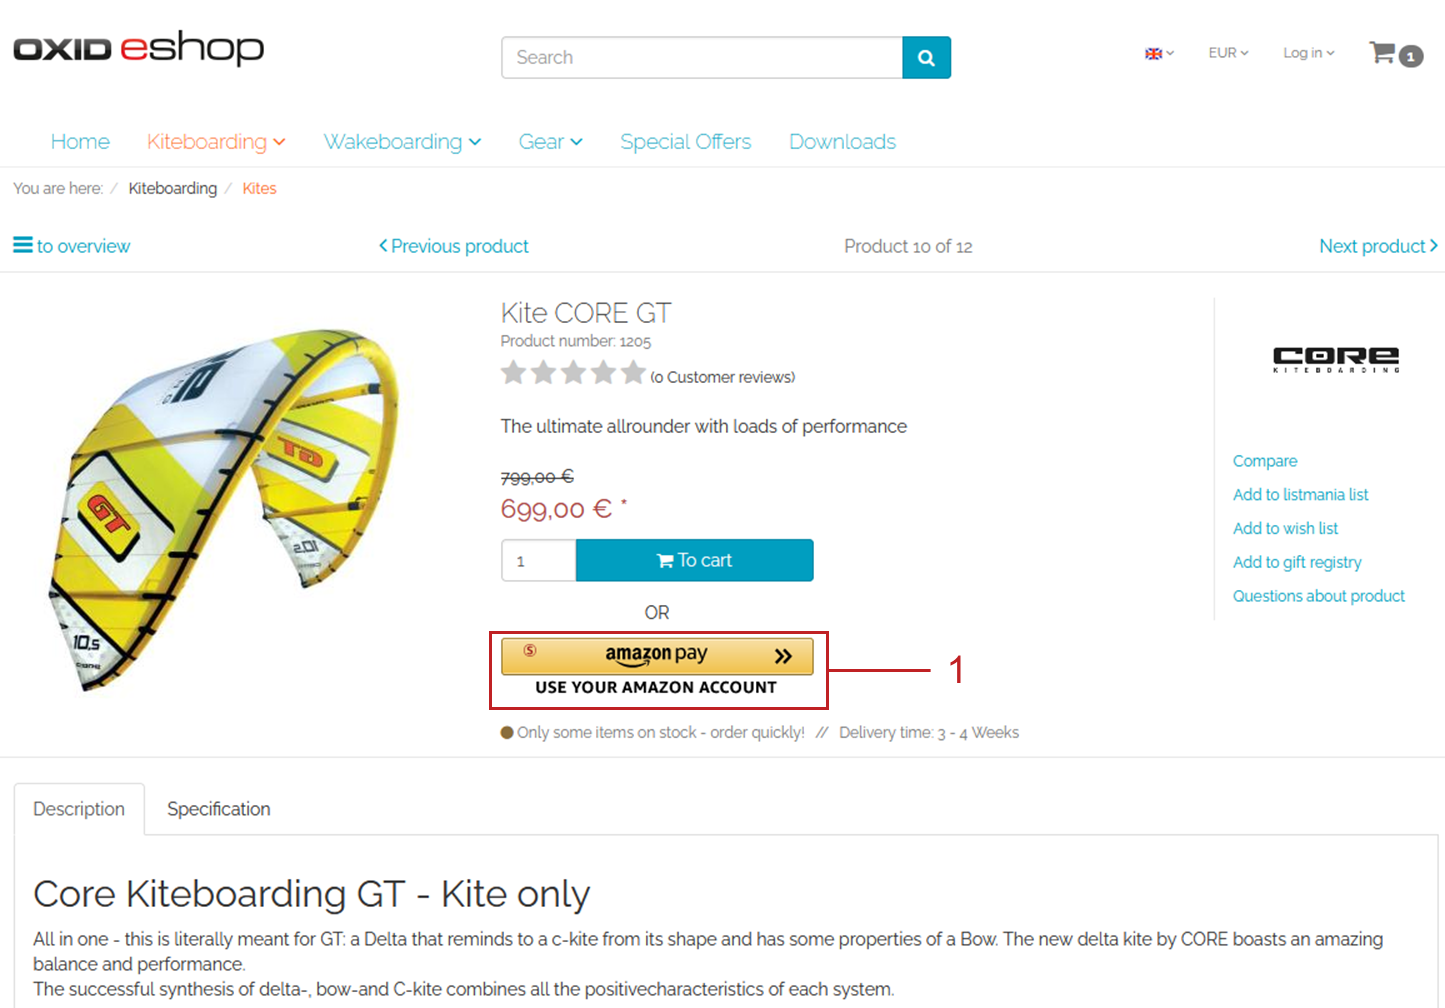
Fig.: Amazon Express button on the product detail page
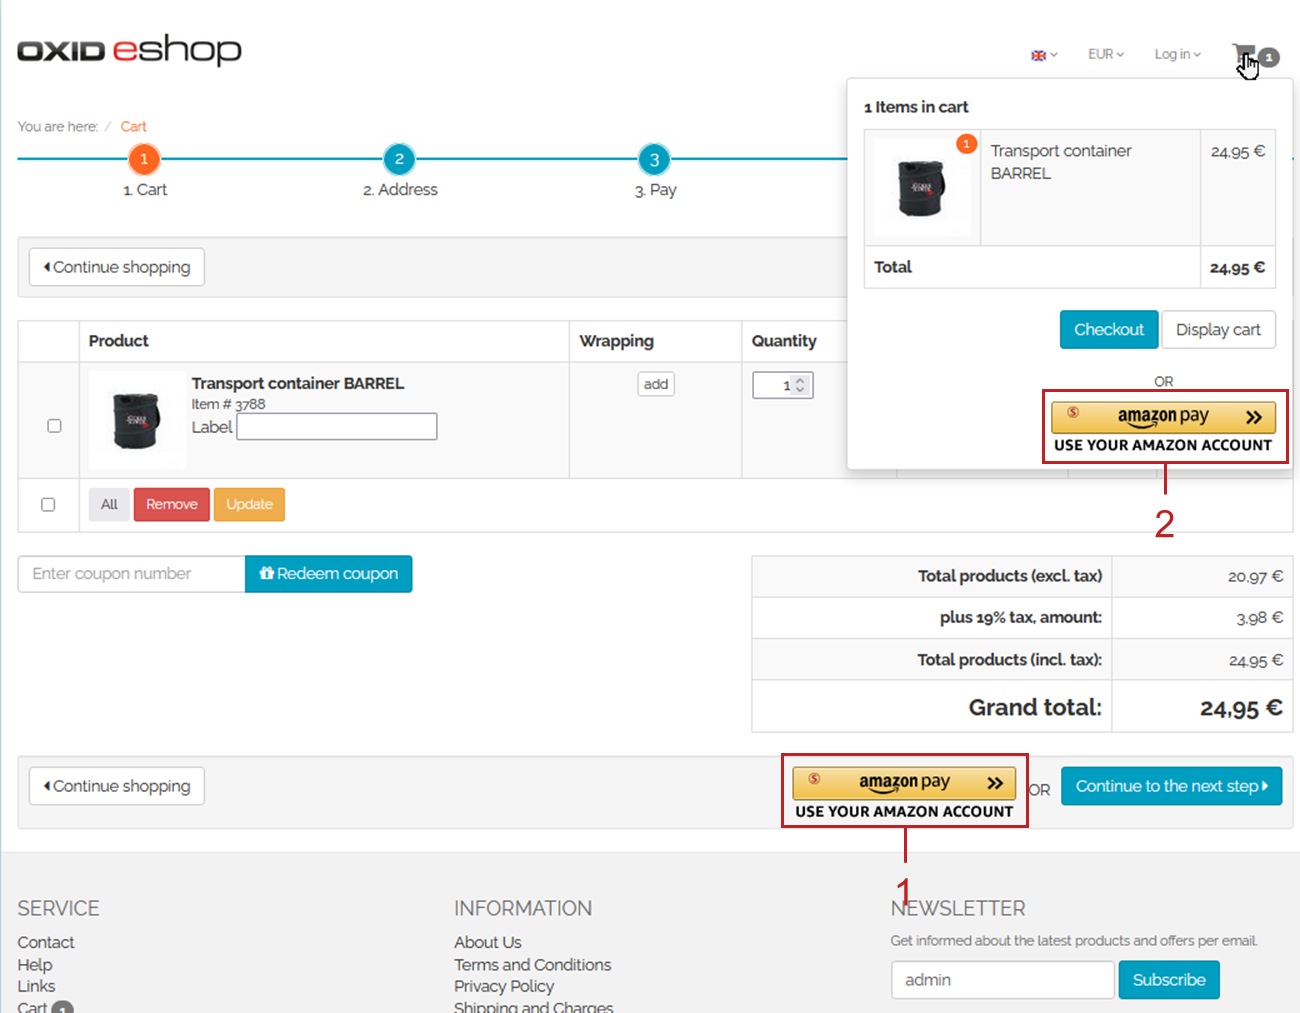
Fig.: Amazon Express button in the shopping cart and in the shopping cart preview
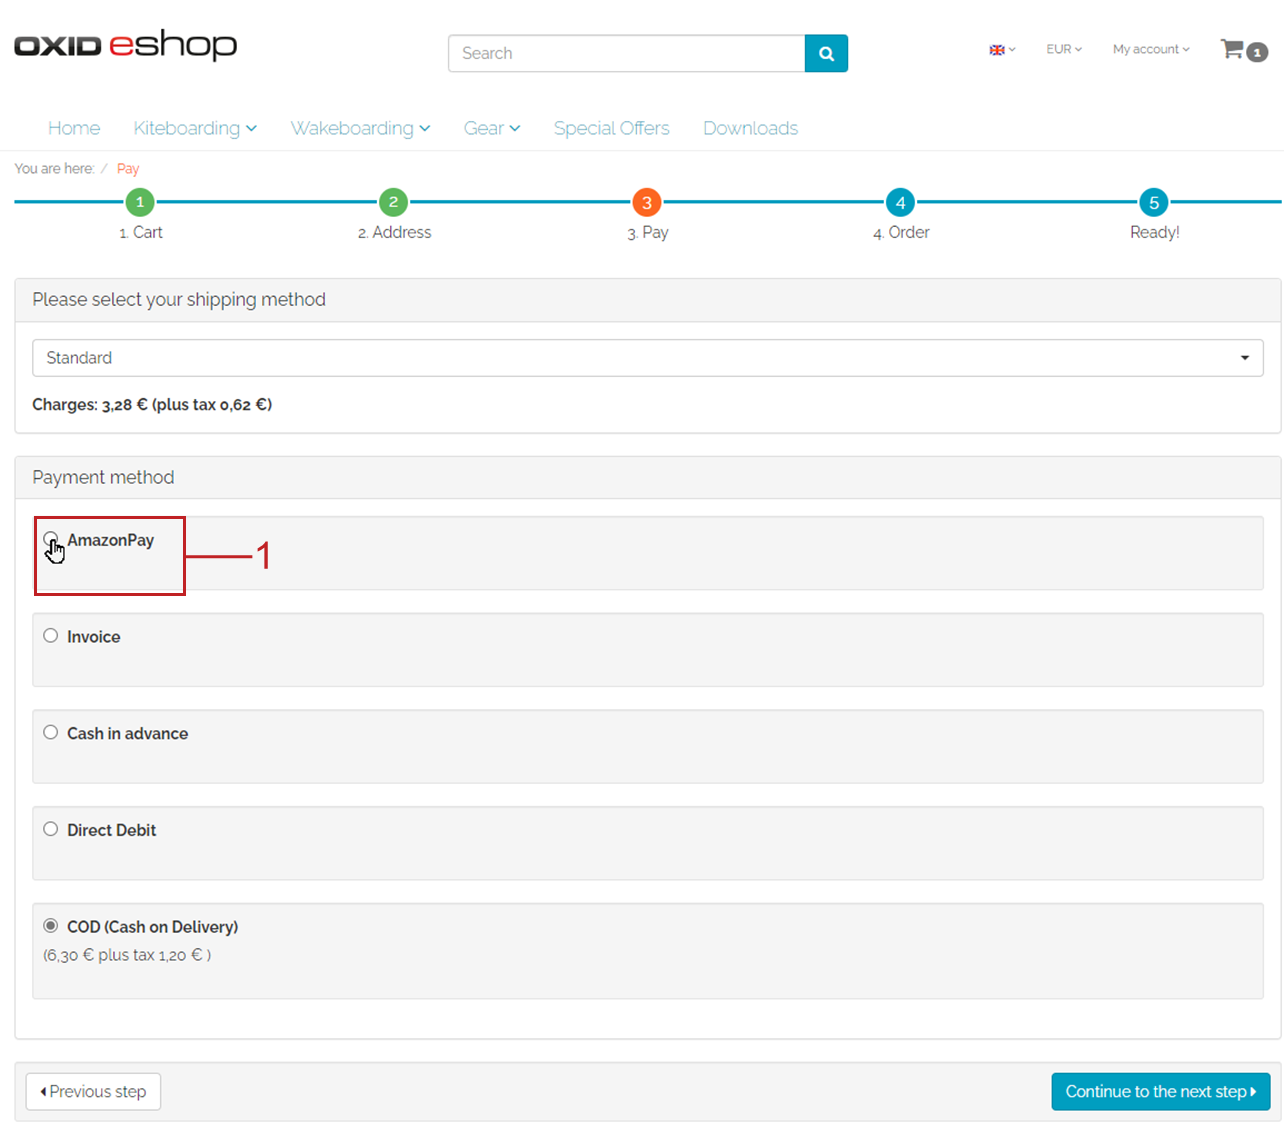
If you hide the Amazon Express button or your customer chooses not to pay with their Amazon account, then this payment method is offered in the checkout.
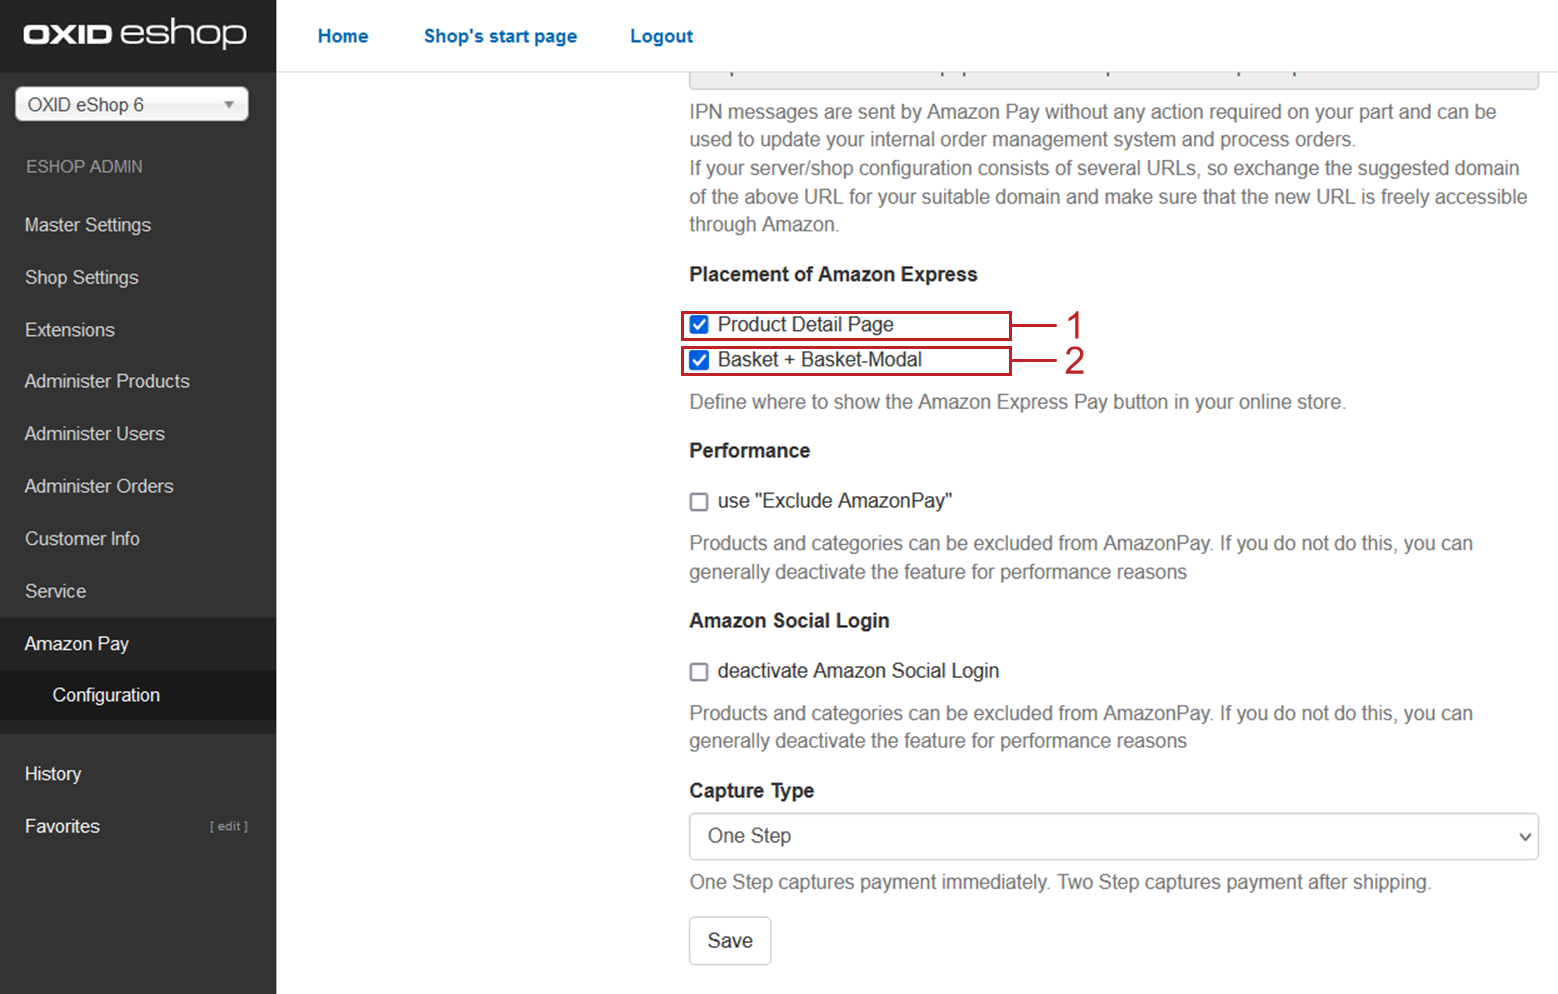
If you want the Amazon Express button to appear on the product detail pages, make sure the Product Detail Page checkbox (Fig.: Configuring the Amazon Pay Express button, item 1) is selected.
If you want the Amazon Express button to appear in the shopping cart as well as in the shopping cart preview, make sure that the Basket + Basket-Modal (Fig.: Configuring the Amazon Pay Express button, item 2) checkbox is checked.
Make sure your customers don’t pay for products with Amazon Pay that are subject to certain restrictions.
Prohibited content will cause Amazon to suspend your Amazon merchant account.
By default, Amazon assumes that your products are not subject to restrictions.
Background
Amazon checks whether the products you sell meet safety and compliance requirements or are subject to restriction.
In Germany, for example, restrictions apply to cigarettes, weapons, or products that glorify National Socialism.
If customers were to buy such products from your eShop and pay with Amazon Pay, these products would appear in the Amazon customers’ order history.
Because of the possible violation of compliance rules, this could result in legal difficulties for Amazon, for which you could be held jointly liable.
Therefore, check if any of your products are subject to such restrictions and exclude these products from payment with Amazon Pay.
Note
Performance degradation
If you exclude individual products from payment with Amazon Pay, your OXID eShop will perform a database query on every page load.
This will delay the loading of all pages of your OXID eShop by a few milliseconds.
Procedure
If you feel that some of your products might belong to the prohibited products or content category, check Amazon’s Acceptable Use Policy.
If some of your products are indeed not in compliance with Amazon’s policies, proceed to step 2.
To be able to exclude products or categories from paying with Amazon Pay, under Performance, check the Exclude Amazon Pay checkbox.
Save your settings.
Under Administer Products ‣ Products or Administer Products ‣ Categories, choose the item or category you want to exclude from Amazon Pay.
On the Main tab, you will find the Exclude Amazon Pay checkbox for this purpose.
Choose Exclude Amazon Pay checkbox.
Ensure that other payment methods are assigned to the product or category.
Save your settings.
Result
The Amazon Pay and Amazon Pay Express buttons are not displayed for the product or category, and your customers must choose another payment method.
Specify whether payments should be collected immediately for the eShop, or whether payments should only be reserved.
Example
Typically, the money is collected immediately.
In certain cases, it makes sense that the payment is only triggered by the delivery:
You sell certain individualized products that you do not manufacture, commission or order until the order is received.
You have an eShop for business customers. Here, the delivery quantities and payment amounts are larger than for private customers.
In the event of an error, returns management would be correspondingly more difficult.
Therefore, you want to make sure that the payment is only triggered when the goods are there or on their way to be shipped.
Procedure
Under Capture-Type, you have the following options:
To trigger payments directly, choose One Step.
To reserve the payment only and trigger it later, choose Two Step.
Ensure that you have assigned only Amazon Pay to the customized products in your eShop.
The delayed payment for payment by Amazon Pay takes effect for all items in your eShop to which you have assigned this payment method.
Save your settings.
Result
If you have selected the value Two Step for payment by Amazon Pay, the payment will be triggered,
automatically: as soon as you have set the ordered item to the status Delivered in your eShop
manually: when you confirm the payment in your Seller Central merchant account under Orders ‣ Manage Transactions
Ensure that the currencies your OXID eShop supports match the currencies Amazon Pay supports.
However, you can’t go wrong: For currencies that Amazon Pay does not support, only the Amazon Pay and the Amazon Pay Express buttons will not be displayed.
To ensure a clean configuration, for the AmazonPay payment types, on the countries tab, make sure that only those countries are assigned which have the currencies supported by Amazon Pay.
Repeat step 4 for the AmazonPay Express payment method.
Optional: Refunding amounts for canceled or deleted orders manually
When you cancel or delete an order, by default, the payment amount is refunded to your customer automatically.
If needed, you can specify to refund payment amounts manually.
Example: You handle the order process, including refunds, in your ERP system. In this case, you disable automatic refunding in the module so that refunding does not happen twice.
For more information about canceling or deleting orders, see Canceling an order.
Procedure
Under Amazon automatic refund and cancel, choose one or both of the following options:
To manually refund payment amounts for cancelled orders, deactivate the Activate Amazon automatic refund (order and order position storno) checkbox.
To manually refund payment amounts for deleted orders, deactivate the Enable Amazon automatic cancel (order deletion) check box.
Testing Amazon Pay and activating production mode
Test Amazon Pay in the Amazon Pay Sandbox and adjust the configuration until all payment processes work the way you want.
To do this, run test payments in the Amazon Pay sandbox.
Recommendation: Use a dedicated test system for testing.
When the test payments work as desired, switch to production mode.
Prerequisites
If you have tested Amazon Pay with your sandbox account on your production system, you have upgraded your sandbox account to an Amazon merchant account.
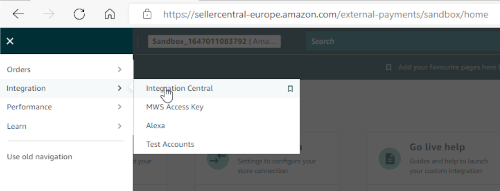
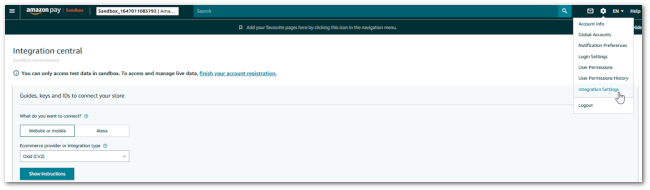
To do so, in your Amazon Sandbox account, under Integration ‣ Integration Central, you have chosen the finish your account registration link and completed the registration.
If you have tested on a test system and are now putting Amazon Pay into operation on the production system, with your Amazon merchant account you have generated the following access data:
The downloaded PEM file containing the private key
In Amazon Integration Central displayed under API credentials:
Store ID
Merchant ID
In Amazon Integration Central displayed under Existing API keys: Public key ID
If you have tested the features of Amazon Pay on a dedicated test system, the URL displayed as the IPN endpoint is different from that of your production system.
In production mode, with the test system IPN endpoint, your OXID eShop would not receive notifications about the status of customer payments. You would need to manually check the status in Amazon Seller Central.
When you switch to production mode, ensure that you register the IPN endpoint of your production system.
Configure the module and test it.
Under Operation Mode, switch to Production.
If you have tested on a test system and are now putting Amazon Pay into operation on the production system, enter your Amazon merchant account access data.
To do so, repeat the steps in chapter Generating an Amazon Pay webhook.
If you have generated your sandbox from an existing merchant account or retroactively registered the merchant account, you do not need to re-enter the access data.
If you have tested on a test system and are now putting Amazon Pay into operation on the production system, register the IPN endpoint of your production OXID eShop.
To do this, repeat the steps in chapter Registering the IPN endpoint with Amazon.
If you have tested Amazon Pay with your sandbox account on your production system, you do not need to register the IPN endpoint again.
Nevertheless, ensure in any case that the IPN endpoint of your production system is registered with Amazon.
Save your settings.
Result
Your production system receives status messages from Amazon about your customers’ payment transactions.