Integrating Consent Management Platforms
If required, implement a consent procedure, for example with Usercentrics.
Visitors to the store will then be shown a “Privacy settings” banner when they first visit the store, informing them that third-party website tracking technologies are used.
Using the Usercentrics Consent Management Platform (CMP) as an example, you can find more information in the documentation of our module OXID Cookie Management powered by usercentrics under Funktionsbeschreibung (in German).
Background
In the definition of consent management platforms, Amazon Pay falls under the category “third-party services”. This is because the function of Amazon Pay requires resources (specifically: Javascript files) must be loaded from external servers (third-party providers).
Problem
Payment buttons, such as those used with Amazon Pay, are elementary and functional components of a store because they enable fast and uncomplicated payment processes.
However, payment buttons may pose a data protection problem for particularly privacy-sensitive customers. Such customers may prefer other payment functions.
This is because third-party providers are theoretically able to use third-party provider access logs to track the customer’s visit to the store website.
As a store owner, you must therefore weigh up between
the functionality of your website
and
the data protection of your customers
Solution
If data protection could be a problem for your customers, the solution is to use a consent procedure such as that offered by consent management platforms like Usercentrics.
Example: Integrating Usercentrics in Amazon Pay
Use the following instructions for integrating Usercentrics in Amazon Pay as a sample that you can also implement in a modified form with any other CMP in order to implement a consent procedure.
Prerequisites
As a shop owner, you are registered a with Usercentrics and have booked a package suitable for your OXID eShop.
For more information, see the documentation of our OXID Cookie Management powered by Usercentrics module under Usercentrics-Paket buchen (in German).
You have installed OXID Cookie Management powered by Usercentrics.
For more information, see the documentation of our OXID Cookie Management powered by Usercentrics module under Installation (in German).
Procedure
Overwrite the Amazon Pay module template.
Background: The Amazon Pay module is prepared in such a way that all templates can be overwritten by individual customizations.
To do so, copy one or more files from the module into your theme template.
Your OXID eShop first uses the module templates, but overwrites them with theme templates if it finds identically defined templates in the store theme.To do so, copy the
/source/modules/osc/amazonpay/views/tpl/shared/layout/base_js.tplfile into the/source/Application/views/<Theme of the OXID eShop>/tpl/modules/osc/amazonpay/directory.If the template directory
/tpl/modules/osc/amazonpay/does not yet exist, create it.Create a data processing service for Amazon Pay.
If you use Usercentrics, as in our example, do the following:
Start the Usercentrics dashboard.
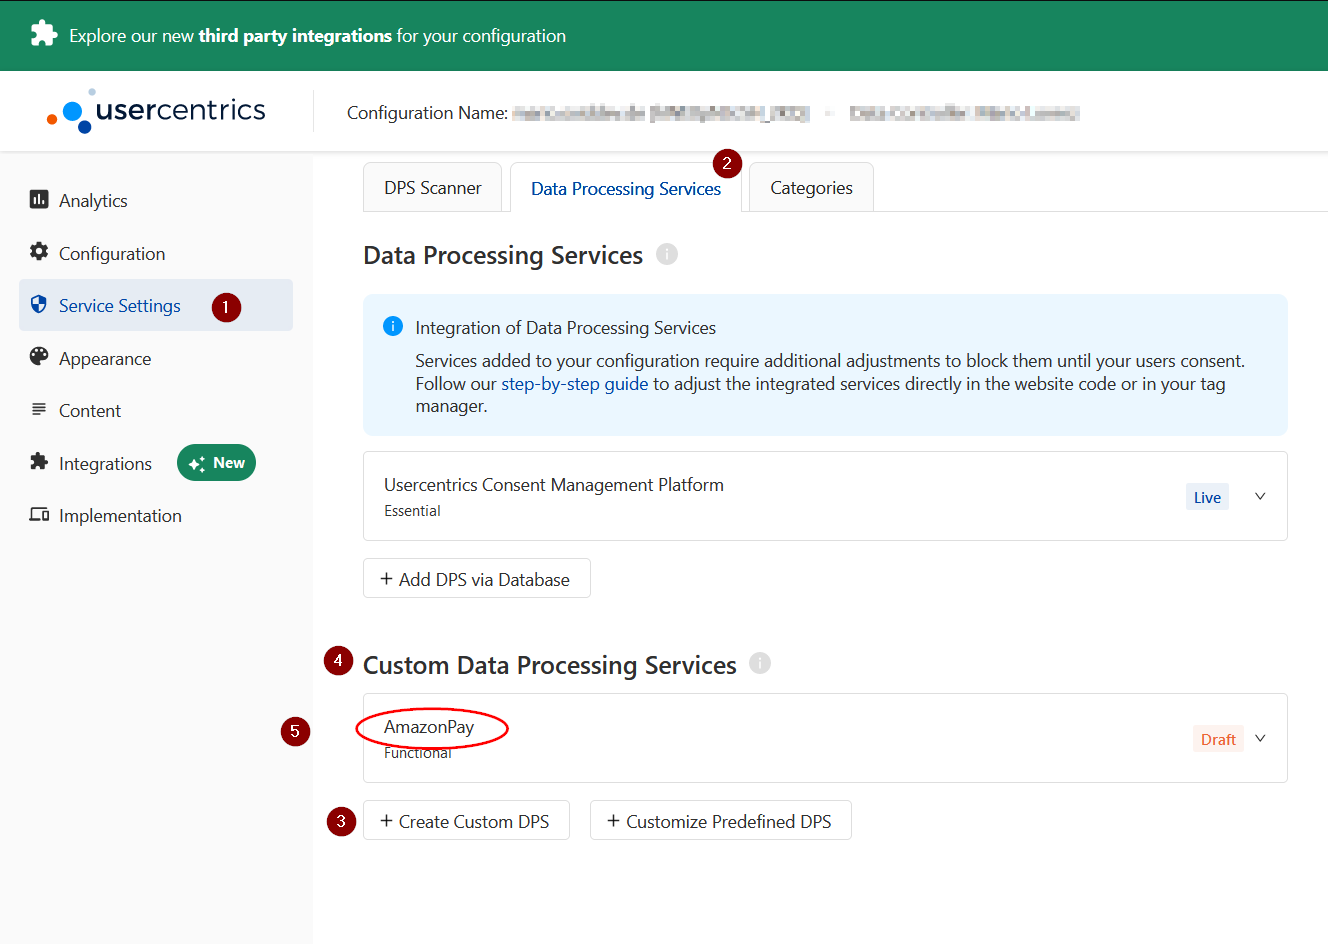
Choose (Fig: Creating a data processing service in the Usercentrics dashbord, items 1, 2).
To create a service for Amazon Pay, choose Create Custom DPS (Fig: Creating a data processing service in the Usercentrics dashbord, item 3).
Under Custom Data Processing Services (Fig: Creating a data processing service in the Usercentrics dashbord, item 4), the name of the data processing service is displayed (Fig: Creating a data processing service in the Usercentrics dashbord, item 5).

Fig: Creating a data processing service in the Usercentrics dashbord
In the
/source/Application/views/<OXID eShop theme>/tpl/modules/osc/amazonpay/base_js.tplfile, customize all Amazon Pay scripts.Background: You want to ensure that all scripts are only executed after consent of your customer.
Do the following:
Add the
type="text/plain"type to your scripts.Background: This ensures that the script is not automatically interpreted and executed by the browser when the page is called up.
To do so, search for the
<scriptexpression and add<script type="text/plain"(see Example: Customizing the Amazon Pay scripts).Assign a custom data attribute to the scripts of the data processing services you use.
Background: The data attribute is used to connect to the CMP and to query the consents.
The syntax of this data attribute is
data-usercentrics="<name of the data processing service>".Here,
<name of the data processing service>corresponds to the exact name of the data processing service that you created in step Creating a data processing service.When copying the name, pay attention to upper and lower case and any spaces.
In our example (Fig: Creating a data processing service in the Usercentrics dashbord, item 5), the data attribute is therefore
data-usercentrics="AmazonPay"(see Example: Customizing the Amazon Pay scripts).
Example: Customizing the Amazon Pay-Scripts
In our example, the original template
/source/modules/osc/amazonpay/views/tpl/shared/layout/base_js.tpllooks like this:... <script src="https://static-eu.payments-amazon.com/checkout.js"></script> ...
After customizing the scripts, your template
/source/Application/views/<Theme of the OXID eShop>/tpl/modules/osc/amazonpay/base_js.tpllooks like this:... <script type="text/plain" data-usercentrics="AmazonPay" src="https://static-eu.payments-amazon.com/checkout.js"></script> ...
Result
When the page is loaded, the Amazon Pay scripts are only executed if your customer has given Amazon Pay their consent.